The Fresh Loaf

A Community of Amateur Bakers and Artisan Bread Enthusiasts.

bwraith's blog

bwraith's picture
bwraith

Sourdough Ciabatta - One Step

Sourdough Ciabatta - One Step (1)Sourdough Ciabatta - One Step (1)

Sourdough Ciabatta - One Step (2)Sourdough Ciabatta - One Step (2)

Sourdough Ciabatta - One Step (3)Sourdough Ciabatta - One Step (3)

Sourdough Ciabatta - One Step Recipe

I made my first attempt at a "one step" recipe, similar to Sourdough-guy's recent blog entry (thanks, SD-guy). Photos of the process are posted. A spreadsheet showing the quantities in ounces and grams, bakers percentages, and some other percentages, such as hydration is also posted.

I wanted to use some more of my "sifted flours" obtained during a recent phase of obtaining and testing some "sifted whole wheat" flours for the fun of it. You can create a substitute for this flour by substituting a mixture of 87% white flour with 10% whole wheat and 3% wheat germ by weight. If you don't want to use wheat germ, you might try something like a 50/50 mix of white flour and whole wheat flour. I haven't tried doing it with all whole wheat, but I suspect that would also make something good with this recipe. The "sifted whole wheat flour" I used is "Golden Buffalo" from Heartland Mills. It is described as sifted so that the germ and 10% of the bran remains in the flour, which makes it about 87% extraction flour. It's characteristics are much closer to whole grain flour than white flour. For example, it absorbs a lot more water before it becomes slack like a ciabatta dough, and it has fairly high ash content and and protein percentage, and it results in a darker crumb and nuttier tasting crumb. Also, it is a high protein flour to begin with, as it is made from a higher protein wheat. At some point, I'll make this with something like KA organic AP, which should rise better and have a softer crumb and a more typical white ciabatta crust color.

Overall, this recipe worked fine, although I realize now that I probably needed to be a little more agressive about rolling and tightening the loaves when they were shaped, as there was the "big hole down the middle" problem to some extent with these loaves, particularly the ones I shaped more gently and baked first. The ones I let proof a little longer also happen to be the ones I shaped a little more tightly, and they seemed to come out better.

Ingredients:

  • 57 grams 100% hydration white flour starter (almost any reasonably active, recently enough refreshed starter will do)
  • 2 grams diastatic malted barley flour
  • 14 grams salt
  • 665 grams water
  • 57 grams light rye flour (I used KA rye blend)
  • 610 grams high extraction wheat flour (I used Golden Buffalo from Heartland Mills - You can mix some AP or bread flour w/whole wheat and wheat germ as mentioned above)

Mix and Rest

Place starter in a large mixing bowl and add the water. You may want to mix only 540 grams of water to begin with, which is 82% hydration. Then, after you've added all the flour, you can mix in more water until you get the right consistency. The water absorption properties of flours varies over a large range, and the amount of water I used in this recipe is at the very high end of what you're likely to need, due to the type of flour I happen to be using. Stir the water and starter well to get the starter dissolved into the water. Add the diastatic malted barley flour and mix well again. Add the rest of the flour and mix just enough to blend everything with a spoon, dough hook, scraper, as you like. Or, do this all in a mixer but use low speed and mix for only 3-4 minutes just to get the ingredients well integrated. Then add the salt, sprinkling it over the whole dough and folding it in. At this point go around the bowl with your tool scraping the outside of the mass into the center and pushing down, similar to a fold, a few times to incorporate some air and mix the ingredients with the salt well. You don't need to do much more than get the ingredients reasonably well mixed.

You may need to add either flour or water to adjust the consistency of the dough. The dough should be fairly wet. It should be more stiff than a batter, but it should feel wet and pliable. It will feel a little wetter as the water incorporates into the flour. At some point the gluten will develop, and it should become an elastic, somewhat slack, pliable dough. In my case, I am using 100% hydration, which is higher than you're likely to need unless you are using a high protein hard whole grain flour, like a hard spring wheat from the northern plains. The flour used in this recipe is of that type, except it has 90% of the bran sifted out. It takes a lot more water than if you make this with mostly white flour. So, you have to do this by feel. What should happen is that when you eventually pour this dough out on the counter to fold it, it should spread out slowly over the course of a minute or so. It shouldn't be runny, but it shouldn't hold it's shape well either.

Cover the bowl with a moist towel and set aside for an hour.

Fold in the Bowl

The first fold probably needs to be done in the bowl, if it is as wet as it is supposed to be. Reach under the dough with a scraper on an edge, lift it up and out a little holding the top gently with your (wetted) fingers, stretching it just a little, then fold the edge over to the center. Do this for all four sides. Let it sit another hour or so.

Fold on counter

An hour after the first fold in the bowl, the gluten should be forming enough to do the folds on the counter. Gently loosen the dough from the bowl and pour it out onto the counter on a light bed of flour. Spread the dough out a little if it doesn't spread out all on its own. If it is very wet, it may not need any help spreading. If it's not quite so wet, you can encourage it to spread out with your fingers or palms. Don't stretch it aggressively, just spread it out, which it should readily do if it is wet enough. Wet your hands well to get all stickiness off them and shake off the drops a little bit. Snuggle your hands under one edge of the dough and gently lift it up and out slightly. Then fold it over to the center or past the center somewhat. Do this for all four sides. If it ends up as a nice tall cube shape, pick it up and turn it over. Then drop it into a dough rising bucket or a bowl for further fermentation. To make it easier to pull out of the dough rising bucket the next time, you can either spray the bucket with some oil spray or give the dough a good dusting with bread flour on the sides before dropping it into the bucket. I often get a rectangular shape after the last fold, since I'm still not anticipating the size of the folds perfectly. If so, you can fold it over itself one more time to make it more of a cube shape and roll it over to bring the stretched side of the dough on top all in one move to end up with a tall cube of dough. Then it can be picked up from the sides or slightly underneath and lowered gently into a rising bucket.

Wait an hour and fold, wait another hour and fold, etc., as above until it begins to have some "resistance" to folding. The gluten will develop all on its own with time and some folding. In my case I did 3 folds on the counter. Ideally, you can wait as long as it takes for the dough to flatten out, as a liquid would, before folding. That's the indication the dough has "relaxed" and is ready for another fold. After a few folds, the combination of gluten developing and enough time going by for the fermentation to start to generate some gas will result in a slight "crown" forming in the dough as it sits in the bucket, so that the dough won't really flatten out anymore. You can try folding again and should now begin to be more elastic and resistant to folding, consistent with the gluten development.

Bulk Fermentation

I intended to have the total rise time be about 12 hours, and I guessed the amount of starter accordingly. I started the mixing a few hours before I went to bed. It did double in about another 7 hours after the last fold, allowing for a good night's sleep if you're a bit of a night owl like me. You can adjust the time to your convenience by putting less starter in at the beginning. I would think it would take about 2-3 more hours for each halving of the amount of starter, but maybe Sourdough-guy can put a finer point on that. The one step method is new to me, so I still haven't developed a good feel for the timing over extended periods with a very small percentage of starter in the dough.

Shaping

When the dough has doubled, turn it out on the counter in a bed of flour. It will be full of air and very soft and slack. Fold it over itself once to get a long rectangular dough. That one fold will stiffen the dough a little. Gently slice the dough into four equal size pieces. Dust the cut ends with flour or roll the pieces in flour. Lay the pieces out in rectangles about 10 inches long and 4 inches wide by gently stretching them in one direction. Roll them up fairly tightly along the short end, occasionally folding the ends of the roll into the center if it is getting too long as you roll it up. Dust them well with flour and place them in a dusted couche. You may want to use some rice flour mixed with bread flour to dust the couche. The dough is very wet and will be sticky. However, if you dust the dough itself well, and also dust the couche with a combination of rice and bread flour it should be OK. I use 25/75 rice/bread flour to dust the couche. I spray the tops of the loaves with some oil and dust with some flour in order to get that ciabatta flour streak crust look.

Final Proof

Cover the loaves with a towel and allow to rise at room temperature for about 1.5-2 hours. I didn't try getting them warmer, like 80-85F as in Sourdough-guys recipe. Also, I am not sure how long the final proof ought to run, and the poke test is harder to read with this higher hydration dough. The longer proofed, slightly more tensioned loaves had a better crumb and rise, so maybe I didn't let the proof run long enough.

Sourdough-guy suggested an estimate of more like 4 hours for the final proof in his recipe from which I derived the recipe in this blog entry, so it may well be I have underestimated the right length for the final proof. I will try a longer proof next time, and if someone tries this recipe and goes for a longer final proof with good results, I would appreciate your comments.

Bake

Place the loaves on a parchment dusted with corn meal or other similar flour to avoid sticking. As you place them on the parchment stretch them out to about 10 inches long. Then use your fingers to press down firmly all over the dough to dimple it and spread it out. I lightly sprayed the loaves with water using an atomizer pump spray bottle. You should have about a 10 inch by 5 inch rectangle when you're done with lots of dimples on it and only about 1/2 inch tall. Bake at 450F for about 18 minutes. I think the crust color darkening is the best indication of doneness, as it seems like the internal temperature isn't a very good indication of doneness for this very wet, airy, flat dough. These only rose to about 1.5 inches. I'm not sure if this is due to my flour choice or the amount of proofing. I suspect that any whole wheat-like flour may tend not to rise quite as much as a similar white flour version. However, it may also have to do with finding the right amount of time for the final proof.

Cool

Allow to cool completely. The crumb will not set properly if you cut into it too soon.

Results

The crumb was soft, cool, and creamy, and the flavor was mild with a nice after taste and only a touch of sour flavor. I believe this is fairly consistent with what I've been reading in Sourdough-guy's blog on the topic of "one step" sourdough. I get fairly similar results with my two step methods of past blog entries. However, I'm realizing that my mild results are probably the result of feeding my culture frequently, i.e. before it is very, very ripe, and also from refrigerating my intermediate "recipe starters" when they have just doubled or even earlier. I also stop my bulk fermentation when the dough has just doubled. The result may therefore be similar to the one step method, since not letting each intermediate step ripen should make the whole process closer to one long slow rise from a small percentage of starter. I think the two step method can result in more sour and stronger flavors if you let the starter and "recipe starter" ferment to a riper stage before adding them to the dough.

As with most of my attempts with sourdough ciabatta, the result is a chewier crust and slightly chewier crumb than yeast raised versions I've made. Also, the rise isn't quite as dramatic. However, the flavor more than makes up for it, and I like the chewy texture most of the time. If doing a barbecue or hamburger sandwich bread, I might prefer a white flour and probably would prefer a yeast raised version such as the Glezer recipe in Artisan Baking.

Feedback

My blog entries are written with the intention to share with and learn from those who participate here. Questions and suggestions regarding the written explanations or improvements to the methods are welcome.

bwraith's picture
bwraith

Marcel's Grandmother's Potato Bread (Kartoffelbrot)

Marcel's Grandmother's Potato Bread (1)Marcel's Grandmother's Potato Bread (1)

Marcel's Grandmother's Potato Bread (2)Marcel's Grandmother's Potato Bread (2)

Marcel's Grandmother's Potato Bread (Kartoffelbrot)

We had a German exchange student stay with us for a couple of weeks recently. Marcel is about 17 years old, and we hit it off great. He shares an interest with me and my oldest son and daughter, who are about the same age as Marcel, in physics, math, computers, and music. He is one of the nicest, most polite young men I've met. One day I was making some sourdough bread in my kitchen, and I noticed Marcel paying very close attention to the process. He then mentioned that his grandmother, who lives with his family in Germany, frequently bakes breads, and he is a big fan of her breads. We quickly discovered that bread was another of our shared interests. He described going to a mill near his village and buying spelt flour and rye flour of a coarseness specified by his grandmother for her breads. What a difference from buying over the internet, as I tend to do here in NJ. So, I asked if he could recite some favorite recipes for me. He then got on the phone with his grandmother, and she emailed us two recipes, one of which is described here, and one will be described in a separate blog entry (spelt bread). We had quite a time translating German baking terminology into English for my use, including struggling with the word edelhefe and with correct translations of some or the names of spices. Also, there was some confusion over methods of handling the dough, but eventually, I felt I had enough information to try these recipes. When Marcel returned to Germany, he also forwarded to me some photos he took of his grandmother's process, although only for the spelt bread, and not for this potato bread recipe.

I have photos of my process for this bread and the spelt bread recipe. Since I did both at the same time, there is an intermingling of the two breads, but I hope it will be clear what is going on with each bread.

Marcel's Grandmother's Potato Bread (Kartoffelbrot) Recipe

Ingredients:

  • 400 grams whole spelt flour (I used Heartland Mills Spelt Flour)
  • 150 grams whole rye (I used KA Pumpernickel)
  • 300 grams water
  • 400 grams peeled, boiled, mashed potatoes
  • 12 grams salt
  • 25 grams butter
  • 1 tsp caraway seeds
  • 1/2 tsp anise seeds
  • 1/2 tsp fennel seeds
  • 3 egg yokes, stirred up
  • 1 package active dry yeast (or 1.5 tsp yeast or 30 grams fresh yeast)

Autolyse, Yeast Proof, Prepare Potatoes

Mix the flours and water aside and allow to sit for about 30 minutes (autolyse). Mix 1/4 cup flour, 1/4 cup water warm water, and yeast in a bowl and allow to sit until very frothy (yeast proofing), about 30 minutes. Peel and boil potatoes until soft, then drain and mash them up.

I actually had no potatoes in the pantry, so I used some potato flakes mixed with water to about the consistency of mashed potatoes. I realized later in the mixing stage this was probably too much water, though I suspect that potato bread like this should seem very wet, based on reading floydm's recipe.

Mix and Knead

Mix together the results from the autolyse, the yeast proofing, and the mashed potatoes along with the salt, spices, and butter. In this recipe, because I used mashed potatoes made from a box of potato flakes, the dough came out very, very wet. I was finding myself having more difficulty handling this dough than I normally have with my very wet miche doughs. So, I added some flour, trying to compensate for what was probably way too much water, and I ended up adding something like 1.5 cups more flour to the dough. Unfortunately, this means, it's tough for me to tell you what the consistency of the dough as specified in the actual recipe given to me by Marcel's grandmother really is, nor do I have pictures of it from her. Anyway, I worked the dough a little bit using a folding technique that one might use for a very wet dough. After about 3 or 4 minutes, it seemed to come together into a very supple but workable dough.

Bulk Fermentation (about 2 hours)

Place the dough in a rising bucket or covered bowl and allow to rise. I did the bulk fermentation above my coffee machine where the temperature is about 80F. It took a little longer than 1.5 hours to rise by double, as specified by Marcel's grandmother.

Kneading, Shaping, Final Proof (15 minutes), Preheat oven to 400F

Take the dough out of the container onto a bed of flour. Stretch and fold it a few times. Let it rest a few minutes. Stretch and fold again, and let it rest. I did this because Marcel's grandmother says to knead it with some flour a little bit. This was Marcel's translation. It seemed like the opportune moment to fold the dough, given that it had risen and still seemed fairly wet. The folding did help the dough to come back together, so I then formed two long batards. The recipe says "form two long breads", according to Marcel. I did this very similarly, once again, to JMonkey's video on shaping a whole wheat dough. However, I just made them a bit longer and skinnier, based on the instructions. Put them in a couche, similar to what one would do for baguettes and allow to rise for 15 minutes covered with towels.

Preheat oven to 400F while final proof continues. In my case the oven was already hot from the Dinkelbrot bake.

Marcel's grandmother says to let it rise 15 minutes under a towel. I realize this was just the right thing to do. However, being nervous this was not enough time, based on other breads I've made, I let them sit a few more minutes - maybe 25 minutes or so. This was a mistake, as they puffed up so quickly, that the skin on the surface was ripping slightly here and there. So, sticking to the instructions might have been perfect. Darn, but will do better next time.

Place Loaves on Peel

Place the loaves on a peel or upside down jelly roll pan on some parchment. The loaves were big and floppy, and I had let them go too long in final proof, so this was harder than it sounds. Paint the loaves with egg yoke. Slash the loaves.

I suspect the loaves were too wet and allowed to rise too long in final proof. The result is they were spreading out very quickly on the peel, and I took a little too long painting them and slashing them because I ran out of yoke and had a hard time moving the floppy loaves to the peel and whatnot. Again, will hope to do better with a little less water or real potatoes and less final proof next time.

Bake

Place loaves in oven preheated to 400F, and bake for about 30 minutes. Internal temperature was 210.

The loaves did spring a little, but mostly they spread. I guess the same notes as above apply - reduce the water to make a little bit stiffer dough and don't let it rise for long in final proof.

Cool

Place loaves on rack to cool completely before cutting into them.

Results

Like the Marcel's Grandmother's Spelt Bread, this bread tasted just great. The crust had a nice shine and color as a result of the egg yoke. Marcel says there is a particular look to these loaves, due to the egg yoke coating, that he says is typical of breads from his village in Germany. The spices add a nice touch to the already good flavor of the spelt and rye. I've decided German breads, at least the ones Marcel's grandmother makes, are wonderful after trying her dinkelbrot and kartoffelbrot recipes. Thanks to Marcel and his grandmother for sharing these recipes with me.

bwraith's picture
bwraith

Marcel's Grandmother's Spelt Bread (1)Marcel's Grandmother's Spelt Bread (1)

Marcel's Grandmother's Spelt Bread (2)Marcel's Grandmother's Spelt Bread (2)

Marcel's Grandmother's Spelt Bread (Dinkelbrot)

We had a German exchange student stay with us for a couple of weeks recently. Marcel is about 17 years old, and we hit it off great. He shares an interest with me and my oldest son and daughter, who are about the same age as Marcel, in physics, math, computers, and music. He is one of the nicest, most polite young men I've met. One day I was making some sourdough bread in my kitchen, and I noticed Marcel paying very close attention to the process. He then mentioned that his grandmother, who lives with his family in Germany, frequently bakes breads, and he is a big fan of her breads. We quickly discovered that bread was another of our shared interests. He described going to a mill near his village and buying spelt flour and rye flour of a coarseness specified by his grandmother for her breads. What a difference from buying over the internet, as I tend to do here in NJ. So, I asked if he could recite some favorite recipes for me. He then got on the phone with his grandmother, and she emailed us two recipes, one of which is described here, and one will be described in a separate blog entry (potato bread). We had quite a time translating German baking terminology into English for my use, including struggling with the word edelhefe and with correct translations of some or the names of spices. Also, there was some confusion over methods of handling the dough, but eventually, I felt I had enough information to try these recipes. When Marcel returned to Germany, he also forwarded to me some photos he took of his grandmother's process.

I have photos of my process for this bread and the potato bread recipe. Since I did both at the same time, there is an intermingling of the two breads, but I hope it will be clear what is going on with each bread.

Marcel's Grandmother's Spelt Bread (Dinkelbrot) Recipe

Ingredients:

  • 800 grams whole spelt flour (I used Heartland Mills Spelt Flour)
  • 500 grams warm water
  • 16 grams salt
  • 2 tsp anise seed
  • 2 tsp caraway seed
  • 1 cup nutritional yeast flakes (edelhefe in German, I used KAL brand)
  • 1 packet active dry yeast (1.5 tsp instant yeast)
  • 1 tsp honey
  • shelled, roasted, unsalted pumpkin seeds or sunflower seeds (I used pumpkin seeds)
  • butter for greasing the loaf pan

Autolyse and Yeast Proofing

Mix water and flour in bowl until flour is hydrated, and set aside for 30 minutes. Mix a small amount of flour with 1/2 cup of warm water, yeast, and the honey. Let sit for about 1/2 hour until it foams up. When I did this, the foam about doubled or tripled in volume and was very foamy.

Mix and Knead

Mix in salt, spices, nutritional yeast flakes, the contents of the cup with the yeast, flour, water, and honey and mix in mixer or by hand. I found the dough a little dry at this point, so I added just a touch of water to facilitate mixing the ingredients. The dough was fairly stiff but somewhat sticky, even after the addition of a small amount of water. I kneaded it for just a couple of minutes to fully mix all the ingredients and to bring the consistency to more like a dough. The recipe Marcel's grandmother gave me doesn't specify any kneading at all. I suspect that is correct, and that I should actually have just stopped after minimal mixing, based on a photo she sent me of what the dough looks like after mixing. Mine rose more than hers appeared to, and I think the bread may be meant to be a bit more dense than what I came up with doing what I did here.

Put Bread in Loaf Pan

I greased the sides of a 9 inch glass loaf dish with butter and sprinkled pumpkin seeds onto the butter. The seeds barely stick to the sides, but they do stay in place. I then formed a stumpy batard, which I shaped in much the same way that JMonkey did in his whole wheat bread shaping video. Again, I may have done more shaping and kneading than was intended based on the pictures, as I look at them in retrospect. Marcel's grandmother has a picture that I now see may have been more significant than I thought where she simply dumps the dough straight out of the mixer and into the loaf dish. I believe there is less kneading and mixing intended by Marcel's grandmother than I did in my version here.

Bake - No Preheat

Slash the loaf down the center, and place the dish in a cold oven and turn the temperature to 400F for 90 minutes. The bread rises nicely as the oven preheats. I forgot to slash the loaf, so I tried to do it after about 15 minutes. The crust was already forming. You can see the result from the pictures, which is not all that pretty. Sorry, it would have worked beautifully to slash before putting it in the oven, even though the oven started out cold. Oh well, I'll do better next time. The internal temperature of the loaf was about 205F after 90 minutes, and the crust was quite thick, hard, and dark.

Cool

Allow the loaf to fully cool. I dropped it out of the dish and let it cool on a rack.

Results

The crust that results is delicious. This bread tastes just great to me, and I generally have a big bias toward the flavor of sourdough breads. However, this yeast raised whole grain bread was just delicious. I realize I must be missing out on some wonderful breads in my baking life by not paying enough attention to German breads. Thank you Marcel, and Marcel's grandmother for sharing this wonderful recipe, for sending me photos, and for spending a lot of time and effort translating and explaining the ingredients and procedures that I was not familiar with.

bwraith's picture
bwraith

Sourdough Ciabatta - Second Try
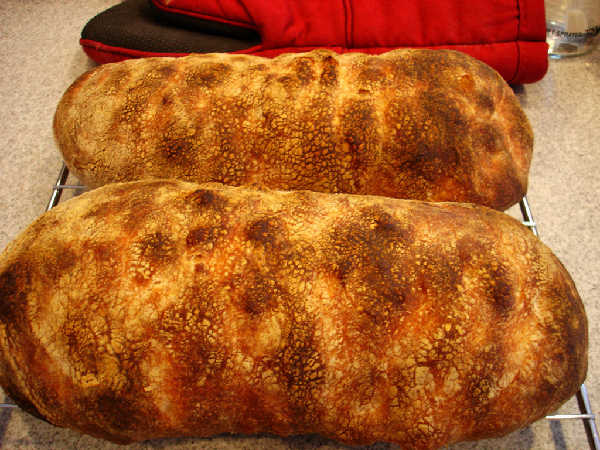
Sourdough Ciabatta - Firm Starter Version (loaves)Sourdough Ciabatta - Firm Starter Version (loaves)
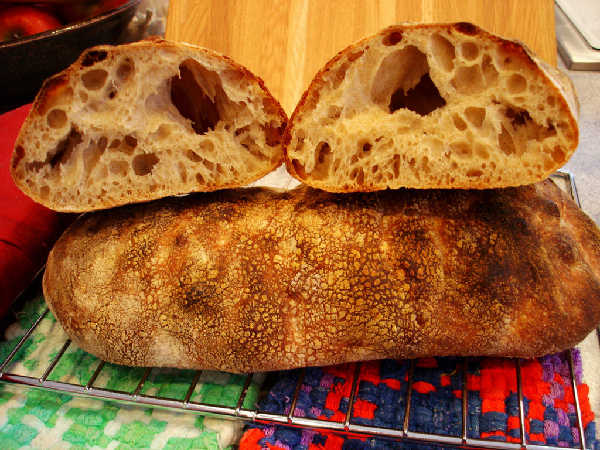
Sourdough Ciabatta - Firm Starter Version (crumb and loaf)Sourdough Ciabatta - Firm Starter Version (crumb and loaf)
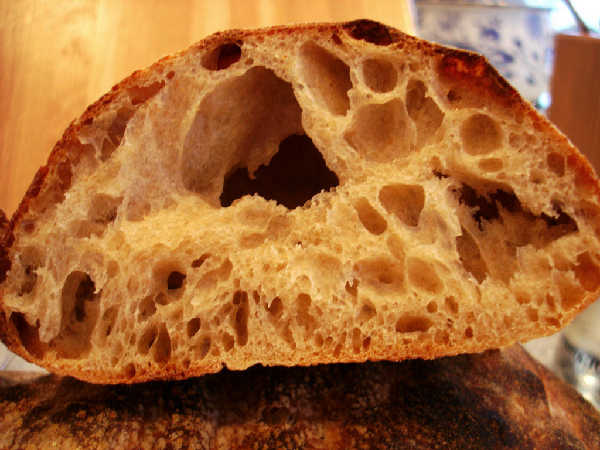
Sourdough Ciabatta - Firm Starter Version (crumb)Sourdough Ciabatta - Firm Starter Version (crumb)
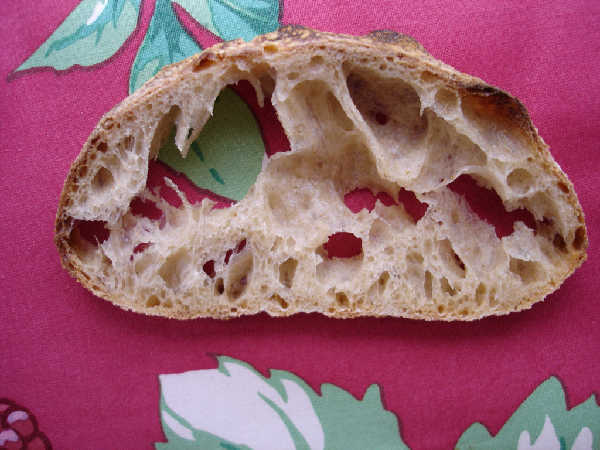
Sourdough Ciabatta - Firm Starter Version (slice)Sourdough Ciabatta - Firm Starter Version (slice)

Sourdough Ciabatta - Firm Starter Version

One of the favorite family breads seems to be ciabatta, and this sourdough version is clearly preferred (wolfed down) by my kids for its flavor. I've achieved a little better crust and crumb with yeasted versions, particularly the one in Maggie Glezer's "Artisan Baking", but the sourdough flavor is hard to beat, especially with salty grilled left over meats in sandwiches. The recipe is loosely based on the BBA (Reinhart) "Poolish Ciabatta", as well as incorporating ideas from Maggie Glezer's version in "Artisan Baking".

This is a work in progress, but I like the way this one turned out - my second blog entry on this recipe. The flavor is a little mild, which may mean I need to lengthen and/or retard the fermentation, or maybe use somewhat more ripe starter, an exercise for future attempts.

Many thanks to various contributors to this site as always, and especially in this case to Zolablue, who encouraged me to pay more attention to ciabatta with some just great photos and discussions about how to achieve better holes in ciabatta through hydration, proper handling, and flour choice, all of which were used here, (again) after much feedback from my first blog entry on the topic.

This version has been changed to use a lower percentage - around 22% - of flour contributed by the starter, and the starter itself is a firm starter, instead of the usual 100% hydration starter I had been using. My theory here was to try the flavors from the firm starter, as well as lower the percentage of starter in the recipe. The higher percentage seems to cause problems with the texture of the dough before it gets a chance to rise. Zolablue and I have both had good success with a "hybrid" method where some yeast is added to the dough to compensate. However, I was curious to see if I could find a percentage that might work with a pure sourdough raise. The result was a higher rise, but I seem to have made the hydration a little high, as the holes are a little too extreme for my tastes. However that should be solved by simply lowering the hydration on my next try. Also, I ran out of KA AP flour, so I substituted some "sifted red whole wheat flour" from Heartland Mills, which is called "Golden Bufallo". They say it is a "high extraction" flour, i.e. the germ and endosperm is in the flour, but most of the bran has been sifted out. I have found it to be a very good flour for rustic breads. It gives the crumb a darker color and there is a nuttier flavor than with KA. Well, I wish I had just stuck with KA organic AP in this case, as the result was a little more rustic than I had in mind. I suppose there are those who would treasure this result and call it something on the way from white ciabatta to "ciabatta integrale".

Photos of process have been posted for this ciabatta using a firm "recipe starter". Don't worry, you can build this starter from any consistency starter you may have by just setting the hydration to 65%, letting it rise by double and refrigerating overnight. A spreadsheet is also posted showing weights in ounces or grams.

Recipe Starter:

  • 2 oz 100% hydration starter (Use whatever starter you like. The intention is a 65% hydration firm starter)
  • 4.5 oz bread flour (I used KA Bread Flour)
  • 2.5 oz water

The day before this bread was baked, I took my "BBA style barm", a 100% hydration starter fed with KA Bread Flour, out of the refrigerator. It had been fed within the last couple of days and was fresh and strong at the time it was refrigerated. I mixed the starter with KA Bread Flour and water in the amounts above and kneaded it for a couple of minutes to form a dough. I then put the dough in a container sprayed with a little oil and left it to rise by double - about 4 hours. Once it had risen by double, I refrigerated it to be used the next day in the dough. Note that it is not necessarily a good thing to let the dough rise by more than double or become overly ripe, as it may affect the consistency of the dough the next day.

Dough:

  • 9 oz of recipe starter from above
  • 12.5 oz AP Flour (I used KA organic AP flour
  • 5 oz high extraction red wheat flour (like Golden Buffalo from Heartland Mills, use AP for a less rustic result)
  • 2 oz KA Rye Blend Flour
  • 16.5 oz water
  • 0.5 oz salt (14 grams)
  • 1/2 tsp diastatic malted barley flour

Autolyse:

Mix all flours but 5 oz of AP flour, diastatic malted barley flour, and water together and mix on low speed just enough to get a well mixed batter. Let this sit 20 minutes. I'm trying to simplify the processing relative to the last version by using my mixer for a change.

Mix:

Cut up the starter into small pieces and mix it in along with the salt. Run the mixer for a minute or so to get a good mix of ingredients in what should still be a thick batter consistency. Then, add in the remaining 5 oz of flour as you run the mixer on a low speed. It should turn into a very slack dough after another couple of minutes. I tried to show a picture of it hanging off the mixer dough hook, so check out the photos of the process linked up above.

Bulk Fermentation and Folding: (about 4 hours)

Make a fairly thick bed of flour on the counter about 12 inches square. Using a dough scraper, pour the dough out into the middle of the bed of flour. Allow it to rest for a few minutes. Then, fold the dough by flouring or wetting your hands, then grabbing one side of the dough and lifting and stretching it, folding it over itself like a letter. Do this for all 4 sides. Brush flour off the dough as you fold over the sides that were in contact with the bed of flour. You don't want to incorporate much flour into the dough as you fold. After folding, shape it gently back into a rectangle or square, turn it upside down and push the seams underneath. Place it in a rising bucket or other rising container of your choice. I spray mine with oil to make it easy to remove the dough. I also spray the top of the dough and then dust lightly with flour. Cover the container and allow to rise. Repeat the folds approximately every hour three more times. You just turn it back out on a light bed of flour - you need less flour once the dough is folded a couple of times. Always brush off flour as you fold it to avoid incorporating flour in the dough. If the dough seems very resistant to stretching, only fold it from two directions instead of four. You don't want the dough to get really stiff from too much folding. The amount of folding you will need will be more if you have more water and less if you have less water. Note that even an ounce can make a very big difference in the consistency of the dough. The dough should rise by double over a total of 4 hours. My dough was sitting at about 76F, so you may have to wait a little longer in a cooler room temperature environment. Stop folding if the dough gets too stiff. This means you didn't get as slack a dough as I had here, probably because of less water or maybe because of a different style of flour. No problem, just fold when it is stretchy, but let it rest and rise if not.

This is the first time I used Zolablue's suggestion to put the dough in a container as in Glezer's Artisan Baking, as opposed to doing it on the counter as in the BBA by Reinhart, and as done in my previous blog entry on sourdough ciabatta. I felt it worked well and had a few advantages. First, you can tell easily how much the dough has risen. That's a good thing because the poke test is hard to interpret with this very slack dough. Second, flour doesn't get stuck to the bottom because of the wet dough sitting on the counter in a bed of flour during the rise. I found that the crust was easier to control. Before I was having trouble with big chunks of wet flour paste getting stuck on the dough. I think that can actually look nice and be a characteristic of ciabatta crust, but it seemed to be a little too much that way with the wetter doughs I've been using to make these ciabattas. The last thing is that you can control the bulk fermentation temperature much more easily with the dough in a container that you can move to a good spot for rising.

Shaping:

Divide the dough into four pieces of equal size, roll them in the bed of flour to dust the cut ends, and let them rest a few minutes. To shape, take one of the four pieces, stretch it out and roll it or fold it over itself very gently. With ciabatta this amounts to a gently stretch and fold like a letter. You want to create some tension in the surface of the dough by folding it over itself that way. I sometimes have to roll it up a little more than just a letter fold to give it some tension. Then if you place the dough folds down on a couche, it will seal up the seams. Use the couche to create folds for the ciabatta and then nestle the folds between supports, such as bags of flour or whatever system you may have similar to what you might do for baguettes. I usually also roll the ends underneath a little to get some tension in the ends of the dough.

Final Proof:

Let them rise in the couche for about 1.5 hours, until they are puffy and have increased significantly in volume.

I baked two loaves at a time, so I proofed two loaves for 1.5 hours and two loaves for 2 hours. Da Crumb Bum - you may be right about these SD ciabatta recipes being on the edge of overproofing. I found that the first batch had darker, harder crust, whereas the second was a little bit on the pale side, even though I baked both for the same amount of time in an oven that I know was fully heated and at the same temperature. Also, the oven spring was much better on the first batch. I believe the steam conditions, temperature, and handling were very, very close to identical for both bakes.

Prepare to Bake:

Preheat oven to 500F (yes, you can probably do it without preheating, as mentioned elsewhere on the site, but it's not what I did this time). While that is going on, take each loaf out of the couche, gently stretch it in one direction by about double, lay it on a peel, maybe with parchment paper underneath, maybe sprinkled with corn meal or similar, and use your fingertips to flatten out and dimple the loaf. You can press down fairly firmly to feel the peel underneath. It sounds crazy, but the loaf will bounce back just fine in the oven if it is not overproofed. This step is important to avoid "separation of crust and crumb" or "one gigantic hole" instead of many holes. It also evens out the loaf so it has a nicer shape after baking.

Bake:

Place loaves in the oven and lower temperature to 450F. Bake for about 15 minutes, until the internal temperature is around 209F (I'm near sea level), rotating them after about 9 minutes. You can bake them longer to get a darker, harder crust, or less to get a lighter softer crust. If you bake them in a dry oven for shorter times, you will get a softer crumb and a crispy, thin, lighter crust that is very good if you intend to use these for sandwiches. If you want a chewier, drier bread with a tastier, harder crust, then bake them more and use steam. Then it is a great bread to just dip in olive oil or use like french bread with dinner. The loaves should spring up from their "flattening" with your fingertips, such that not much evidence is left of the dimples you made with your fingers.

The oven spring on these was better than in my first version. The dough also seemed handle more easily. It seemed to stretch without tearing during the folds and didn't seem as sticky. I was happier with the lower percentage of starter in this dough. I wish I had the KA organic AP for the recipe, just for comparison, and also because I liked the soft white crumb, but this one is good for a more rustic effect. The size of these loaves was about 10in x 5in x 2.5in. This is a better oven spring than last time. They were about 3 inches high right after baking, but they shrunk back down to 2.5 inches after cooling off. That's still quite a bit better than the previous version, which was about 2 inches tall. It's probably true that the best of both worlds would be hybrid method, i.e. add about 1/2 to 3/4 tsp of instant yeast to either this recipe or my previous version and get a little bit faster rise and a softer, lighter crumb, as well as getting the sourdough flavors in there.

Cool:

Let bread completely cool, if you can stand to wait.

This bread is especially good for sandwiches, sliced in half and then sliced along the "flat" direction to open up like a hamburger bun. It is great for burgers, steak sandwiches, ham, or just with olive oil and pepper.

bwraith's picture
bwraith

Olive Bread - Sourdough Yeast Hybrid (1)Olive Bread - Sourdough Yeast Hybrid (1) 

Olive Bread - Sourdough Yeast Hybrid (2)Olive Bread - Sourdough Yeast Hybrid (2)

My wife said we were invited to dinner and could I make some bread to bring. This was in the morning of the same day, so I was unable to do a long rising, multiple step, sourdough bread, as I would have with more warning. So, I went for a fast approach. I had some left over starter that was intended for some bread I never got to. It was 5 days old sitting in the refrigerator. I decided to use it as a flavor ingredient, and add regular yeast to the dough in a "hybrid method". I also have had some kalamata olives in the pantry, thinking I might want to make some olive bread, which I had not done before. The result was a very mild sourdough flavor combined with olive fragrance and brine flavor. It seemed to go over fairly well. I took some photos and thought I would post this recipe. It's a way to get some sourdough flavor even if your starter is not fully revved up or if you are just in a hurry.

Olive Bread - Sourdough Yeast Hybrid

For the Dough:

  • 360 grams of 5 day old refrigerated 100% hydration sourdough culture (mine is BBA style, fed with KA bread flour)
  • 320 grams of AP (I used KA organic AP)
  • 100 grams sifted white wheat flour (this could just be more AP, some white whole wheat flour, or other "rustic" flour)
  • 50 grams KA rye blend (again any rye, whole wheat, or other "rustic" flour)
  • 285 grams water
  • 13 grams salt
  • 1.5 tsp instant yeast (I used SAF instant)
  • 0.5 tsp diastatic malted barley flour (not critical - optional ingredient)
  • 200 grams kalamata olives, pitted, halved, stored in natural brine (that's what I had, but I'm sure lots of other types would be good, too)

There is a lot of flexibility in the age of the starter and the type of starter. I'm just using it as a flavor ingredient. You could easily make this a pure sourdough recipe by using fresh starter and leaving out the instant yeast. The bulk fermentation and final proof would just run longer, maybe 4 hours for the bulk fermentation and 2 hours for the final proof if done with pure sourdough.

Autolyse

Mix flours and water together, and use frisage, dough hook, or mixer to get it reasonably well mixed. Let sit for 20 minutes.

Mixing and Kneading

Work in the starter, yeast, then salt, and use frisage or mixer to get all the ingredients well mixed. Press in olives a dozen at a time and fold dough a few times to get them integrated into the dough. Knead for a few minutes until the dough is resilient. It will probably be quite sticky. The hydration is about 71%, so it is wetter than regular french bread dough. The ripe starter will make it have a wetter stickier consistency also. Place the dough in a covered container to rise. You can spray a little oil in the container beforehand and also on the exposed surface of the dough, but it's not that critical.

Bulk Fermentation and Folding - about 2.5 hours at 78F (or a little longer at room temperature)

Fold the dough at about 1 hour and then again at about 2 hours. At 1 hour it should have risen to about 1.5 the original dough volume. At 2 hours, it should have risen to about double the original dough volume. To fold, turn the dough out onto a lightly floured surface. Spread it out, pressing down gently without ripping the dough. Then, grab one corner of the dough, stretch it out gently and fold it over itself into the center of the dough. Do this for all four corners. If the dough is hard to stretch, just do two opposite corners, like a letter, rather than all four corners.

Shaping

Turn the dough out onto a lightly floured surface. Split into two equal pieces and let rest 10 minutes. To shape, create a rectangle about twice as long as it is wide. Roll the rectangle up from the short side, tensioning the outer surface as you roll. Pinch the sides under tightly to create more tension. Then, pinch the ends under also. Let it rest ten minutes with the seams down. Place the shaped loaf seams up in a couche lined banneton floured with a very small amount of rice flour or use other rising form as you prefer and optionally spray a little oil over the exposed surface. Cover with a towel and let rise for about 1.25 hours until puffy and probably a little less than doubled in volume (I did this at 78F, so adjust times if doing it at room temperature).

Bake

Preheat oven to 500F. Turn loaves onto a peel using your favorite method. I use parchment paper sprinkled with corn meal on a peel. Slash lengthwise a couple of times. Optionally mist the loaves with water very lightly using a fine mist spray bottle. Place loaves in oven, and generate steam using your preferred method. Just wetting the surface of the loaves is one simple appproach. Bake at 500F for about 10 minutes. Open the oven door and remove all the steam generating stuff you may have, and drop the oven temperature to 450F. Bake another 10 minutes or more until internal temperature is about 207F (at sea level).

Cool

Let them completely cool before you cut into them.

bwraith's picture
bwraith

A Hamburger BunA Hamburger Bun

I just got a new barbecue grill, so hamburgers were in order. As a home bread baker, I've occasionally made homemade hamburger buns, and there is no question that a hamburger is just better with freshly baked buns.

If you've had the same thought, well here's a recipe for a hamburger bun. The recipe uses direct method instant yeast, so it only takes 3-4 hours. The hydration is a little higher than french bread, but still very easy to handle.

A Hamburger Bun

The Dough:

  • AP flour (I used KA AP) 650 grams
  • Water 290 grams
  • milk 200 grams
  • olive oil 30 grams
  • salt 13 grams
  • 1 package active dry yeast
  • Mix flour, water, milk together using frisage and a few folds, and let sit for 20 minutes.

Mix/Knead

Work yeast into the dough, then work salt into the dough, then work olive oil into the dough. This can be done with a mixer or by hand using frisage and a few folds. Then knead the dough for about 5 minutes until it becomes workable, stretchy, and seems like it bounces back when you punch it, or whatever magic you use to tell if the dough is right. Add flour or water if necessary to make the dough elastic and not too stiff, but it shouldn't spread out when placed on a table. Place the dough in a container to rise.

Bulk Fermentation and Folding (about 2.5 hours)

When the dough has risen by about half, which should happen in roughly an hour, turn it out on the counter, spread it out a little, pressing on it gently. Then, pull a side of the dough and gently stretch and then fold it into the center of the dough. Do this for four sides. You will now have approximately a ball of dough again. Turn it over and push the seams created by the folding under it. Place it seams down back in the container. Repeat this again in about another hour when it should be about double the volume of the original dough when you first mixed it. Then, let it rise for another 0.5 hours or so.

Shaping

Split the dough into ten pieces. I use a scale and break pieces of dough off if necessary. Let the pieces rest for 5 minutes. Take each piece and do the same type of fold as above in the bulk fermentation. You press it down and spread it out gently, and then fold the four sides toward the middle. After folding, turn it over, and make it into a small boule by pushing the sides under and creating some tension on the top surface. Press down on it with your palm again, to seal the seams underneath. Shape all ten buns and place them on a peel or sheet, leaving some room. I had to bake these in two batches in order to have enough room in my oven. Spray them very lightly with oil. Cover them with a towel.

Final Proof

While the buns are rising, preheat the oven to 450F.

Prepare to Bake

Paint the buns with milk and sprinkle sesame seeds on top. Press them down gently with your palm to spread them out a little.

Bake

Bake for about 15 minutes at 450F. The internal temperature should be around 207F

Cool

Let them cool for a few minutes at least.

bwraith's picture
bwraith

Sourdough Raisin Focaccia

Sourdough FocacciaSourdough Focaccia

Sourdough Raisin Focaccia (a)Sourdough Raisin Focaccia (a)

Sourdough Focaccia CrumbSourdough Focaccia Crumb 

My wife's favorite bread is without a doubt sourdough raisin focaccia. The recipe is loosely based on the BBA (Reinhart) "Poolish Focaccia", including his mention of raisin focaccia and a tradition in certain parts of Italy for "breakfast focaccias".

Many thanks to various contributors to this site as always. Photos of the process have been posted for this sourdough raisin focaccia and the sourdough ciabatta I made at the same time and mentioned recently in a previous blog entry. A spreadsheet is also posted showing weights in ounces or grams.

Starter:

  • 14 oz BBA style barm fed w/KA organic AP flour (1:1 by weight flour:water)

The day before this bread was baked, I took my "BBA style barm", a 100% hydration starter fed with KA Bread Flour, out of the refrigerator. I fed it 1:2:2 (starter:flour:water) three times over the course of the day at room temperature, which refreshed the starter and built enough starter for this recipe, the sourdough ciabatta I also made the next day, as well as some left over to return to storage in the refrigerator. The larger amounts were made by feeding with KA organic AP flour, to convert to KA organic AP flour, a choice of a slightly lower protein flour that should be good for irregular, large holes and artisan style bread.

Dough:

  • 14 oz 100% hydration starter using KA organic AP Flour
  • 13 oz KA organic AP Flour
  • 2 oz KA Rye Blend Flour
  • 2.5 oz olive oil
  • 10.5 oz water
  • 0.5 oz salt (14 grams)
  • A box of golden raisins (about 2.5 cups)

Autolyse:

Mix the flours and water together in a bowl (I used a dough hook for this). Let sit for about 30 minutes.

Mix:

Mix flours and water above with the 14 oz of starter, 0.5 oz salt, 2.5 oz olive oil, and mix for a couple of minutes - just long enough to thoroughly mix the starter and salt with the flour and water from the autolyse step. Add a box of golden raisins (about 2.5 cups). The dough should be quite "wet", meaning it will not clean the bottom or even much of the sides of the mixer bowl. It should be fairly sticky and already have a fair amount of gluten development. I realize I needed a little more water than I actually used (10 oz), so the recipe says 10.5 oz and is what I will use next time. As a result, the dough was a little too stiff and the crumb wasn't quite as open as I think it would be with the extra ounce of water.

Bulk Fermentation and Folding:

Make a fairly thick bed of flour on the counter about 12 inches square. Using a dough scraper, pour the dough out into the middle of the bed of flour. Allow it to rest for a few minutes. Then, fold the dough by flouring or wetting your hands, then grabbing one side of the dough and lifting and stretching it, folding it over itself like a letter. Do this for all 4 sides. Brush flour off the dough as you fold over the sides that were in contact with the bed of flour. You don't want to incorporate much flour into the dough as you fold. After folding, shape it gently back into a rectangle or square, spray it with a light coating of olive oil or some other oil spray, and dust very lightly with flour. Then cover it with plastic wrap, and drop a towel over it. If the dough seems a little stiff at this point, it unfortunately probably already doesn't have enough water in it. You can put it back in the mixer and add 1 oz of water and try again. Or, soldier on and adjust your water next time. Repeat the folds approximately every 45 minutes two more times. If the dough seems very resistant to stretching, only fold it from two directions instead of four. You don't want the dough to get really stiff from too much folding. The amount of folding you will need will be more if you have more water and less if you have less water. Note that even an ounce can make a very big difference in the consistency of the dough. After three folds, let the dough rise for another 1.5 to 2 hours, at which point, the dough should have doubled roughly in volume. Use the "poke test" to get a feel for how long to continue the bulk fermentation.

Shaping:

Line a standard (the ones that are about 17 inches long and 13 inches wide) baking sheet with parchment paper and spread about 1/4 cup of olive oil over the parchment paper. Transfer the dough to the sheet. Spread the dough out by dimpling it systematically with your finger tips, pressing down firmly into the dough with all ten fingertips, and slowly getting the dough to spread out in the pan. Don't stretch the dough, just dimple it by pressing into the dough vertically with your fingers. If necessary, wait 10 minutes for the gluten to relax, if it won't spread out enough to fill the pan at first. As you do the dimpling with your fingers, work about another 1/3 cup of olive oil into the top of the dough by spreading it over the top of the dough as you dimple away. Once the dough has  spread all the way out and nearly fills the corners, you can cover it with saran wrap.

Final Proof:

Let the dough rise for about 2.5 hours, until it is puffy and has increased significantly in volume. With this sourdough version it may not rise above the lip of the pan, but it should come close. If it rises unevenly, you can dimple the high sections again periodically to even out the height of the dough across the whole pan. I actually let this one rise almost 3 hours. It finally seemed to relax and rise around 2.5 hours, so I went ahead and tried baking it. As I mentioned before, the result wasn't quite as open of a crumb as I hoped, but it was fine - next time a little more water, and it will be better.

Prepare to Bake:

Preheat oven to 500F. Remove plastic wrap, and use your fingers to spread about 3/4 teaspoon of kosher salt evenly over the dough. Don't use more than 3/4 tsp of salt, or it will come out too salty. Spread the salt with your fingers by holding the 3/4 tsp of salt in your palm and picking up pinches of salt and slowly spreading it over the dough. Again, it's important to get it spread evenly in just the right amount, and that is very difficult to do unless you measure out 3/4 tsp of kosher salt and then spread it in small pinches very evenly over the whole surface.

Bake:

Place pan in the oven and lower temperature to 450F. Bake for about 12 minutes, until the internal temperature is around 207F (I'm near sea level), rotating it after about 9 minutes. You can bake longer to get a darker, harder crust. Actually, I think this KA organic artisan AP flour may benefit from a little bit of added diastatic malted barley flour, as the breads I baked with this flour today were more pale than previous results with KA AP or KA Bread Flour combinations. I don't think I overproofed them, but maybe that's a factor. The focaccia should spring up from their "flattening" with your fingertips, such that not much evidence is left of the dimples you made with your fingers.

Cool:

Let bread completely cool, if you can stand to wait.

This bread is especially good for breakfast lightly toasted or heated with a little butter and/or honey. The mixture of salt, sourdough flavor, and the sweetness of the raisins is delicious.

bwraith's picture
bwraith

Sourdough Ciabatta 

 Sourdough Ciabatta CrustSourdough Ciabatta Crust: Sourdough Ciabatta Crust

Sourdough Ciabatta CrumbSourdough Ciabatta Crumb

Sourdough Ciabatta Crumb (lengthwise slice)Sourdough Ciabatta Crumb (lengthwise slice)

Sourdough Ciabatta w/Olive OilSourdough Ciabatta w/Olive Oil

One of the favorite family breads seems to be ciabatta, and this sourdough version is clearly preferred (wolfed down) by my kids for its flavor. I've achieved a little better crust and crumb with yeasted versions, particularly the one in Maggie Glezer's "Artisan Baking", but the sourdough flavor is hard to beat, especially with salty grilled left over meats in sandwiches. The recipe is loosely based on the BBA (Reinhart) "Poolish Ciabatta", as well as incorporating ideas from Maggie Glezer's version in "Artisan Baking".

This is a work in progress, but I like the way this one turned out. The flavor is a little mild, which may mean I need to lengthen and/or retard the fermentation, or maybe use somewhat more ripe starter, an exercise for future attempts.

Many thanks to various contributors to this site as always, and especially in this case to Zolablue, who encouraged me to pay more attention to ciabatta with some just great photos and discussions about how to achieve better holes in ciabatta through hydration, proper handling, and flour choice, all of which were used here.

Photos of process have been posted for this ciabatta and a sourdough raisin focaccia I made at the same time. A spreadsheet is also posted showing weights in ounces or grams.

Starter:

  • 16 oz BBA style barm fed w/KA organic AP flour (1:1 by weight flour:water)

The day before this bread was baked, I took my "BBA style barm", a 100% hydration starter fed with KA Bread Flour, out of the refrigerator. I fed it 1:2:2 (starter:flour:water) three times over the course of the day at room temperature, which refreshed the starter and built enough starter for this recipe, the sourdough raisin focaccia I also made the next day, as well as some left over to return to storage in the refrigerator. The larger amounts were made by feeding with KA organic AP flour, to convert to KA organic AP flour, a choice of a slightly lower protein flour that should be good for irregular, large holes and artisan style bread.

Dough:

  • 16 oz 100% hydration starter using KA organic AP Flour
  • 15 oz KA organic AP Flour
  • 2 oz KA Rye Blend Flour
  • 12 oz water
  • 0.5 oz salt (14 grams)

Autolyse:

Mix the flours and water together in a bowl (I used a dough hook for this). Let sit for about 30 minutes.

Mix:

Mix flours and water above with the 16 oz of starter, 0.5 oz salt, and mix for a couple of minutes - just long enough to thoroughly mix the starter and salt with the flour and water from the autolyse step. The dough should be quite "wet", meaning it will not clean the bottom or even much of the sides of the mixer bowl. It should be fairly sticky and already have a fair amount of gluten development.

Bulk Fermentation and Folding: (about 4.5 hours)

Make a fairly thick bed of flour on the counter about 12 inches square. Using a dough scraper, pour the dough out into the middle of the bed of flour. Allow it to rest for a few minutes. Then, fold the dough by flouring or wetting your hands, then grabbing one side of the dough and lifting and stretching it, folding it over itself like a letter. Do this for all 4 sides. Brush flour off the dough as you fold over the sides that were in contact with the bed of flour. You don't want to incorporate much flour into the dough as you fold. After folding, shape it gently back into a rectangle or square, spray it with a light coating of olive oil or some other oil spray, and dust very lightly with flour. Then cover it with plastic wrap, and drop a towel over it. If the dough seems a little stiff at this point, it unfortunately probably already doesn't have enough water in it. You can put it back in the mixer and add 1 oz of water and try again. Or, soldier on and adjust your water next time. Repeat the folds approximately every 45 minutes two more times. If the dough seems very resistant to stretching, only fold it from two directions instead of four. You don't want the dough to get really stiff from too much folding. The amount of folding you will need will be more if you have more water and less if you have less water. Note that even an ounce can make a very big difference in the consistency of the dough. After three folds, let the dough rise for another 2.5 to 3 hours, at which point, the dough should have doubled roughly in volume. Use the "poke test" to get a feel for how long to continue the bulk fermentation.

Shaping:

Divide the dough into four pieces of equal size, roll them in the bed of flour to dust the cut ends, and let them rest a few minutes. To shape, take one of the four pieces, stretch it out and roll it or fold it over itself very gently. With ciabatta this amounts to a gently stretch and fold like a letter. You want to create some tension in the surface of the dough by folding it over itself that way, then if you place the dough folds down on a couche, it will seal up the seams. Use the couche to create folds for the ciabatta and then nestle the folds between supports, such as bags of flour or whatever system you may have similar to what you might do for baguettes.

Final Proof:

Let them rise in the couche for about 2.5 hours, until they are puffy and have increased significantly in volume.

Prepare to Bake:

Preheat oven to 500F (yes, you can probably do it without preheating, as mentioned elsewhere on the site, but it's not what I did this time). While that is going on, take each loaf out of the couche, gently stretch it in one direction by about double, lay it on a peel, maybe with parchment paper underneath, maybe sprinkled with corn meal or similar, and use your fingertips to flatten out the loaf. You can press down fairly firmly to feel the peel underneath. It sounds crazy, but the loaf will bounce back just fine in the oven if it is not overproofed. This step is important to avoid "separation of crust and crumb" or "one gigantic hole" instead of many holes. It also evens out the loaf so it has a nicer shape after baking.

Bake:

Place loaves in the oven and lower temperature to 450F. Bake for about 13 minutes, until the internal temperature is around 207F (I'm near sea level), rotating them after about 9 minutes. You can bake them longer to get a darker, harder crust. Actually, I think this KA organic artisan AP flour may benefit from a little bit of added diastatic malted barley flour, as the breads I baked with this flour today were more pale than previous results with KA AP or KA Bread Flour combinations. I don't think I overproofed them, but maybe that's a factor. The loaves should spring up from their "flattening" with your fingertips, such that not much evidence is left of the dimples you made with your fingers.

Cool:

Let bread completely cool, if you can stand to wait.

This bread is especially good for sandwiches, sliced in half and then sliced along the "flat" direction to open up like a hamburger bun. It is great for burgers, steak sandwiches, ham, or just with olive oil and pepper.

bwraith's picture
bwraith

In Search of a Good Miche Version (2)

 Mixed Flour Miche (2)

 Mixed Flour Miche (2) Crumb (a)Mixed Flour Miche (2) Crumb (a): Mixed Flour Miche (2) Crumb (a)

 Mixed Flour Miche(2) Crumb (b)Mixed Flour Miche(2) Crumb (b): Mixed Flour Miche(2) Crumb (b)

Mixed Flour Miche (2): Mixed Flour Miche (2)

Mixed-Flour Miche: Loosely based on BBA Miche and Hamelman Mixed-Flour Miche.

I did a new slightly different version of the miche in my first blog entry about this recipe. I have a spreadsheet showing the recipe and percentages.

I have some photos of my process, but it is from the original blog entry, not for this specific bread. However, the process was the same other than as noted below.

Many, many thanks to JMonkey, SourdoLady, Zolablue, Mountaindog, Floydm, and numerous others. My results on this and other recipes are much better because of the great ideas I've found in the various blogs, postings, and lessons here.

Mixed-Flour Miche (2) as in version (2): Loosely based on BBA Miche and Hamelman Mixed-Flour Miche.

There is a "firm starter" that is built from white poolish-like starter as in the BBA "barm" version (50/50 by weight using breadflour and water), which is retarded overnight and included in the dough which is baked the same day.

The recipe I've been doing lately has evolved from the BBA miche recipe to be more like the "Mixed-Flour Miche" in Bread by Hamelman. My objective has basically been to have a high whole wheat content, but use sifted flours to get a less coarse crumb. I have also mixed red wheat and white wheat flours as well as tried some spelt trying to come up with a flavor that is not too "grassy" or "nutty". I find the taste of 100% white wheat bread to be a little too bland, whereas using too much red wheat seems bitter in a way I don't like.

As a result, I've ended up mixing various flours in an attempt to get something that is mostly whole wheat with some of the coarser bran sifted out and partly red wheat, partly white wheat for flavor.

The recipe showing in the photos above is as follows, and is loosely based on both the BBA Miche and the Hamelman "Mixed-Flour Miche" in Bread.

For the firm starter:

  • 7oz "BBA style barm" (100% hydration bread flour starter)
  • 4 oz KA Whole Spelt Flour
  • 3 oz KA Organic Whole Wheat
  • 2 oz KA Bread Flour
  • 4oz water

Mix/knead ingredients for about 3 minutes to get a fairly firm not very sticky dough. Place in container and let rise to about 2x in volume - about 3 hours. No extra punch down and additional rise at this point, compared to original recipe. Place in refrigerator overnight.

The difference in the firm starter above from the version (1) recipe is I substituted 4 oz Whole Spelt and 2 oz KA Bread Flour for 6 oz Golden Bufallo Sifted Red Wheat Flour. The objective was to get a more mild, less sour flavor. I also only let this rise for 3 hours, rather than 5 hours in version 1. This bread tasted better to me. The sour flavors that seemed a little too strong, as noted in the original blog entry, are more mild and complex this time, with no subtle excess of sour dominating the after taste of the crumb.

For the dough:

  • 3 oz KA whole spelt flour
  • 8 oz Golden Buffalo sifted red wheat flour (Heartland Mills)
  • 3 oz KA Organic Whole Wheat
  • 8 oz sifted white wheat flour (Homestead Grist Mill)
  • 7 oz Sir Lancelot High Gluten flour
  • 3 oz KA Rye Blend
  • 29.5 oz water
  • 3/4 tsp diastatic malted barley flour
  • 24 grams salt (about .8 oz) (2 grams less than in the first version)
  • Firm starter from day before.

The overall difference from the previous recipe is just a small decrease in red wheat flours, and less spelt flour in the dough, since I have more spelt flour in the firm starter. Also, the hydration is a little higher, about 83% from more like 82% in the previous recipe. Also, I used water on my hands and on the kneading surface instead of flour, instead of the flour that was used in the first recipe (based on some recommendations from the WW gods on the site), so that may account for a significant difference in the wetness of this dough. I imagine that could contribute an additional 1% difference in hydration.

Cut up firm starter and cover with towel to allow the pieces to lose their chill.

Autolyse: Mix all but salt and starter in bowl until the ingredients form a uniform shaggy mass. Allow to rest for 30 minutes.

I decided to use less of an autolyse, based on some advice in Raymond Calvel's book, "The Taste of Bread" which seems to indicate that letting the autolyse go on too long may take away from bread flavor.

Mix and knead dough: Push the pieces of starter into the dough and sprinkle with salt. Use a "frisage", i.e. use the heal of your palm to push the ingredients out along the table, so that all the lumps become mixed. See the Danielle Forestier video on the Julia Child video site. Mix/knead for 5 minutes to form a supple, fairly soft dough. I grab an end, lift it from the table, stretching it from the other end, which is stuck to the table. Then, toss the middle sideways and drop the end back down against the end stuck to the table, which forms a fold. Then, do the same thing from a quarter turn of the dough, i.e. grab an end at a right angle to the end you grabbed before. The total hydration of the entire overall dough is 83%, so it is relatively soft at the beginning. Place in a container to rise.

Fold the dough every 30 minutes: The total bulk fermentation time was 3.5 hours. I was folding it using the technique in Hamelman's Bread, i.e. (very roughly) turn the dough out on a bed of flour top down and gently spread it out/push out some of the gas. Then pull out and stretch one side of the dough and fold it toward the center. Do the same for the other three sides. Put the dough back in the container with the top up and the seams down. I folded 3 times, then let it rise for the rest of the time.

This time I folded every 30 minutes instead of every 60 minutes, and I only folded 3 times instead of 4 times. The result was a much more slack dough after completion of the bulk fermentation. This time, because of the higher hydration of this version, I probably should have folded at least one more time to get a dough that would hold its shape better. This dough spread out a little too much. It had good oven spring, so that compensated to some extent, but overall I wished it would hold its shape better than it did. Next time, I may reduce the water slightly and fold a little more to get a better shape.

Shape into boule: Form a boule not too differently from the folding technique above, except it is more of a gathering in of the edges of the dough and pinching them together underneat to stretch the top of the dough. Let the boule relax for 10 minutes to seal the seams underneath. Flour a couche very lightly with rice flour and place in 8 quart steel mixing bowl, and then place the dough in the couche seams up.

This time I tried to use mountaindog's recently blogged techniques for shaping the boule "right side up" instead of my previous upside down technique. I also allowed the relaxation of the boule for 10 minutes this time. The only gotcha I suffered was that the dough didn't come out of the rising bucket properly because it was still fairly gloppy - not enough folding of the more hydrated dough. As a result, the dough ended up lopsided, and a couple of the seams from the folding were slightly visible on the top of the dough after the final proof. I slashed through it, to not so gracefully hide that - oh well, next time I'll do better. This time, I did an additional fold after turning the dough out on the table, as it seemed quite gloppy. I need the fold to get to the point where I could form the boule.

Final Proof: Allow to rise for about 2 hours.

Last time, I think the final proof went on too long - 3 hours, and that probably contributed to slightly excessive sour flavors I wasn't so happy with. Also, I think it was long enough that the oven spring wasn't that great. This time, the flavor was very good, at least I thought so. The flavor of this one is complex, slightly sour only, with a cool, light, moist crumb. Although the gloppy dough did spread out, it also had decent oven spring, so the overall shape was slightly flatter than I wanted but not a huge disappointment.

Place on parchment: Place parchment on an upside down baking sheet or a peel and flour with coarse corn meal. Invert the bowl with the dough onto the parchment and pull away the bowl. Gently pull away the couche, which works great with the rice flour on the couche. Slash as photos show. I very lightly spray water on the dough with a pump pressure spray mist bottle.

When I placed the dough on the parchment paper this time, it spread out alarmingly, but was not a disaster. I realize that I need to fold the more hydrated dough one or two more times.

Bake: Preheat oven to 500F well before this point, like an hour before. Use various steaming techniques as described many places for home ovens. Drop temperature to 450F after about 5 minutes. Bake at 450 for 10 minutes, then rotate loaf and drop temperature to 400F for another 15 minutes. Then rotate and drop temperature to 375F. Continue to bake until internal temperature is about 208F.

This version had great flavor. I think this is partly because of the more mild starter, which used spelt instead of more red wheat flour. Also, I fermented for less time at all stages this time, which seems to have helped remove the slightly too sour after taste of version 1. I think the oven spring was better because of more hydration and less folds earlier. The crumb was a little more open for the same reason. Next time, I want to use slightly less hydration and one or two extra folds to make the dough a little stiffer - closer to version 1.

bwraith's picture
bwraith

My staple bread for the past couple of years has been a miche. I started doing the BBA recipe with half bread flour and half KA whole wheat flour. Lately I've been experimenting with different blends of organic and sifted flours. I haven't yet settled on one recipe and change things every time I do it lately, but I thought I'd describe this basic recipe.

 Loosely based on BBA Miche and Hamelman Mixed-Flour Miche.

 Loosely based on BBA Miche and Hamelman Mixed-Flour Miche.

Mixed-Flour Miche: Loosely based on BBA Miche and Hamelman Mixed-Flour Miche.

I have some photos of my process.

Many, many thanks to JMonkey, SourdoLady, Zolablue, Mountaindog, Floydm, and numerous others. My results on this and other recipes are much better because of the great ideas I've found in the various blogs, postings, and lessons here.

Mixed-Flour Miche: Loosely based on BBA Miche and Hamelman Mixed-Flour Miche.

There is a "firm starter" that is built from white poolish-like starter as in the BBA "barm" version (50/50 by weight using breadflour and water), which is retarded overnight and included in the dough which is baked the same day.

The recipe I've been doing lately has evolved from the BBA miche recipe to be more like the "Mixed-Flour Miche" in Bread by Hamelman. My objective has basically been to have a high whole wheat content, but use sifted flours to get a less coarse crumb. I have also mixed red wheat and white wheat flours as well as tried some spelt trying to come up with a flavor that is not too "grassy" or "nutty". I find the taste of 100% white wheat bread to be a little too bland, whereas using too much red wheat seems bitter in a way I don't like.

As a result, I've ended up mixing various flours in an attempt to get something that is mostly whole wheat with some of the coarser bran sifted out and partly red wheat, partly white wheat for flavor.

The recipe showing in the photos is as follows, and is loosely based on both the BBA Miche and the Hamelman "Mixed-Flour Miche" in Bread.

For the firm starter:

  • 7oz "BBA style barm" (100% hydration bread flour starter)
  • 6oz Golden Buffalo flour (sifted red wheat flour from Heartland Mills)
  • 3 oz KA Organic Whole Wheat
  • 4oz water

Mix/knead ingredients for about 3 minutes to get a fairly firm not very sticky dough. Place in container and let rise to about 1.5x in volume - about 3 hours. Punch it down and allow to rise again to double - another 2.5 hours, roughly. Place in refrigerator overnight. I was trying to get this one to be a little more sour, and I think I went too far, as the bread was just a touch too sour for my tastes, but I don't like my bread very sour. Some might like the more sour flavor I got. My plan is to reduce the rise time of the firm starter and use less Golden Buffalo and maybe use whole spelt flour in higher proportion next time.

For the dough:

  • 6 oz KA whole spelt flour
  • 8 oz Golden Buffalo sifted red wheat flour (Heartland Mills)
  • 3 oz KA Organic Whole Wheat
  • 6 oz sifted white wheat flour (Homestead Grist Mill)
  • 6 oz Sir Lancelot High Gluten flour
  • 3 oz KA Rye Blend
  • 29 oz water
  • 3/4 tsp diastatic malted barley flour
  • 26 grams salt (about .9 oz)
  • Firm starter from day before.

Cut up firm starter and cover with towel to allow the pieces to lose their chill.

Autolyse: Mix all but salt and starter in bowl until the ingredients form a uniform shaggy mass. Allow to rest for 60 minutes.

Mix and knead dough: Push the pieces of starter into the dough and sprinkle with salt. Mix/knead for 5 minutes to form a supple, fairly soft dough. The total hydration of the entire overall dough is 82%, so it is relatively soft at the beginning. Place in a container to rise.

Fold the dough hourly: The total bulk fermentation time was 4.5 hours. I think I probably went too long, though. Anyway, I was folding it using the technique in Hamelman's Bread, i.e. (very roughly) turn the dough out on a bed of flour top down and gently spread it out/push out some of the gas. Then pull out and stretch one side of the dough and fold it toward the center. Do the same for the other three sides. Put the dough back in the container with the top up and the seams down. I may have "overfolded", as the dough seemed a little "too tough" possibly, and I didn't get as much oven spring as I was hoping for.

Shape into boule: Form a boule not too differently from the folding technique above, except it is more of a gathering in of the edges of the dough and pinching them together to stretch the "top" of the dough (which is face down on the counter as with the folds). Flour a couche with rice flour and place in 8 quart steel mixing bowl, and then place the dough in the couche seams up.

Final Proof: Allow to rise for about 2.5 hours - again I let it go until 3 hours, and I think it was probably too long to wait.

Place on parchment: Place parchment on an upside down baking sheet or a peel and flour with coarse corn meal. Invert the bowl with the dough onto the parchment and pull away the bowl. Gently pull away the couche, which works great with the rice flour on the couche. Slash as photos show. I very lightly spray water on with spray mister.

Bake: Preheat oven to 500F well before this point, like an hour before. Use various steaming techniques as described many places for home ovens. Drop temperature to 450F after about 5 minutes. Bake at 450 for 10 minutes, then rotate loaf and drop temperature to 400F for another 20 minutes. Then rotate and drop temperature to 375F. Continue to bake until internal temperature is about 208F.

I would enjoy hearing any comments about how to manipulate flavor, the amount of rise, crumb texture, and so on. This bread did not rise quite as much as some others I've done in similar fashion. There are a few reasons I can think of, such as too much fermentation and proofing time, starter slightly too ripe and sour, possibly folding too much, maybe kneading too much in the very beginning, and so on. I also think the sour flavor is too much for my tastes, and other versions I've done were less sour. I think this is due mainly to overly long fermentation and proof, and to allowing the starter to become too ripe. Also, I used a higher proportion of red wheat flour in this starter than previously.

Pages

Subscribe to RSS - bwraith's blog