The Fresh Loaf

A Community of Amateur Bakers and Artisan Bread Enthusiasts.

dmsnyder's blog

dmsnyder's picture
dmsnyder

We're invited for dinner tomorrow at the home of one of my favorite high school teachers. He and his wife have become our good friends over the years. I offered to bring bread and decided to bake two different breads that I think they will enjoy: The Miche, Pointe-à-Callière from Hamelman's "Bread" and my own San Joaquin Sourdough. (This version)

My wife thought the miche would be just too much, so I divided the dough and baked two boules of 820 gms each.

Boules, Pointe-à-Callière

Rather a "bold bake" of these, but I expect the caramelized crust to be very tasty. 

Boules, Pointe-à-Callière crumb

Here's another photo of the boule that's going to dinner.


And the San Joaquin Sourdough. I think it was a bit under-proofed. The oven spring was ... exuberant. 

San Joaquin Sourdough 

David

Submitted to Yeast Spotting


dmsnyder's picture
dmsnyder

Today, I baked Hamelman's "Normandy Apple Bread" for the first time. This bread is a pain au levain spiked with instant yeast. It uses a firm starter and bread flour and whole wheat in the final dough. The apple flavor comes from chopped dried apples and apple cider.

Jeff (JMonkey) posted the formula and instructions for this bread May 19, 2007, so I won't duplicate them here. For those interesting in making this bread, Jeff's entry can be found here: Hamelman's Normandy Apple Bread

I followed Hamelman's instructions pretty much to the letter. I machine mixed for about 7 or 8 minutes and did a French fold before bulk fermentation. I did one more fold after one hour of a 2 hour bulk fermentation. I had to refrigerate the formed loaves for about 3 hours to work around an afternoon outing. I then let them proof about 60-75 minutes at room temperature before baking.

The loaves smelled wonderful while baking. The crust was crunchy. The flavor was somewhat disappointing. The apples do give pleasant little bursts of sourness, but the crumb flavor was not my favorite. It was basically like a light whole wheat levain, and that is not a type of bread I particularly like.

Your taste (undoubtedly) varies, and you may enjoy it more than I.

Then again, the Vermont Sourdough had such spectacular flavor, anything else would be hard to compare. Again, that's my taste.


David

dmsnyder's picture
dmsnyder

These were made with the San Francisco Sourdough starter from sourdo.com. 

Vermont Sourdough on the left. San Francisco Sourdough on the right.

Please note the 3 distinct shades of browning of the Vermont Sourdough bloom. This is a sign that the blooming occurred gradually over a large portion of the bake. To me, this is an indication that the stars (loaf proofing, scoring, baking stone temperature, oven steaming, etc.) were all aligned propitiously. The oven gods smiled on these loaves, as you can see from their smiles' reflection on the loaves. (Eeeeew ... That's corney! Well, that 's what writing while listening to Beethoven's Piano Concerto No. 5 does. Consider yourselves fortunate I wasn't listening to the Dvorak Cello Concerto!)

Okay! Enough, already! On to crumb shots ...

San Francisco Sourdough from "Crust & Crumb" 

The crust was crunch-chewy. The crumb was a bit less open than expected. (The loaves were a somewhat over-proofed and collapsed slightly when scored.) The flavor was inoffensive but had no particular wonderfulness. It was mildly to moderately sour, which was what I'd wanted.

Vermont Sourdough from "Bread"

The crust was crunchy and nutty-sweet. The crumb was about as expected. It could have been more open, but I'm not unhappy with it. The crumb was quite chewy and the flavor was marvelous! Complex, sweet and moderately sour. It was close to my ideal for sourdough bread. 

The Vermont sourdough did have whole rye (10%) and the San Francisco Sourdough was straight white flour (except for a trace of whole wheat and rye in the starter feeding). Both of these formulas can make blow your socks off delicious bread. I credit the rye with the superior flavor in the Vermont Sourdough today. I certainly recommend a flour mix of 90% white and 10% rye to anyone who hasn't tried it. You don't taste "rye," but it does enhance the overall flavor greatly.

David

dmsnyder's picture
dmsnyder


Ed Wood, who sells sourdough cultures from various parts of the world, insists that a culture will maintain its unique combination of yeast and lactobacillus species and, thus, its unique growth characteristics and flavor, forever. My experience has been otherwise. I've bought his San Francisco Sourdough culture on two previous occasions. Both times, after a couple weeks of feeding, they produced bread with the characteristic San Francisco sourdough flavor, but after six months or so the flavor changed. The eventual culture was in no way "bad," it was just different. I assume the original organisms were replaced by others, and, from what I've read, the new ones derived from the flour with which I was feeding my culture.

My understanding is that the yeast and bacteria which inhabit grains are mostly on the outer surface, that is the bran. I have fed my starters with a mixture of white flour, whole wheat and whole rye for some time. Also, I keep my starters at about 75% hydration. Dr. Wood does not address what kind of flour one should use for feeding starters, but he does recommend keeping the San Francisco culture as a liquid. I believe this favors the homofermentive (lactic acid producing) bacteria over the heterofermentive (lactic and acidic acid producing) bacteria which prefer a less liquid (and cooler) environment.

With these considerations in mind, I have purchased Dr. Wood's San Francisco Sourdough starter a third time. I am feeding it only white flour. I still use whole grains in final levain builds, but I will not feed them to my "stock" cultures.

It is now a month since I activated the SF SD culture. I've baked a few breads with it, but I made no special effort to bring out the distinctive SF SD flavor to date. The breads I baked were very tasty – among the best tasting I've made. The dough rose very well, indicating good yeast activity. The sourness has been mild.

I figure it's time to start following the procedures I understand to optimize the culture for making breads with the authentic, distinctive San Francisco Sourdough flavor.

The first goal is to generate a mature starter with good numbers of active yeast and lactobacilli. Second, to have this starter ferment at the hydration levels and temperatures that enhance the production of the “right” balance of lactic and acetic acid. Third, to mix and ferment a dough with the desired flavor balance.

Incidentally, for this bake, I also incorporated Eric's (ehanner) recently endorsed addition of a small amount of Durum flour to a white flour mix to enhance flavor.
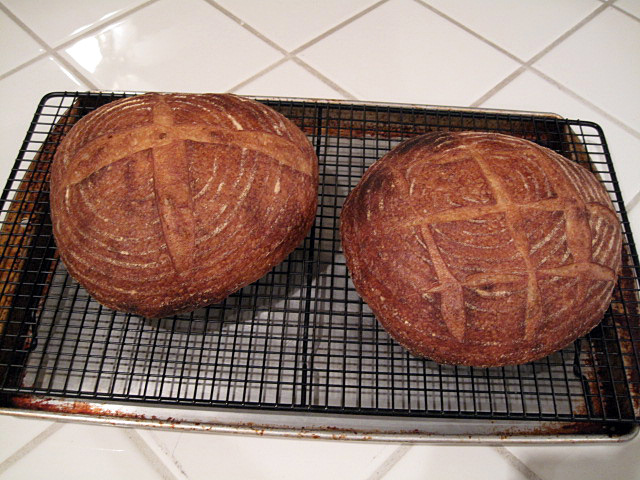
 

Penultimate levain build

Ingredients

Ingredient weights (gms)

Baker's percentages

Stock starter (67% hydration)

50

50

KAF AP flour

100

100

Water

100

100


Ultimate levain build

Ingredients

Ingredient weights (gms)

Baker's percentages

Activated levain

250

167

KAF AP flour

150

100

Water

150

100


Final dough

Ingredients

Ingredient weights (gms)

Baker's percentages

Ripe levain

200

37

Fine durum flour (from KAF)

35

6.5

KAF European Artisan-style flour

500

93.5

Water

360

67.3

Salt

10

1.9


Procedures

  1. Make the penultimate levain by dissolving the firm starter in the water and mixing in the flour. Ferment at room temperature until it is actively bubbling but not foaming. (8-10 hrs) I mixed this early one morning and let it ferment while I was at work.

  2. Make the ultimate levin by dissolving the penultimate levain in the water and mixing in the flour. Ferment at room temperature for 2-3 hours, then at 78-85ºF for another 10-12 hours. I mixed this after dinner and placed it in a warmed microwave oven over night. In the morning, I refrigerated it while I was at work.

  3. Mix the final dough by dissolving the ripe levain (Feed the extra and save it for another bread.). Add the flours and mix to a shaggy mass. Cover tightly and let it sit for 20-60 minutes. (Autolyse)

  4. Add the salt and mix thoroughly. Knead by french folding or in a stand mixer until the gluten is moderately developed. If using a KitchenAid mixer, this dough will not completely clean the sides of the mixer. With the flours I used, this was a moderately slack and somewhat sticky dough, even though the hydration was actually lower than what I most often use for sourdough breads these days. I assume this was because I have generally been using about 10% whole wheat or whole rye flour, which absorbs more water.

  5. Transfer the dough to a large bowl and cover it tightly. Note the volume of the dough.

  6. After 20 minutes, “stretch and fold in the bowl” for 30 strokes. Cover tightly.

  7. Repeat Step 6. two more times.

  8. After the third “stretch and fold in the bowl,” let the dough rest for another 20 minutes, then transfer it to a lightly floured board and do a stretch and fold (“letter fold”). Return the dough to the bowl.

  9. After 45 minutes, do a second stretch and fold on the board. Return the dough to the bowl. Cover tightly. Continue fermenting until the dough has doubled in volume from the original volume that you noted in Step 5.

  10. Transfer the dough to the board. Divide it into two equal pieces, and pre-form each piece into a round (if making boules) or log (if making bâtards). Cover the pieces and let them rest for 10-20 minutes to relax the gluten.

  11. Form your loaves and transfer them to bannetons. Cover with plasti-crap or place each banneton in a food-grade plastic bag.

  12. Cold retard the loaves until ready to bake. (12-16 hours at 40ºF)

  13. Remove the loaves from the refrigerator and allow them to warm up and continue proofing until they have expanded by 50-75%

  14. One hour before baking, preheat your oven to 500ºF with a baking stone and your steaming method of choice in place.

  15. Pre-steam the oven.

  16. Transfer the loaves to your peel. Score the loaves. Transfer the loaves to the baking stone. As anticipated, the loaves spread some when transferred to the peel and spread more when scored.

  17. Steam the oven and turn the temperature down to 460ºF.

  18. After 12 minutes, remove your steaming source. (If it is already dry, you can leave it in place, but do open the oven door for 10-20 seconds to vent the steam.

  19. Continue baking until the loaves are done – about 18-20 minutes more. (Their internal temperature is 205ºF, and thumping their bottom gives a hollow sound.)

  20. Leave the loaves in the turned off oven with the door ajar for 7-10 minutes to dry the crust.

  21. Transfer the loaves to a cooling rack.

  22. Cool thoroughly before slicing. (At least 2 hours)
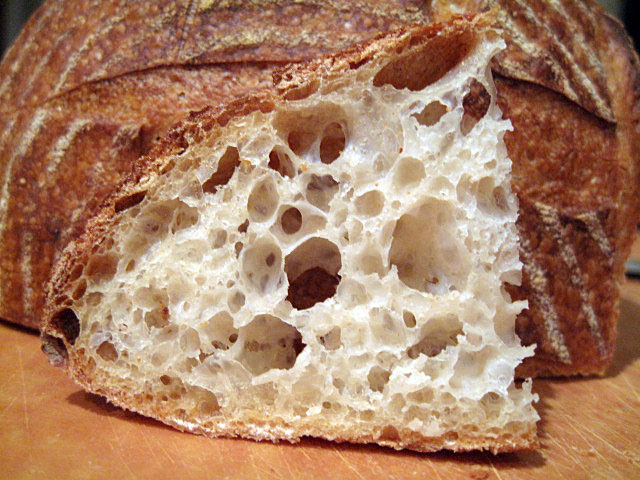
 

The crust is very crisp and crackly. The crumb is moist, tender and quite full of lovely holes. The flavor is sweet and "clean" with no perceptible sourness. This is a wonderfully tasting bread, but the absence of any sour flavor is a mystery.

My next experiment needs to be to bake the "San Francisco Sourdough" from Reinhart's "Crust&Crumb." If that is not sour, the lactobacilli must have missed the plane from Idaho!

David

Submitted to Yeast Spotting.


dmsnyder's picture
dmsnyder


My San Francisco Sourdough starter from sourdo.com is now two weeks old. I made another pair of my San Joaquin Sourdough breads with it yesterday. I modified my formula somewhat. I used a 60% hydration starter fed with AP flour only. I increased the amount of starter by 50%. I used KAF AP flour for the dough. I used no added instant yeast.


Ingredients

Weight

Baker's Percentage

Firm starter

150 gms

30.00%

KAF AP flour

450 gms

90.00%

BRM Dark Rye flour

50 gms

10.00%

Water

360 gms

72.00%

Salt

10 gms

2.00%


Procedure

  1. Mix the firm starter (1:3:5 – Starter:Water:Flour). Let it ferment at room temperature for 12 hours.

  2. Pour the water into a large mixing bowl. Add the starter and dissolve it in the water.

  3. Add the flours and mix to a shaggy mass. Cover tightly and let it sit for 20-60 minutes.

  4. Sprinkle the salt over the dough and mix thoroughly using the “stretch and fold in the bowl” technique. Let it rest for 30 minutes.

  5. Repeat the “stretch and fold in the bowl” for 30 strokes 2 more times at 30 minute intervals.

  6. Transfer the dough to a lightly floured board, and do one stretch and fold.

  7. Form the dough into a ball and place in a lightly oiled bowl. Note the volume of the dough. Cover the bowl tightly. Let it rest for 30 minutes.

  8. Repeat the stretch and fold on the board. Reform the dough into a ball and replace it in the bowl.

  9. Allow the dough to continue fermenting until the volume has increased 50%.

  10. Cold retard the dough for about 20 hours. (The dough had more than doubled and was full of large and small bubbles.)

  11. Take the dough out of the refrigerator and immediately transfer it to a lightly floured board.

  12. Divide the dough into two equal pieces and pre-shape them into logs or rounds, depending on whether you want to make boules or bâtards. Cover the pieces with plasti-crap and let them rest for 60 minutes. (Give them a shorter rest if the kitchen is very warm. You don't want them to expand very much, if any.)

  13. Pre-heat the oven to 500ºF with a baking stone and your steaming method of choice in place.

  14. Shape the pieces and place them in bannetons or on a couche. Cover the loaves and proof them until they have expanded by 50-70%. (30-45 minutes)

  15. Pre-steam the oven. Then transfer the loaves to a peel (or equivalent). Score them, and load them onto your baking stone.

  16. Turn the oven down to 460ºF.

  17. After 12 minutes, remove your steaming apparatus. Turn the loaves 180º, if necessary for even browning.

  18. Continue to bake the loaves for another 15-18 minutes or until their internal temperature is 205ºF.

  19. Turn off the oven, but leave the loaves on the stone with the oven door ajar for another 7-10 minutes to dry the crust.

  20. Transfer the loaves to a cooling rack.

  21. Cool the loaves completely before slicing.


The loaves were already singing when I took them out of the oven. The crust developed crackles, which can be credited to the use of AP rather than higher gluten flour and the drying in the oven (Step 19., above).


The crumb was nice and open.


The crust was crisp when first cooled and crunchy/chewy the next morning. The flavor was sweet and wheaty, like a good baguette, with the barest hint of sourness. This was po

ssibly the best tasting San Joaquin Sourdough I've made. I think I'm going to stick with this version. Next time, I may use this dough to make baguettes.

David


Submitted to YeastSpotting


dmsnyder's picture
dmsnyder

These breads were made with my recently activated San Francisco Sourdough starter from sourdo.com. I used 100 gms of starter fed with a mix of AP, WW and Rye flours, 500 gms KAF Sir Lancelot flour, 360 gms water, 10 gms salt. The formed loaves were cold retarded for about 14 hours.

The flavor is very nice. It is a little more sour than yesterday's San Joaquin Sourdough, as expected, but still only mildly sour. I'm hoping the distinctive SF SD flavor will develop over a few weeks. Stay tuned.

David

dmsnyder's picture
dmsnyder

I am again trying Ed Wood's "San Francisco Sourdough" starter. I began activating the dry starter just a week ago. It took about 5 days to get it up to speed. This is the first bread I've baked with this new starter. It's my "San Joaquin Sourdough" made without any added instant yeast and with KAF Bread Flour.

My San Joaquin Sourdough is based on Anis Bouabsa's method for baguettes, which utilizes a long cold retardation at the bulk fermentation stage. The flavor of the bread was what i usually get with this formula. It is very mildly sour. There was no distinctive "San Francisco Sourdough" flavor, but the starter is still very new, and the flavor should develop over the next month or so. We'll see.

I have another couple loaves shaped and cold retarding to bake tomorrow. Those were also made with this starter but with a more conventional method. I expect them to be more sour in flavor.

David

dmsnyder's picture
dmsnyder

We were in Portland, OR last week. While I was in meetings, my wife bounced between Powell's (the biggest book store in the US of A) and the Pearl Bakery. I got to taste a number of their breads in sandwiches my wife brought back to the hotel, but I didn't taste their "multigrain roll," which my wife had one day and really liked.

Susan often asks me to make rolls for her lunch sandwiches, so with her description of the Pearl's roll in mind I went looking for a multigrain roll to make. I've made several of Hamelman's multigrain breads and liked them all. I think any of the ones I've made would make good rolls, but I wanted to try something new. Reading through "Bread," I found the "Whole-Wheat Bread with a Multigrain Soaker." (Pg. 126) It is a 50% bread flour/50% whole wheat dough with a soaker of cracked wheat, coarse corn meal, millet and oats. I had all the ingredients but for the millet. I substituted flax seeds.

This is one heavy dough. I added quite a bit of water, which Hamelman says is often needed, to get the consistency I thought was "right." I formed the 4+ lbs of dough into 2 bâtards and a half dozen 3 oz rolls.

Whole-Wheat Bread with Multigrain Soaker bâtard crumb

I baked the rolls at 450ºF for 15 minutes. The bâtards baked at 450ºF with steam for 12 minutes, then at 440ºF for another 15 minutes followed by 7 minutes in the turned off oven with the door ajar.

The crust was crunchy. The crumb was tender but chewy. The flavor is assertively honey whole wheat, mellowed somewhat by the soaker ingredients. It's outstanding with a thin spread of sweet butter.

My wife liked it but says it's nothing like the Pearl Bakery's multigrain rolls. Hee hee. An excuse to bake more rolls.

David

Submitted to YeastSpotting

dmsnyder's picture
dmsnyder

I haven't made my San Joaquin Sourdough for quite a while. It is one of my favorites, so I made a couple loaves today. I used KAF European Artisan Style flour and Bob's Red Mill Dark Rye. The "variation" of note is that I used a bit less rye (5%) and put all the rye flour in the starter feeding. I also decreased the overall dough hydration just a bit to 70%.

The bread had a thin crust and very chewy crumb. It is mildly sour. It's still a really good bread.

You can find the basic formula and method here: San Joaquin Sourdough 1

David

dmsnyder's picture
dmsnyder

Hansjoakim recently showed us a Flax Seed Rye Bread he baked from a formula Jeffrey Hamelman published in Modern Baking in March, 2009.

I have baked a number of Hamelman's rye breads before and a number of his breads with seeds. I have enjoyed them all. This Flax Seed Rye is a new formula that is not in Hamelman's “Bread,” however. Yet its components are all familiar to anyone who has baked the ryes and multi-grain breads from that book. The combination of a 40% Sourdough Rye and a seed and “old bread” (altus) soaker sounded like a bread I'd really enjoy.

Hamelman's published formula for this bread is scaled for commercial bakery quantities. I scaled the formula to make a single 1 kg loaf.


Overall Formula


Ingredients

Wt (gms)

Baker's percentage

Flour (11.7% protein)

300

60

Whole rye flour

200

40

Water

402

80.3

Salt

10

2

Instant yeast

6.5

1.3

Flax seeds

50

10

Old bread

40

8

Total (approx.)

1 Kg

201.5


Sourdough (rye sour)


Ingredients

Wt (gms)

Baker's percentage

Whole rye flour

200

100

Water (cool)

166

83

Rye sour

24

12

Total (approx.)

390

195


Method: About 16 hours before the final mix, disperse the mature sourdough culture into the cool water. Add the whole or medium rye flour, and mix until it is incorporated. Sprinkle a layer of rye on top, and cover the bowl with plastic to prevent dehydration. Ripen the sourdough at about 70°F.

Soaker


Ingredients

Wt (gms)

Baker's percentage

Flax sees

50

100

Old bread

40

80

Water (cool)

150

300

Total

240

480

Method: Make the soaker at the same time you make the sourdough. Cut the old bread into cubes, and put it into a bowl along with the flax seed. Add the water and cover overnight.

Final dough


Ingredients

Wt (gms)

Flour (11.7% protein)

300

Water

85.5

Salt

10

Instant yeast

6.5

Sourdough

366

Soaker

240

Total (approx.)

1 kg


Method

  1. Remove a portion of the sourdough to perpetuate the culture.

  2. Dissolve the sourdough in the water, mix in the soaker, then add the rest of the ingredients and mix thoroughly. The dough will be rather loose. You can adjust by adding small amounts of water or flour, but avoid adding too much flour.

  3. Mix at Speed 2 (KitchenAid) to a moderate degree of gluten development. Desired dough temperature is 78F. (This dough, which Hamelman says is “tacky” was extremely sticky for me. I suspect the dough was over-hydrated. I would be inclined to reduce the water, use a more absorbent flour or both next time. I mixed for 25 minutes. There was better than “moderate” gluten development. It was just a very wet dough.)

  4. Bulk ferment in an oiled bowl for 45-60 minutes.

  5. Transfer the dough to the board and pre-shape into a round. Let it rest while you flour your banneton and pre-heat the oven to 480F with a baking stone and your steaming method of choice in place. (Note: Hamelman suggests baking 1.5 lb loaves. I chose to make one larger loaf. Also, you could shape this bread as one or more bâtards, if you choose.)

  6. Shape the dough into a tight boule. Optionally, press the dampened smooth side of the dough into a mix of seeds (Flax seeds 45%, sesame seeds 45%, caraway seeds 10% suggested by Hamelman. I brushed the smooth side of the loaf with water and sprinkled on some caraway seeds only.)

  7. Transfer the boule to a floured banneton. If you used the optional seeds, place it with the seeded side up. If you didn't seed it, place it with the seamed side up. Cover the banneton with a kitchen towel or plasti-crap, or place it in a food-safe plastic bag.

  8. Proof the boule for 45-60 minutes. (Hamelman specifies an ambient temperature of 80F.)

  9. Pre-steam the oven. Load the loaf on your baking stone, and steam the oven again.

  10. Bake at 440F for about 40 minutes with steam for the first third of the bake. (Note: Hamelman specifies about 38 minutes for a 1.5 lb loaf. For larger round loaves, a longer bake is needed, but be prepared to lower the oven temperature as the bake progresses if the crust appears to be getting too dark. Also note that, if you shape the bread as an oval loaf, the baking time may be less than for a round loaf.) The bread is done when the internal temperature reaches 205F and the loaf gives a “hollow” sound when thumped on the bottom.

  11. Cool completely before slicing.

The "supporting cast" is a couple loaves of Susan from San Diego's "Original" favorite sourdough. My timing was a bit off. The sourdough boules needed just enough more time in the oven to result in the rye over-proofing.

The rye had only modest oven spring and has a lower profile than hansjoakim's bake. In any event, it smells delicious!

The crust was quite hard when the loaf came out of the oven. By time it had cooled, the crust was soft. I left it on the counter, wrapped in a cotton cloth for about 20 hours. By the time I sliced it, the crust had firmed up again and was chewy. The texture of the crumb is drier than I expected, given the hydration level of the dough. I wonder how much impact my long mixing had on the dough structure and mouth feel.

The flavor of the bread is like that of other 40% sourdough rye breads, which is to say very nice. There is a subtle overtone  from the flax seeds which is not as pronounced as that in some of the other 5-grain breads in "Bread." 

I am thinking of ways I might modify the formula for future bakes. For example, I might use First Clear flour rather than AP. I would make the dough drier - more like what I think Hamelman describes. I might make Hamelman's "5-grain sourdough rye" with some old bread added to the soaker. 

Thanks again, hansjoakim, for bringing this bread to our attention!

David

Submitted to Yeast Spotting

Pages

Subscribe to RSS - dmsnyder's blog