I've decided to blog my baking and look forward to sharing recipes and getting advice from y'all.
For the past 15 years here in Taiwan, I had made far too many doorstops and hockey pucks instead of edible bread, until a couple months ago I decided to invest in a few good books on baking (I got PR's BBA (Peter Reinhart's The Bread Baker's Apprentice), RLB's BB (Rose Levy Beranbaum's Bread Bible), and NS's BLB (Nancy Silverton's Breads from the La Brea Tarpits), and also found this wonderful forum. It's helped immensely -- thank you all!
I've learned not to work so much flour into the dough (wetter is better!), and have also learned to weigh, not scoop and pack (!) flour. Equally importantly, I've learned to let it rise and proof by volume and not by the clock. I've started doing lots of pre-ferments, using sourdoughs as well as commercial yeast, and using pâte fermentée. Finally, I've gotten a hotter oven and started using steam.
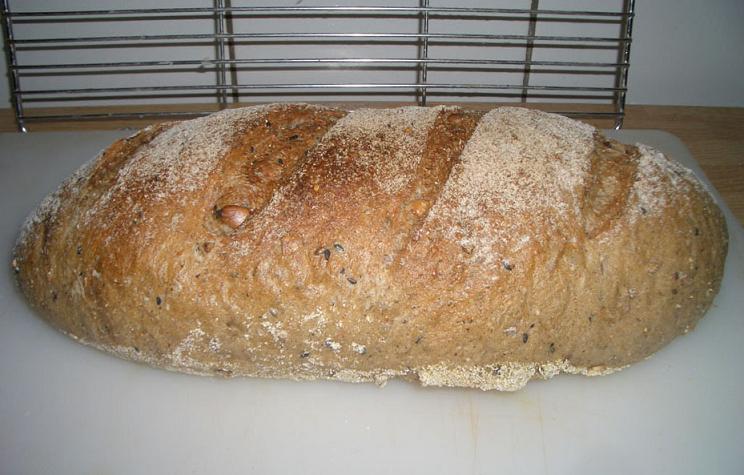
My first big success was my Fifteen-grain Torpedo, based on the Tyrolean Ten-Grain Torpedo in RLB's BB p. 394. I changed the flour to 日清特高筋麵粉 extra-high gluten flour (sorry, but the brands here aren't generally in Roman script -- I'll sometimes post the original Mandarin because there's at least one other forum member here in Taiwan who might want to know the brand name or the product name in Mandarin; you can just ignore it if you don't read Chinese). I also added vital wheat gluten (小麥蛋白). The very high gluten content gave this loaf incredible shape-retention during its rise.

Dragonbones Fifteen-Grain Bread

This was baked in my old oven, which I got rid of a couple weeks ago. It didn't get hot enough (only 400F max, sometimes 365F), especially the lower element, so the bottom crust in the above pic could obviously be improved upon.
DAY ONE:
Make sponge.
- ¼ tsp instant yeast
- ½ TBSP malt syrup
- ¾ cup + optional 1-2 TBSP water, RT
Should be DRY, to make up for the very wet mixture of grains and seeds to be added later. Let hydrate an hour, then add 100g (about 2/3 c) extra-high-gluten flour (日清特高筋麵粉 brand). Original recipe called for bread flour (throughout).
Make flour mixture (dry mix). In a separate bowl, mix these:
- 200 g (about 1.25c plus ½ TBSP) extra-high-gluten flour
- ¾ tsp instant yeast
- 4 tsp (12 g) vital wheat gluten (小麥蛋白))
Whisk these 3 items together, dry. Spoon onto the sponge to cover it completely. Cover this with plastic, ferment 4 hours at RT, then overnight in the fridge. This will form the 'dough' on day two.
Soak grains and seeds: Mix the following (or your own creative mixture of seeds and grains) in a small bowl, then add ½ c minus 1 TBSP HOT water, stirring well. Cover tightly, soak overnight at RT.
RLB's Original: ten-grain cereal mix, ½ c plus 2 TBSP, or 100 g
My version - equal amounts of the following, mixed into a larger bag (then measured out ½ cup of the mix, saving the rest for a subsequent batch):
- buckwheat flour, fine
- pumpkin seeds, toasted
- sunflower seeds, toasted
- cornmeal
- whole oats (chopped in my spice grinder) then toasted
- pearl barley; briefly chopped in spice grinder then toasted
- barley tea (=roasted unhulled barley), cracked (in my spice grinder)
- whole millet, toasted
- sesame, white
- sesame, black
- rye crumbs
- caraway
- spelt flour
- wheat germ and wheat bran
- zaliang 雜糧 (multi-grain) powder
DAY TWO:
Mix the dough on low (KA2) 1 min., then medium (#4) SEVEN mins; will be dryish. Rest 20 mins (do not skip). Add salt (1.25 tsp) and presoaked seed mixture including liquid.
Knead another 3-5 mins until well incorporated; should be slightly sticky. Adjust with flour or water; will weigh 680 g (24 oz). Taste to check whether salt was added. Due to errors on my first attempt (failure to realize sponge should be so dry, leading to adding too much water), I kneaded longer, working in flour, for about 15 minutes before dough was smooth; it was a very firm dough, resilient, slightly tacky.
Put in greased, flat-bottomed bowl; turn once. Push down to make top level, and mark this and the double level. Cover tightly. Let rise RT til double. Dough becomes more slack, workable.
Oil spatula. Scrape onto floured counter, press into rectangle. Letterfold, turn, repeat; return to oiled bowl, turn, cover, let rise until doubled again, 45-60 mins.
Shape and final rise: Turn onto lightly floured counter, press into a rectangle. Shape into a torpedo-shaped loaf or bâtard. Spray parchment with oil then dust heavily with cornmeal. Set parchment on a peel or the back of a cookie pan; set torpedo atop this, and cover with a large container, proofing box, or loosely with oiled plastic wrap. Let rise until doubled. Meanwhile preheat oven to its maximum, with stone on lowest shelf, and cast iron pan on oven floor.
Dust with light or medium rye flour and score. Prepare a cup of boiling water. Open the oven, slide the dough with its parchment sheet onto oven stone directly, and pour water onto cast iron pan underneath. Shut door quickly. After 30 seconds, spray water and shut door. Repeat once more. I didn't lower the oven temp because my old oven maxed out at a wimpy temperature. A hotter oven might need to be turned down at this point, especially the top element. Bake 20-30 mins, turning once, or until golden brown; internal temp should be about 208°F. Cool completely on rack before cutting.
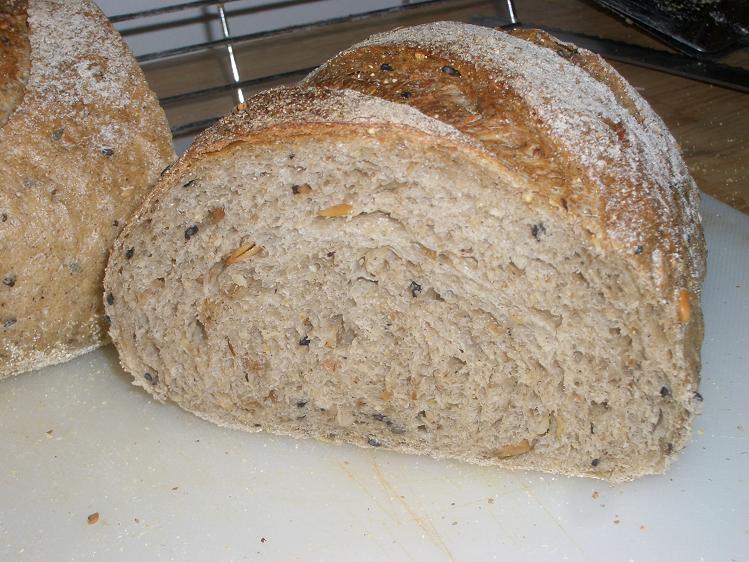
RESULT: Excellent! Chewy, full of grain, nice crust, nice flavor. Maintained shape, rose more than expected during final rise (had to orient diagonally on parchment to fit in oven!). Cuts opened well, looked great! Cornmeal on bottom contributed nice texture too.
My first real bread success! (This was about 6 weeks ago, I guess). I'll be trying it again with a hotter stone this time for a better bottom crust, now that I have a new oven.