The Fresh Loaf

A Community of Amateur Bakers and Artisan Bread Enthusiasts.

Isand66's blog

Isand66's picture
Isand66

There are many things in my life that I have a passion for, with bread  being near the top.  Recently I was very saddened to learn of the sudden passing of a terrific baker and person Eric Hanner.  Eric was a frequent contributor on The Fresh Loaf website and he inspired me with his passion for baking and touched a great many people along the way.

His willingness to share his vast baking experiences and cooking expertise as well photography pointers left an unforgettable mark on all that came in contact with him.  One of Eric's favorite recipes was his Jewish Rye which goes great with his homemade pastrami.  I had a spirited conversation with Eric regarding our pastrami passion and  I couldn't wait to try his pastrami after I had baked his famous rye.

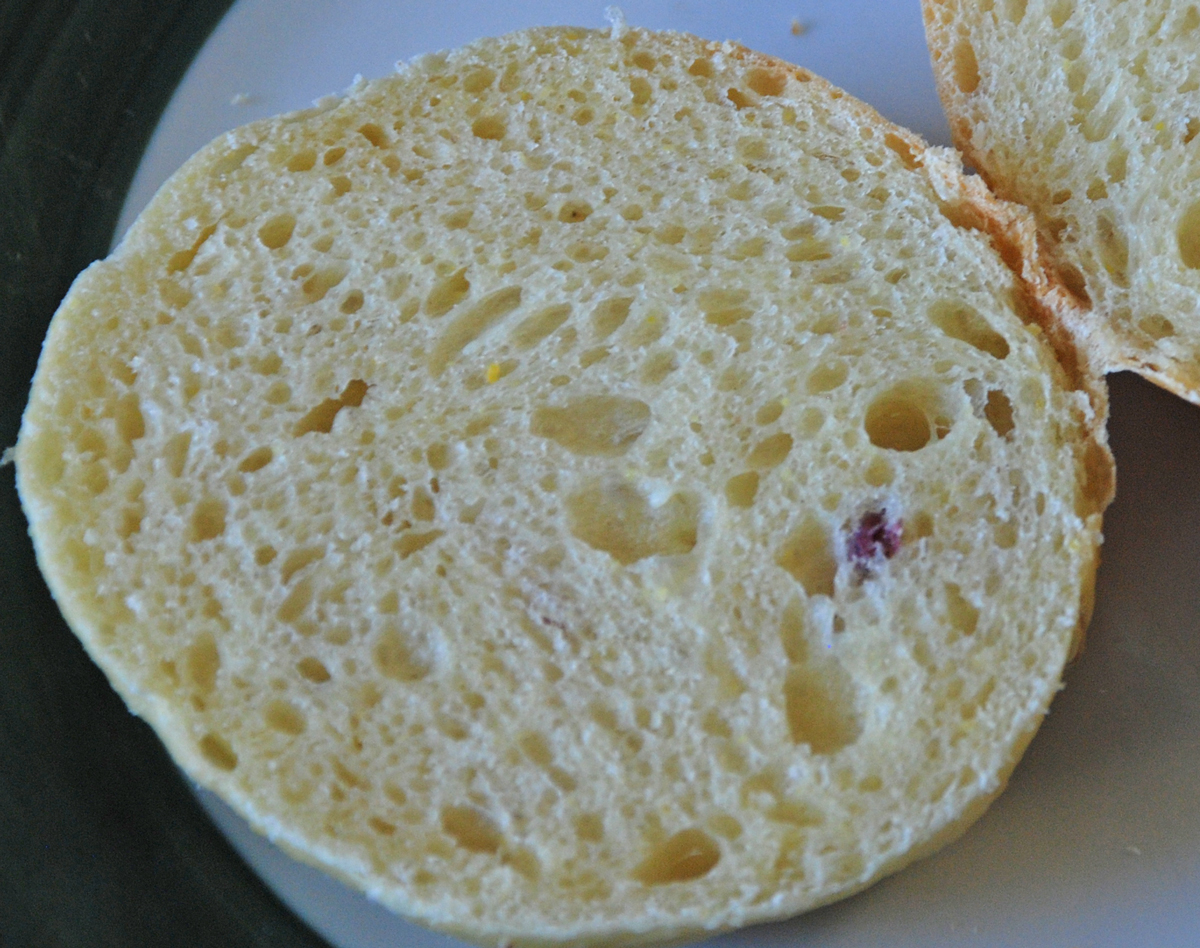
In tribute to Eric I offer my own inspired Jewish Rye (I'm Jewish...therefore it's a Jewish Rye :0).  I have not used my yeast water starter in a while so I refreshed it with some oranges due to my apples having gone bad.  I also created a rye sour converting my AP starter in 3 stages including adding sautéed onions in stage 2.  Both starters were finished by bringing them from 100% hydration to 65% hydration.

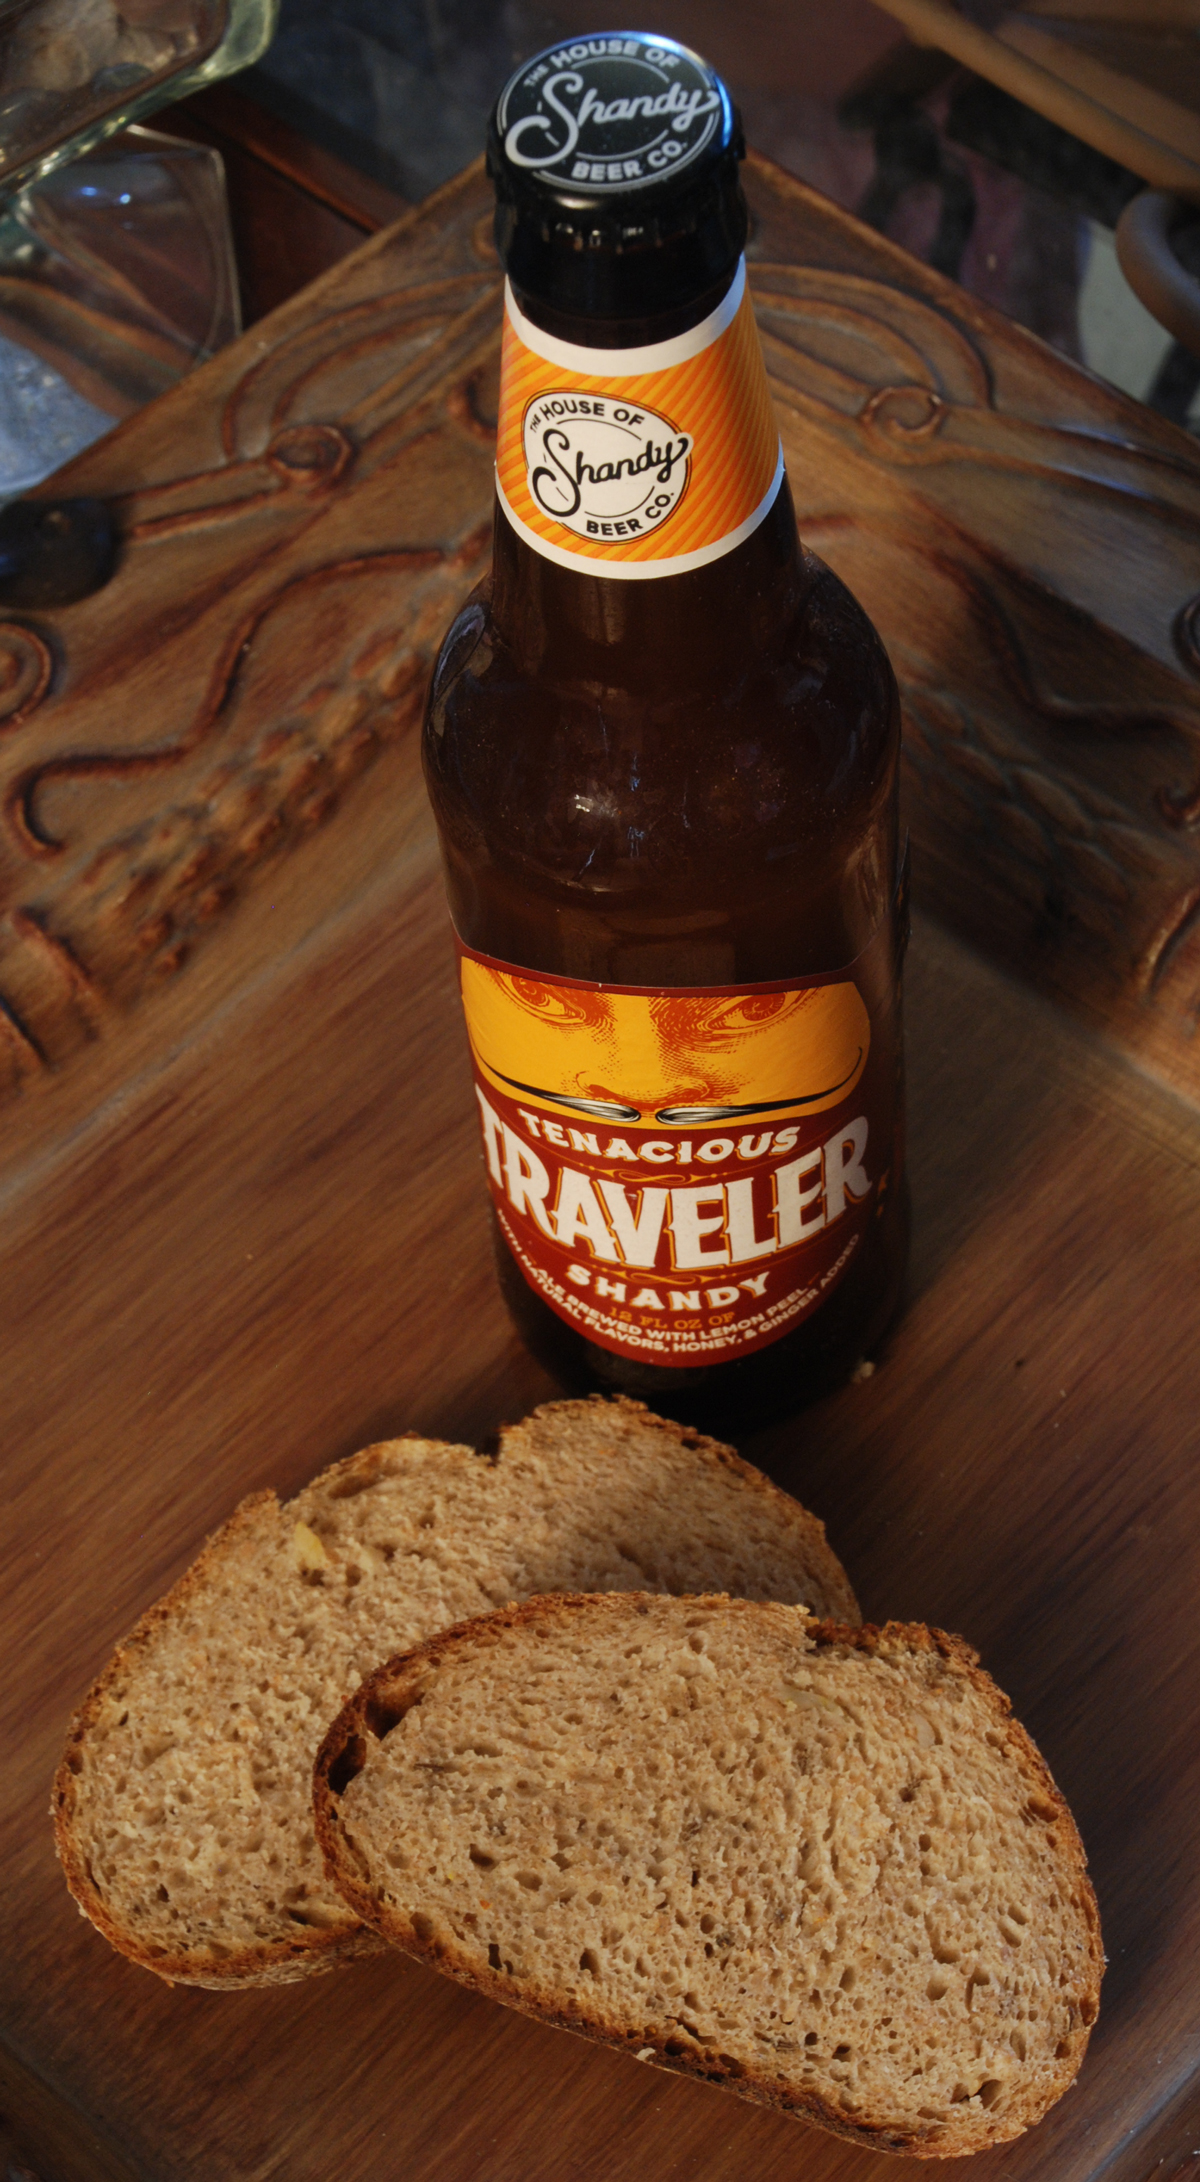
I also picked up some interesting ale at the local supermarket which was brewed with lemon peels, ginger and honey so naturally I needed to use some in this rye bread.

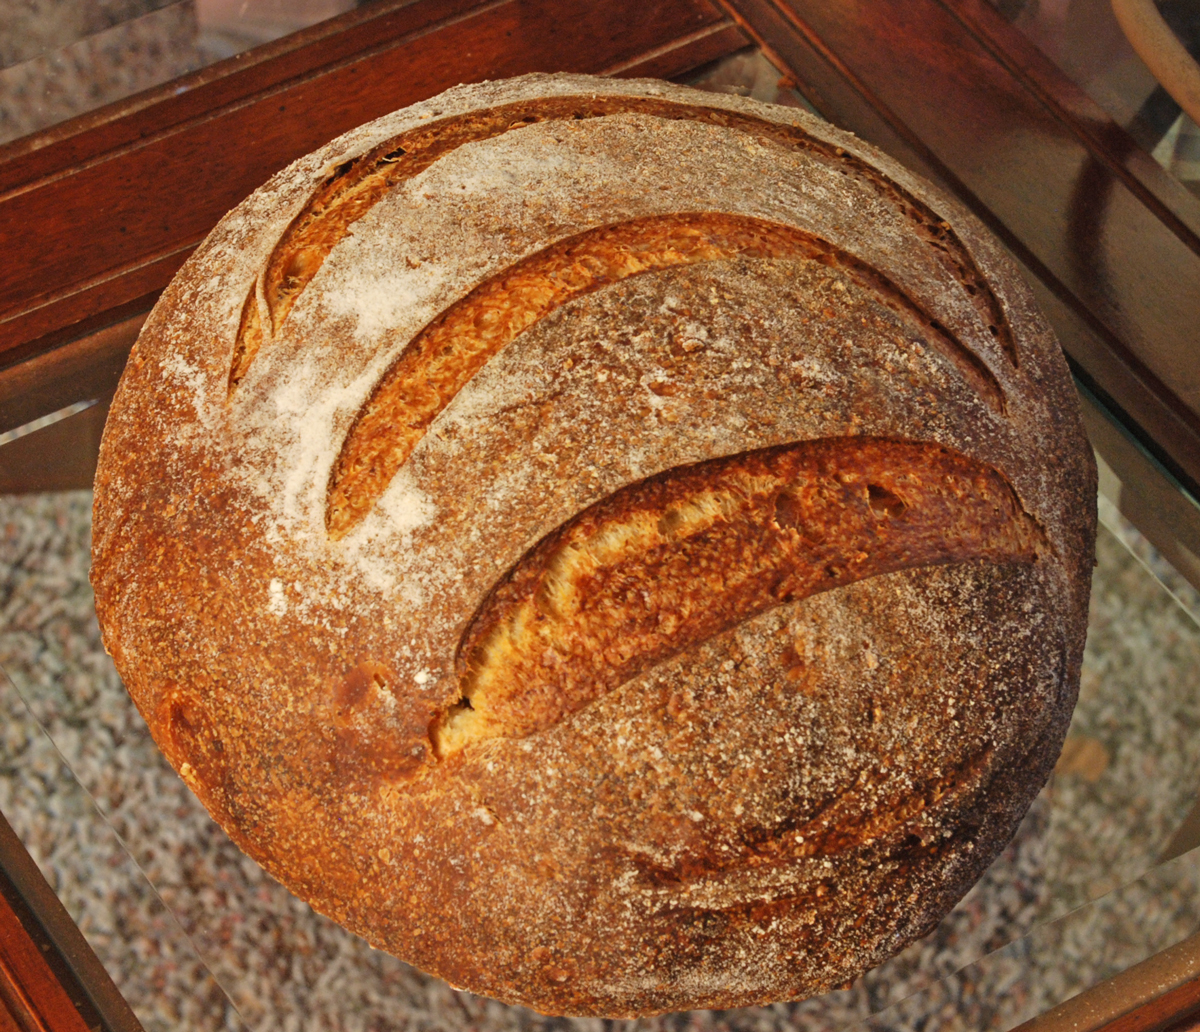
The final loaf ended up being by far one of the best rye breads I have  made to date.  The onions combined with the 2 starters and the ale made this a wonderfully tasty moist bread perfect for a pastrami or corned beef sandwich or a smear of cream cheese.

Procedure

Yeast Water Starter Build 1

60 grams Pumpernickel  Flour (KAF)

60 grams Yeast Water Starter

Mix the flour and Yeast Water in a bowl until thoroughly combined.  Cover the bowl and let it sit at room temperature for around 6 hours.  The starter should almost double when ready to proceed to build 2.

Build 2

Add ingredients below to starter from above and mix until incorporated.  Cover with plastic wrap and let sit at room temperature for 6 hours.

100 grams Pumpernickel Flour

100 grams Yeast Water

Build 3

Add flour to starter from above and mix until incorporated.  Cover with plastic wrap and let sit at room temperature for 4 hours or until bubbly and either use immediately or put in the refrigerator for the next day.

100 grams Pumpernickel Flour

10 grams Yeast Water

(Note: I made extra starter since I wanted to use this for another bake.  You can cut the amounts down to make the 125 grams needed in the recipe)

Rye Sour Starter Build 1

63 grams AP Starter

63 Pumpernickel Starter

75 grams Water

Mix the flour, starter and water in a bowl until thoroughly combined.  Cover the bowl and let it sit at room temperature for around 4-6 hours.  The starter should almost double when ready to proceed to build 2.

Rye Sour Starter Build 2

100 Pumpernickel Flour

100 grams Water

123 grams Sautéed Onions (sautéed in olive oil)

Mix the flour and water with the sour starter from build 1 along with the onions.  Cover and let sit at room temperature for 4-6 hours until doubled and nice and bubbly.

Rye Sour Starter Build 3

102 grams Pumpernickel Flour

Add the flour to the rye sour from build 2 and let it rest covered for 4-6 hours until bubbly and nearly doubled.

Main Dough Ingredients

300 grams Rye Starter from Above

125 grams Yeast Water Rye Starter from Above

400 grams First Clear Flour (KAF)

80 grams White Rye Flour (KAF)

50 grams Rye Chops (KAF)

30 grams Potato Flour (KAF)

357 grams Tenacious Traveler Shandy Ale

18 grams Seas Salt or Table Salt

8 grams Caraway Seeds

1 Large Egg (for egg wash only)

Procedure

Build your Yeast Water levain and rye sour starter the day before you are ready to bake.

The evening before you want to bake, mix the flours, rye chops, caraway seeds and the ale.  Mix on low-speed in your stand mixer or by hand for about 1 minute until the ingredients are combined.  Let the dough autolyse for about 20 minutes to an hour.

Next add both levains along with the salt and mix for 4 minutes on low.  The dough will come together and be slightly sticky.  Place the dough in a slightly oiled bowl and do a couple of stretch and folds.  Cover the bowl and let it rest for 10-15 minutes.  Do another stretch and fold in the bowl and let it rest another 10-15 minutes.  Do another stretch and fold and let the dough sit out in the covered bowl for another 1.5 hours.  Place the dough in the refrigerator until ready to bake the next day.

When ready to bake take the dough out and leave it covered in your bowl for 1.5 to 2 hours.  Next divide the dough into 2 loaves and either place in a banneton or from into batards and let them rest in floured couches for 1.5 - 2 hours.

About one hour before ready to bake, set your oven for 500 degrees F.and make sure you prepare it for steam.  I have a baking stone on the top shelf and the bottom and use a heavy-duty rimmed baking pan that I pour 1 cup of boiling water into right as I put the loaves into the oven.

Score the loaves as desired and brush each loaf with a simple egg wash using 1 whole egg and a couple of teaspoons of water.

When ready to bake place the loaves into your oven on  your oven stone with steam and lower the temperature immediately to 450 degrees.  It should take around 30 minutes to bake  until the rye breads  are golden brown and reached an internal temperature of 200 - 205 degrees F.

Let the loaves cool down for at least an 2 hours or so before eating as desired.


Isand66's picture
Isand66

I wanted to make a bread to bring into my new office and my wife had just cooked some bacon for our grilled cheese with bacon sandwiches so naturally I needed to use the left-overs in a bread.  I started out with the Italian Country Bread from Peter Reinhart's BBA book and changed most of the ingredients while adding a few additional as well.

I used my AP starter instead of a biga and I added some maple syrup instead of sugar.  The combination of flours I used along with some cracked wheat and wheat germ turned this into a great rustic bread with a nice chewy crust and open crumb.

My only regret is I didn't double the recipe so I had an extra loaf for myself.  The new office crowd devoured it and commented that I was welcome to bring in additional bread whenever I visited.

Ingredients

453 grams 65% Hydration Starter Refreshed

84 grams First Clear Flour

84 grams Sir Lancelot High Gluten Flour (KAF)

84 grams Durum Flour

28 grams European Style Flour (KAF)

28 grams Potato Flour

24 grams Wheat Germ

16 grams Cracked Wheat

18 grams Olive Oil

18 grams Maple Syrup

226 grams Water at room temperature

11 grams Sea Salt or Table Salt

36 grams Chopped Cooked Bacon (feel free to add more if desired)

Directions

Using your stand mixer or by hand, mix the flours and cracked wheat and wheat germ together with the water and maple syrup for 1 minute just until it starts to come together.  Let the dough autolyse for 20 minutes to an hour.  This will let the flour absorb the water.

Next, add the starter by breaking it up into pieces and mix along with the salt for 3 minutes.  After 3 minutes add the bacon to incorporate it into the dough and mix for 1 more minute.  You should end up with a slightly sticky ball of dough that has started to become smooth.

Remove dough to your lightly floured work surface and need for 1 minute and form a ball.

Leave uncovered for 10 minutes.

Do a stretch and fold and form into a ball again and cover with a clean moist cloth or oiled plastic wrap.

After another 10 minutes do another stretch and fold and put into a lightly oiled bowl that has enough room so the dough can double overnight.

Leave the covered dough in your bowl at room temperature for 2 hours and then put it in your refrigerator overnight or up to 2 days.

When ready to bake the bread, take the bowl out of your refrigerator and let it rest at room temperature for 2 hours.  After 2 hours shape the dough as desired being careful not to handle the dough too roughly so you don't de-gas it.  Place it in your bowl, banneton or shape into baguettes.

Let it sit at room temperature for 2 hours covered with oiled plastic wrap or a wet cloth.

Pre-heat oven with baking stone (I use one on bottom and one on top shelf of my oven), to 500 degrees F.

Slash loaves as desired and place empty pan in bottom shelf of oven.

Pour 1 cup of very hot water into pan and place loaves into oven.

Lower oven to 450 Degrees and bake for 25 - 35 minutes until bread is golden brown and internal temperature reaches 200 degrees.

Let cool on cooling rack for at least 2 hours and enjoy!

I think I have a ghost in my house...or a hungry cat!
Crust and Crumb came out very tasty


Isand66's picture
Isand66

Sorry for the delay in posting but it's been a crazy past couple of weeks.  First we were away for the entire week of Thanksgiving and then as soon as we got home the Monday after I had to drive to PA to start my new job.  I just got home last night after basically being away for 2 weeks so it's nice to sleep in my own bed and see my kitties and my wife of course.

Anyway, below is the post I was writing in North Carolina but never posted since I lost my internet connection.

We made our annual pilgrimage to North Carolina the Saturday before the big day and once we arrived we began the baking preparations.

While my wife was busy making assorted pies and cheesecake plus guacamole I made two different types of rolls.   The first one I baked was a version of my recent Cream Cheese Sourdough bread with some slight modifications including the addition of roasted sweet potatoes.

The end result was a tasty fluffy roll that went perfect with the fried and baked turkeys, mashed potatoes, and other assorted delicious side dishes.

Even though these require a little extra effort with the egg whites, they are worth it and I guarantee you will gobble these up with or without Mr. Turkey!

I have to say the end result was exactly what I was hoping for and more.  The crust is perfect with a nice airy open crumb and the taste is nice and nutty but light.  The malted wheat flakes add a nice element in the crumb as well.

This is a perfect bread for just about anything so I hope you give it a try.

I used my standard 65% AP starter for this recipe.

Directions

AP Starter

227 grams AP Flour

71 grams AP Seed Starter

151 grams Water at Room Temperature (80-90 degrees F.)

Mix ingredients in a bowl until thoroughly combined.  Cover the bowl and let it sit at room temperature for around 8 hours.  The starter should almost double when ready to proceed.  You can either mix in final dough or put in refrigerator for at most 1 day before using.  If your kitchen is warmer than mine which is usually about 70-72 degrees with my air-conditioning you can proceed sooner.

Main Dough Ingredients

425 grams Refreshed AP Starter (65% hydration) from above

150 grams European Style Flour (KAF, you can substitute bread flour with a little whole wheat mixed in)

50 grams Wheat Germ

200 grams French Style Flour (KAF, you can substitute AP flour if necessary)

50 grams Oat Flour (KAF)

50 grams White Rye Flour (KAF)

65 grams Potato Flour

40 grams Malted Wheat Flakes

224 grams Softened Cream Cheese (1 Package)

132 grams Egg Whites (4 large eggs)

25 grams Raspberry Balsamic Vinegar

16 grams Seas Salt or Table Salt

343 grams Water at Room Temperature

Procedure

In the bowl of your mixer using your beater attachment whip the egg whites on the highest speed until stiff peaks are formed.  Set aside while you mix the main dough below.

Mix the flours, and malted wheat flakes and wheat germ with the water in your mixer or by hand for 1 minute.   Next fold in the egg whites by hand and let it rest covered in your bowl for 20-30  minutes.   Next cut the starter into small pieces and add to the flour mixture in the bowl and also add the oil, salt, cream cheese and vinegar.  Mix for 4 minute to incorporate all the ingredients.

Next take the dough out of the bowl and place it in an oiled bowl or container.  Do a stretch and fold and rest the dough uncovered for 20 minutes.  After the rest do another stretch and fold and cover the dough and let it rest for 10 minutes.  Do one more stretch and fold and put the dough into a lightly oiled bowl and let it sit at room temperature covered for 2 hours (if it is already in a bowl just make sure to cover it).   (Note: since this dough is very wet, I did 2 extra stretch and folds in the bowl and one additional one right before putting it in the refrigerator).  After 2 hours you can put the dough into the refrigerator for 24 hours or up to 2 days before baking.    I baked the bread about 24 hours later.

The next day (or when ready to bake) let the dough sit out at room temperature for 2  hours.

Next, form the dough into rolls and put them on a baking sheet and let them rise covered for 2 hours or until they pass the poke test.  Just make sure to not let them over-rise.

When read to bake prepare an egg-wash by beating 1 egg with some water and brush on the rolls.

Set your oven for 500 degrees F. at least 45 minutes before ready to bake.  When ready to bake place the loaves into your on  your oven stone with steam and lower the temperature immediately to 450 degrees.    When the rolls are nice and brown and reached an internal temperature of 200 degrees F. you can remove them from the oven. It should take about 25 minutes for the rolls to finish.

Let the rolls cool down for at least an hour or  so before eating as desired.

Isand66's picture
Isand66


I based this recipe loosely on an old yeast based recipe I had created many years ago which always came out nice and light and moist.  I wanted to make a nice light and airy sourdough loaf using whipped egg whites and cream cheese for a nice flavorful texture.  I like to think my bread making is much more sophisticated now than 15 years ago when I first made this recipe.  Back then I was not into sourdough yet and had just graduated from the bread maker to a Kitchen Aid stand mixer.  Now, I prefer bread that has layers of flavor and a nice chewy crust.

In order to accomplish my goal of a light and airy bread but with a nice crust and layers of flavor I used wheat germ, malted wheat flakes and oat flour to give the finished product a nice nutty flavor.  I used a combination of French style flour and European style flour from KAF along with some white rye and potato flour as well as some raspberry balsamic vinegar.

I have to say the end result was exactly what I was hoping for and more.  The crust is perfect with a nice airy open crumb and the taste is nice and nutty but light.  The malted wheat flakes add a nice element in the crumb as well.

This is a perfect bread for just about anything so I hope you give it a try.

I used my standard 65% AP starter for this recipe.

Directions

AP Starter

227 grams AP Flour

71 grams AP Seed Starter

151 grams Water at Room Temperature (80-90 degrees F.)

Mix ingredients in a bowl until thoroughly combined.  Cover the bowl and let it sit at room temperature for around 8 hours.  The starter should almost double when ready to proceed.  You can either mix in final dough or put in refrigerator for at most 1 day before using.  If your kitchen is warmer than mine which is usually about 70-72 degrees with my air-conditioning you can proceed sooner.

Main Dough Ingredients

425 grams Refreshed AP Starter (65% hydration) from above

150 grams European Style Flour (KAF, you can substitute bread flour with a little whole wheat mixed in)

50 grams Wheat Germ

200 grams French Style Flour (KAF, you can substitute AP flour if necessary)

50 grams Oat Flour (KAF)

50 grams White Rye Flour (KAF)

65 grams Potato Flour

40 grams Malted Wheat Flakes

224 grams Softened Cream Cheese (1 Package)

132 grams Egg Whites (4 large eggs)

25 grams Raspberry Balsamic Vinegar

16 grams Seas Salt or Table Salt

343 grams Water at Room Temperature

Procedure

In the bowl of your mixer using your beater attachment whip the egg whites on the highest speed until stiff peaks are formed.  Set aside while you mix the main dough below.

Mix the flours, and malted wheat flakes and wheat germ with the water in your mixer or by hand for 1 minute.   Next fold in the egg whites by hand and let it rest covered in your bowl for 20-30  minutes.   Next cut the starter into small pieces and add to the flour mixture in the bowl and also add the oil, salt, cream cheese and vinegar.  Mix for 4 minute to incorporate all the ingredients. I mixed on speed #1 for 3 minutes and speed #2 for 1 minutes.   Note this is a very wet dough but resist the urge to add too much flour as you don't want the dough to become too stiff.

Next take the dough out of the bowl and place it in an oiled bowl or container.  Do a stretch and fold and rest the dough uncovered for 20 minutes.  After the rest do another stretch and fold and cover the dough and let it rest for 10 minutes.  Do one more stretch and fold and put the dough into a lightly oiled bowl and let it sit at room temperature covered for 2 hours (if it is already in a bowl just make sure to cover it).   (Note: since this dough is very wet, I did 2 extra stretch and folds in the bold and one additional one right before putting it in the refrigerator).  After 2 hours you can put the dough into the refrigerator for 24 hours or up to 2 days before baking.    I baked the bread about 24 hours later.

The next day (or when ready to bake) let the dough sit out at room temperature for 2  hours.

Next, form the dough into your desired shape and put them in floured bannetons, bowls or on a baking sheet and let them rise covered for 2 hours or until they pass the poke test.  Just make sure to not let them over-rise.

I made one large boule and used a basket with a floured linen liner.

When read to bake, score the loaf as desired and prepare your oven for baking with steam.

Set your oven for 500 degrees F. at least 45 minutes before ready to bake.  When ready to bake place the loaves into your on  your oven stone with steam and lower the temperature immediately to 450 degrees.    When both loaves are golden brown and reached an internal temperature of 200 degrees F. you can remove them from the oven.  Since this was one large loaf it took about 55 minutes to bake.  (Note: since I made one large Miche I had to lower the temperature to around 425 degrees F. with about 20 minutes to go so the crust would not get too dark).

Let the loaves cool down for at least an 3 hours or so before eating as desired.

 
Isand66's picture
Isand66

If you live in New York like me you are spoiled as there is little doubt we have more bagel shops than anywhere in the country and most of them are very good.  I have tried bagels in other cities and usually they taste like a dense tasteless ball of dough.  Since I usually can get great bagels in my town I usually don't make them myself but I figured I would give it a go with a twist of course.

I decided to use my apple/blueberry yeast water to make a durum and high gluten flour starter.  I built this as usual in 2 steps as outlined below and I used King Arthur's Sir Lancelot high gluten flour along with some more durum flour in the final dough.

To shape the bagels I used the technique outlined in the excellent book "Inside the Jewish Bakery" which instructs you to form the dough into ropes and after cutting off the correct size piece to adjoin the rope together and roll out to seal.

I must admit I need more practice with this technique as some of my bagels ended up looking like a blind man-made them.

The end result was satisfactory.  The durum combined with the yeast water provided a nice slightly nutty flavor with a nice moist crumb.  I don't think I'm ready to open up my own bagel shop yet, but overall they made a nice toasted bagel with cream cheese.

Directions for Yeast Water Levain

Yeast Water Starter Build 1

60 grams Sir Lancelot High Gluten Flour (KAF)

60 grams Durum Flour (KAF)

120 grams Yeast Water Starter

Mix the flour and Yeast Water in a bowl until thoroughly combined.  Cover the bowl and let it sit at room temperature for around 4 hours.  The starter should almost double when ready to proceed to build 2.

Build 2

Add ingredients below to starter from above and mix until incorporated.  Cover with plastic wrap and let sit at room temperature for 4 hours.

50 grams Sir Lancelot High Gluten Flour (KAF)

50 grams Durum Flour (KAF)

100 grams Yeast Water Starter

Main Dough Ingredients

400 grams Yeast Water Levain from above

450 grams Sir Lancelot High Gluten Flour (KAF)

100 grams Durum Flour

38 grams Vegetable Oil

25 grams Malt Barley Syrup

14 grams Seas Salt or Table Salt

170 grams Water at Room Temperature

Procedure

Mix the levain with the water to break it up in your mixer or by hand.  Next mix the rest of the ingredients in your mixer or by hand for 2 minutes on speed #1.  Change to speed #2 for 4 minutes and then place on your work surface and knead by hand for about 2 minutes.  You should not have to add any flour as the dough should be tacky  but pretty stiff and easy to knead.

Place the dough in a lightly oiled bowl and cover it.  Let it rest in the bowl for 3 hours.  After 3 hours turn the dough out onto your unfloured work surface and form the dough into a log shape.  Cut it into 2 pieces and roll each piece into a 2" diameter rope.  Let it rest covered for about 20 minutes to relax the dough.  Roll one of the ends of the rope into a strand about 8 to 10 inches long and wrap it around your knuckles and break it off with your thumbnail or a bench scraper.  Roll the overlapping ends against your work surface to seal the bagel.  You may need to spray some water on the surface to help roll and seal the bagels.

Place the bagels on a parchment lined baking sheet and cover with oil sprayed plastic wrap.  Place the bagels in your refrigerator overnight to develop the maximum flavor.

The next morning heat your oven to 460 degrees F. while at the same time prepare a large pot of water and bring to a rolling boil.  Add another 25 grams of malt syrup to the boiling water (note this is not listed in the total ingredients).  Next add 2-3 bagels at a time in the boiling water and remove them once they start to float.

Place the bagels on a cooling rack and immediately add your toppings of choice.  I used toasted onions, poppy seeds, toasted garlic mix and parmesan cheese mix.

Once the oven has come up to temperature, place the bagels on your baking sheet again and bake for 15 to 20 minutes until they are nice a brown.

Remove them from the oven when done and let cool on a rack for about 20 minutes or longer before diving in.


Cosmo Waiting Patiently for a Bagel

Isand66's picture
Isand66

The storm is upon us as I try to write this post before losing power.  Hurricane Sandy is set to touch down in a few hours but already the wind is howling and the water is starting to rise over the docks on Long Island.

I baked this rye bread yesterday in preparation for possibly not having any bread or water for a while. Fortunately it came out as good as I could hope with the addition of a corn slurry added which added some nice moisture to the overall bread.

I built up a yeast water starter using white rye and pumpernickel flour in two builds and also used some of my existing AP sourdough starter as well.

Directions for Yeast Water Levain

Yeast Water Starter Build 1

40 grams White Rye Flour (KAF)

40 grams Pumpernickel Flour (KAF)

80 grams Yeast Water Starter

Mix the flour and Yeast Water in a bowl until thoroughly combined.  Cover the bowl and let it sit at room temperature for around 4 hours.  The starter should almost double when ready to proceed to build 2.

Build 2

Add ingredients below to starter from above and mix until incorporated.  Cover with plastic wrap and let sit at room temperature for 4 hours.

100 grams Pumpernickel Flour

100 grams Yeast Water Starter

Main Dough Ingredients

345 grams Rye Starter from above

80 grams AP Sourdough Levain Refreshed (65% Hydration)

305 grams First Clear Flour (KAF)

75 grams Potato Flour (Bob's Red Mill)

100 grams Pumpernickel Flour (KAF)

85 grams Corn Flour (Bob's Red Mill)

50 grams Rye Chops

141 grams Corn Slurry (1 small can of corn put in food processor for about 30 seconds, water drained before processing)

22 grams Pistachio Oil (You can sub Olive Oil or Vegetable Oil or any nut oil)

18 grams Seas Salt or Table Salt

350 grams Water at Room Temperature

Procedure

Mix the starters (levains) with the water to break them up in your mixer or by hand.  Next mix the flours, and rye chops with the starters in your mixer or by hand for 1 minute. Let it rest covered in your bowl for 20-30  minutes.   Next  add the oil, salt, and the corn slurry mix for 4 minute to incorporate all the ingredients. I mixed on speed #1 for 3 minutes and speed #2 for 1 minutes.   The dough should have come together in a ball and will be pretty sticky from the high percentage of rye flour.

Next take the dough out of the bowl and place it an oiled bowl or container.  Do a stretch and fold and rest the dough for 30 minutes.  After the rest do another stretch and fold and cover the dough and let it rest for 30 minutes.  Do one more stretch and fold and let it sit at room temperature covered for 2 hours.  After 2 hours you can put the dough into the refrigerator for 24 hours or up to 2 days before baking.  Feel free to do some additional S & F's if you feel it is necessary.  I baked the bread about 24 hours later.

The next day (or when ready to bake) let the dough sit out at room temperature for 2  hours.

Next, form the dough into your desired shape and put them in floured bannetons, bowls or on a baking sheet and let them rise covered for 2 hours or until they pass the poke test.  I used my baker's couche to let the batards rise.  Just make sure to not let them over-rise.  Note this dough is going to be very sticky so resist the urge to use too much flour just use enough to prevent sticking.

Score the loaves as desired and prepare your oven for baking with steam.

Set your oven for 500 degrees F. at least 30 minutes before ready to bake.  When ready to bake place the loaves into your on  your oven stone with steam and lower the temperature immediately to 450 degrees.    When both loaves are golden brown and reached an internal temperature of 200 degrees F. you can remove them from the oven.

Let the loaves cool down for at least an 3 hours or so before eating as desired.

Isand66's picture
Isand66

Following up on the success I had with the 36 hour Durum Semolina SD bread I made last week I wanted to try a Pain au Levain version and see if I could get similar results.

I have been waiting for the right bread to use my new square-shaped cake pan with a middle column.  Unfortunately this didn't really work the way I hoped and instead of a square loaf with a hole in the middle I ended up with a horseshoe-shaped loaf and a pretty big one at that!

Using this time intensive 36 hours plus technique I learned from TxFarmer's blog posts I have to say I was very happy with the final result. The dough was again nice and silky to work.  The crumb was nice and open with a nice crisp and dark crust.  The taste from the sprouted whole wheat in the levain along with the spelt in the final dough provided a nice earthy and nutty flavor to this bread.

Directions

Starter Build 1

30 grams Seed Starter (Mine is a 65% White AP starter)

22 grams Spouted Whole Wheat or Regular Whole Wheat Flour

38 grams French Style Flour (KAF or AP Flour)

60 grams Water at Room Temperature (80-90 degrees F.)

Mix ingredients in a bowl until thoroughly combined.  Cover the bowl and let it sit at room temperature for around 8 hours.  The starter should almost double when ready to proceed.    If your kitchen is warmer than mine which is usually about 70-72 degrees with my air-conditioning you can proceed sooner.

Starter Build 2

All Starter from Build #1:

100 grams French Style Flour

37 grams Sprouted Whole Wheat

100 grams Water at Room Temperature (80-90 degrees F.)

Mix ingredients in a bowl until thoroughly combined.  Cover the bowl and let it sit at room temperature for around  4 - 6 hours.  The starter should almost double when ready to proceed.    If your kitchen is warmer than mine which is usually about 70-72 degrees with my air-conditioning you can proceed sooner.

Main Dough Ingredients

300 grams  Starter  from above (note: you should have a small amount left over)

150 grams Whole Spelt Flour

700 grams French Style Flour (KAF)

20 grams Seas Salt or Table Salt

590 Ice Water

Procedure

Mix the flour and the ice water together in your mixer or by hand until it just starts to come together, maybe about 1 minute.  Put the dough in a slightly covered oiled bowl and put in the refrigerator for 12 hours.

The next day add your starter and salt to the dough and mix by hand until it is thoroughly mixed and evenly distributed.  Due to the high water content in the 100% hydration starter this dough is very easy to mix by hand and is very silky and smooth.

Bulk rise at room temperature for 2-3 hours until it grows around 1/3 in volume doing stretch and folds every half hour until it has developed the correct amount of strength.

Put the dough back into the refrigerator for around 20-24 hours.  I took it out about 20 hours later.

When you take the dough out of the refrigerator you want it to have almost doubled in volume.  Mine only rose about 1/3 in volume.  Let it rise at room temperature for around 2 hours or until the dough has doubled from the night before.

Next, divide the dough and shape as desired.  I made a battard and placed it in my square pan.

Cover the dough with a moist towel and let sit at room temperature for 1.5 to 2 hours.

Score as desired and prepare your oven for baking with steam.

Set your oven for 500 degrees F. at least 45 minutes before ready to bake.  When ready to bake place the loaves into your on  your oven stone with steam and lower the temperature immediately to 450 degrees.    When both loaves are golden brown and reached an internal temperature of 205 degrees F. you can remove them from the oven.

Let the loaves cool down for at least an 3 hours or so before eating as desired.

Be sure to visit my other blog at www.mookielovesbread.wordpress.com for all of my recipes.

Isand66's picture
Isand66

I have not made any rolls in a while and since my wife insisted on some "simple" rolls for our lunch sandwiches this weekend I decided to whip something up using instant yeast instead of my sourdough starter or yeast water starter.

I had some left over mashed potatoes so I wanted to use those in the recipe.  I love using Durum flour in my breads so I used an almost 50% mix of Durum with a high protein flour from KAF, called Sir Lancelot to offset for the lower protein content in the Durum flour.

I recently purchased some Avocado Oil so of course I needed to add some in this recipe along with some Agave Nectar for a little sweetness.

The dough was retarded overnight for added flavor and baked this morning.

I do have to say they came out as good as I could have expected.  They are nice and soft and tasty and are going to make a perfect sandwich roll for sure.

Ingredients

400 grams Sir Lancelot Flour (KAF, you can substitute Bread Flour)

374 grams Durum Flour (Do not use fancy Semolina as it is to gritty)

112 grams Mashed Potatoes with Skins

227 grams Water 85 - 90 degrees

255 grams Milk at room temperature

14 grams Instant Yeast

57  grams Avocado Oil

14 grams Seas Salt or Table Salt

60 grams Agave Nectar

Directions

Mix flours with yeast to combine.  Next add remainder of the ingredients .  Mix on low-speed or by hand for 1 minute and let the dough rest for 5-10 minutes to absorb the flour.

Next mix the dough for another 3 minutes on #2 (If you have a dough hook switch use for this step).  The dough should come together and be scraping the side of the mixing bowl and be nice and fairly smooth but still tacky.

Remove the dough to your work surface and knead by hand for 1 minute.  Do about 3-4 stretch and folds and put in a well oiled bowl or container with a cover.  Put it in your refrigerator immediately.

You can keep it in your refrigerator for about 24 to 36 hours.  I ended up baking it in the morning so it was only in my refrigerator for around 14 -15 hours.   The dough should double while in the refrigerator.

When ready to bake the rolls or bread, take it out of the refrigerator and immediately weigh out your pieces or loaves and shape as desired.  I made rolls and let them rise for 1 hour on a cookie sheet with parchment paper.

After 45 minutes turn your oven up to 350 degrees F. and prepare your rolls as desired.  I beat 1 whole egg mixed with a little water and put an egg wash on each roll.  I also added some toasted onions to some and some dried cheese mix on some as well.  At the 1 hour or so mark pop them in the oven and turn once after about 15 minutes.  These should take about 25 minutes to cook thoroughly.

Let them cool on wire rack for at least half an hour before digging in if you can wait that long.

Isand66's picture
Isand66

A few weeks ago I finally had some good results with TxFarmer's 36 Hour Baguette recipe and I have been wanting to try making some boules with this technique and see how they turned out.  I decided to make a Durum starter and I cut the hydration down slightly from the baguette recipe.  I followed the same basic method for mixing and retarding the dough with some slight modifications including using my mixer for the initial mix.  I doubled the recipe from the baguette recipe so I could make 2 large boules.

The end result was a nice open crumb with an excellent crunchy crust and a nice buttery flavor.  I do have to say while mixing this dough following this method it created one of the smoothest and most silky dough I have made to date.

Directions

Semolina Starter Build 1

30 grams Seed Starter (Mine is a 65% White AP starter)

60 grams Durum Flour (Do not use the Fancy Course Semolina)

60 grams Water at Room Temperature (80-90 degrees F.)

Mix ingredients in a bowl until thoroughly combined.  Cover the bowl and let it sit at room temperature for around 8 hours.  The starter should almost double when ready to proceed.    If your kitchen is warmer than mine which is usually about 70-72 degrees with my air-conditioning you can proceed sooner.

Semolina Starter Build 2

Add to Build 1 Starter:

100 grams Durum Flour

100 grams Water at Room Temperature (80-90 degrees F.)

Mix ingredients in a bowl until thoroughly combined.  Cover the bowl and let it sit at room temperature for around  4 - 6 hours.  The starter should almost double when ready to proceed.    If your kitchen is warmer than mine which is usually about 70-72 degrees with my air-conditioning you can proceed sooner.

Main Dough Ingredients

300 grams Durum Starter  from above (note: you should have a small amount left over)

400 grams Durum Style Flour (KAF)

150 grams Whole Spelt Flour

300 grams French Style Flour (KAF)

590 Ice Water

20 grams Sea or Table Salt

Procedure

Mix the flour and the ice water together in your mixer or by hand until it just starts to come together, maybe about 1 minute.  Put the dough in a slightly covered oiled bowl and put in the refrigerator for 12 hours.

The next day add your starter and salt to the dough and mix by hand until it is thoroughly mixed and evenly distributed.  Due to the high water content in the 100% hydration starter this dough is very easy to mix by hand and is very silky and smooth.

Bulk rise at room temperature for 2-3 hours until it grows around 1/3 in volume doing stretch and folds every half hour until it has developed the correct amount of strength.

Put the dough back into the refrigerator for around 20-24 hours.  I took it out about 20 hours later.

When you take the dough out of the refrigerator you want it to have almost doubled in volume.  Mine only rose about 1/3 in volume.  Let it rise at room temperature for around 2 hours or until the dough has doubled from the night before.

Next, divide the dough and shape as desired.  I made 2 boules and placed them in their respective baskets.

Cover the dough with a moist towel and let sit at room temperature for 1.5 to 2 hours.

Score the loaves as desired and prepare your oven for baking with steam.

Set your oven for 500 degrees F. at least 45 minutes before ready to bake.  When ready to bake place the loaves into your on  your oven stone with steam and lower the temperature immediately to 450 degrees.    When both loaves are golden brown and reached an internal temperature of 205 degrees F. you can remove them from the oven.  .

Let the loaves cool down for at least an 3 hours or so before eating as desired.

Please feel free to visit my other blog at www.mookielovesbread.wordpress.com for all my recipes.

Isand66's picture
Isand66

Mookie likes to get his way and when he wants something he lets me know it.  For example, when he wants breakfast he will knock everything he can off of my night stand until I get up and feed him.  When he wants dinner he will flop down by the door when I come home and insist on a belly rub until he is satisfied and then run to the kitchen and yell at me to feed him.

Here is my belly...what are you waiting for?

He will wait by the closet in the kitchen where the food is until he is satisfied that the can of food I have chosen meets his standard.  So I really didn't have a choice when Mookie told me he was tired of not having a bread named after him and if I didn't rectify the situation there would be serious consequences.

For this reason and this reason alone, I present to you a bread worthy of its namesake.  Mookie loves hot cocoa and he is a big potato fan as well.  This bread also has some espresso powder, pistachio oil, and assorted flours since Mookie has a sophisticated palate.

Mookie did insist on having the bread have his likeness on it, so since I don't have a cat mold I used a cookie cutter to make a bread cookie to adorn the top of the bread.  I am not sure if he approves of how it looks since it doesn't have any white in it, but he said he will overlook that if it tastes good.

I am happy to report that the bread is nice and moist and you taste the espresso powder and a hint of the hot chocolate.  The rye chops and First Clear flour along with the Oat flour and White Rye give this bread a nice earthy flavor that Mookie liked so much he refused to share it with his brother and 3 sisters.

I made 1 large boule with this recipe but you can easily make 2 smaller loaves if desired.

The total hydration of this dough is 71% which made a nice wet dough and a final moist loaf.

I used my standard 65% AP starter for this recipe.

Directions

AP Starter

227 grams AP Flour

71 grams AP Seed Starter

151 grams Water at Room Temperature (80-90 degrees F.)

Mix ingredients in a bowl until thoroughly combined.  Cover the bowl and let it sit at room temperature for around 8 hours.  The starter should almost double when ready to proceed.  You can either mix in final dough or put in refrigerator for at most 1 day before using.  If your kitchen is warmer than mine which is usually about 70-72 degrees with my air-conditioning you can proceed sooner.

Main Dough Ingredients

425 grams Refreshed AP Starter (65% hydration) from above

200 grams European Style Flour (KAF, you can substitute bread flour with a little whole wheat mixed in)

50 grams Wheat Germ

150 grams First Clear Flour (KAF)

70 grams Oat Flour (KAF)

100 grams White Rye Flour (KAF)

70 grams Rye Chops

260 grams Mashed Potatoes (I added a little Greek Yogurt to smooth it out)

14 grams espresso Powder

25 grams Pistachio Oil (You can sub Olive Oil or Vegetable Oil or any nut oil)

16 grams Seas Salt or Table Salt

350 grams Hot Chocolate (Cooled to Room temperature)

Plus 65 grams Water at Room Temperature

797 grams Total Flour

566 grams Total Liquid

71% Hydration

Procedure

Mix the flours, and rye chops with the hot chocolate  in your mixer or by hand for 1 minute. Let it rest covered in your bowl for 20-30  minutes.   Next cut the starter into small pieces and add to the flour mixture in the bowl and also add the oil, salt, potatoes and the water.  Mix for 4 minute to incorporate all the ingredients. I mixed on speed #1 for 3 minutes and speed #2 for 1 minutes.   The dough should have come together in a ball and be tacky but not too sticky.

Next take the dough out of the bowl and place it on your work surface or as in this case place it in an oiled bowl or container.  Do a stretch and fold and rest the dough uncovered for 10 minutes.  After the rest do another stretch and fold and cover the dough and let it rest for 10 minutes.  Do one more stretch and fold and put the dough into a lightly oiled bowl and let it sit at room temperature covered for 2 hours (if it is already in a bowl just make sure to cover it).   After 2 hours you can put the dough into the refrigerator for 24 hours or up to 2 days before baking.  Feel free to do some additional S & F's if you feel it is necessary.  I baked the bread about 24 hours later.

The next day (or when ready to bake) let the dough sit out at room temperature for 2  hours.

Next, form the dough into your desired shape and put them in floured bannetons, bowls or on a baking sheet and let them rise covered for 2 hours or until they pass the poke test.  Just make sure to not let them over-rise.

I saved a small piece of dough and used a cat shaped cookie cutter to create the Mookie decoration.

I let this rise covered with a towel and when ready to bake the loaves I glued it on the loaf with some water.  In hindsight I should have adhered the dough better as it kind of puffed up and looks like a handle.  Hey, I guess that could be a new concept....a built-in carry handle for your loaf of bread!

Score the loaves as desired and prepare your oven for baking with steam.

Set your oven for 500 degrees F. at least 30 minutes before ready to bake.  When ready to bake place the loaves into your on  your oven stone with steam and lower the temperature immediately to 450 degrees.    When both loaves are golden brown and reached an internal temperature of 200 degrees F. you can remove them from the oven.  Since this was one large loaf it took about 45 minutes to bake.

Let the loaves cool down for at least an 6 hours or so before eating as desired.

Be sure to visit my other blog at www.mookielovesbread.wordpress.com for all my recipes.

I put on this stupid costume so where is my treat!

Pages

Subscribe to RSS - Isand66's blog