The Fresh Loaf

A Community of Amateur Bakers and Artisan Bread Enthusiasts.

teketeke's blog

teketeke's picture
teketeke

Hello everyone,

I have a question of this flour "  King Arthur Special Patent Flour " , which I found at local bakery supply wholesaler.

SPECIAL PATENT

12.7% Protein.50% AshMalted, Enriched

 This "short patent" is a classic spring wheat bread flour milled from the center of the wheat kernel resulting in high protein and low ash. A good fit for hand or machine production. Provides good tolerance and oven spring and is ideal for hearth breads, pan breads, and buns. Also works well for yeasted breakfast pastries.


I found this article about this flour below..


http://www.thefreshloaf.com/node/39784/patent-flour-versus-bread-flour


But I am wondering what is the difference when I make a sourdough loaf with this flour? 
 I often use King Arthur All Purpose flour and 0.93% of Bob's Red Mill's vital wheat gluten flour for my sourdough loaves.


I would appreciate for any thoughts..

Happy baking,

Akiko


teketeke's picture
teketeke

Hello everybody,

It has been long time to come here.

I hope that everybody is good and healthy, which is the most important for our lives, I wonder?


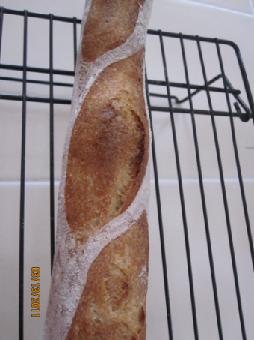
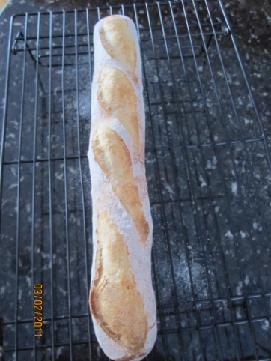
Well, I just started to challenge for a perfect baguette that I had been trying yesterday.

But I have had always a very weak oven.   I can't increase the temperature over 430F. :(

I am not satisfied with crust, neither scoring that I make.


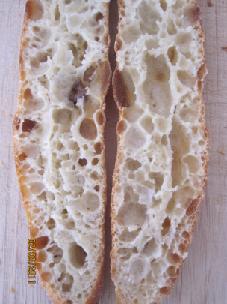
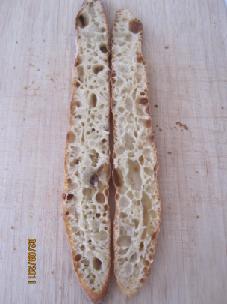
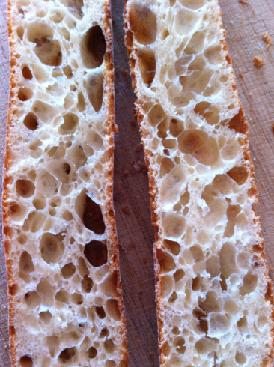
I think that the crumb look fine. but I am really NOT happy with the crust and scoring.

I I can't afford to buy a new oven for sure.   Do you have any suggestions or ideas to make darker crust and have more oven spring? 


 All the best,

Akiko


teketeke's picture
teketeke

Happy Merry Christmas to everybody! and thank you so much, Robyn (RobynNZ)!  She is the one of  TFL members who taught me the great Christmas tree recipe that she found, and more than that, she is  the one who encouraged me to join with TFL. I was very nervous to write about my bread in English. I can't thank her enough as I see that she has been helping everybody here beside me. 

You can see the detail from here.

I hope that everybody will have very nice Christmas and a Happy New Year,

Akiko


teketeke's picture
teketeke

Note:  6/13/2011  To make good crust and flavor for a baguette, especially in summer, I really watch out for the dough temperature more than the time and roomtemperature.


I pulled together in one recipe from my post of Amazing airy baguette that I posted before http://www.thefreshloaf.com/node/22286/amazing-airy-holey-baguettes 

 It has been 2 months since I made a baguette last time that was in April 1st this year. I copied the recipe and method below and baked a baguette today. It came out good. The shaping and scoring are not perfect but I am pleased with it.


 Ingredients:

KA AP 130g

Raisin yeast water 14g

Water 76g ( DDT 69F /20.5℃)

Salt 2.1g

-------------------------------------

Method: ( I always set up at 6pm around so I can bake at 6am next morning)

1. I mixed all the ingredients except the salt for a minute, then add the salt, mix it again for a few minutes with my hands (Dough temperature(DT) 69F)

2. S&F x2 every 30 minutes ( I did in the air with my hands) ( DT was 70F both after the S&F)--Rest at room temperature was 26-28℃ /78.8F-82F for 4.5 hours until the dough is little flat and the surface is slightly bumpy.


3.I moved the dough at room temperature around 18-19℃ for about 8 hours

4. The dough in the morning: I saw a lot of bubbles on the bottom. ( DT62.5F/16.9℃)

5. I put the dough on the floured wood board very gently. The bottom is face now.

Stretch the dough X way to make a rectangle around 35cm x11cm is better ( I stretched too much this time I did 41cmx11cm)

6.Using a ruler, make a fold like the picture. Pat the dough gently and

Put tightly squeezed dump kitchen towels on the dough and take a bench time for 15-20 minutes ( I took 15 minutes )

7. After the bench time,

8. Using your finger tips, pat the dough gently... ( I feel like that I can shape the air in the crumb at this time)

9. Push the edge little harder and Pat the rest of the dough with your finger tips again. ( If I didn't do this process, the crumb was tight... I think that both sides dough need some space to have airy crumb when you roll. )

10. Brush off the excess flour and roll and pinch the seam very well.( This picture is a different one. I just want show you how I pinch the dough)

11. Proof : I put a tightly squeezed dump kitchen towels on the linen, then I put it on the top of the refregerator for 35-40 minutes at 70-71F /21-21.7℃

12 Prepare the steaming towels ( Sylvia's steaming method), Scoring, then ready to bake.

13.Preheated 470F ( I can't use maximum temperature 500F because I broke the fuze twice before- too much baking for baugettes)   

  1) Bake at 470F for 7 minutes with steam ( Sylvia's steaming method http://www.thefreshloaf.com/node/20162/oven-steaming-my-new-favorite-way)

  2) Take out of the steaming towels and a parchement that was on the baguette, then decrease the temperature to 450F  and bake more 13 minutes.

  3) Shut off the oven and open the door a little bit and leave the baguette for 3 minutes in the oven. - I got this idea from David. Thank you, David.


I practice to score baguettes a lot using playdough playing with my daughter because I am not good at it. I used to drag so much.. A couple of my Cookpad friends gave me great advices. I am still afraid of it....

How I score a baguette:

  • Score the right angle 80-90 degrees ( it will be difficult to score at acute angle around 30-45 degrees for wet dough)
  • *Score the dough the same speed and depth.  This is the point  Please read the note below.
  • I recommend you to use a bamboo skewer to get the length that you want( probably 10-11.5cm?)and make a mark with a tooth pick or so. --This is from the book.

1) 2) 3)


 You can prepare the scoring lines using a stick before you acutally score your baguette dough. The red line ( 2.5-3cm )below will be a lap between first score line and the second one, the same lap for the second line and the third one  and other third and forth lones, too.


↑ Note: For*Score the dough the same speed and depth.  I score the top and end that I marked on red  (the picture above) again reversely to make the cut depth evenly because my scoring of the top and end is always shallower.

----------------------------------------------------------------------

How do you slice when you score the dough?

I found out that I can score very straight when I use No.1 way. My Cookpad friend suggested me the way. That is very helpful.. I don't think that my way fit everybody but, It may help some TFL members.

-----------------------------------------------------

I will leave the method to make raisin yeast water for reference.

http://www.thefreshloaf.com/node/23809/how-i-make-and-maintain-raisin-yeast-water

Happy baking,

Akiko

teketeke's picture
teketeke

 Because all of the pictures below are broken. Very sorry for this inconvenience, that my computer crushed and lost all pictures I had.


--------------------------------------------------------------------------------------------------------------------------------------------------------------------------------


Once I had made my raisin yeast water, I really didn't care about methods to make - I had mine, and that was all I cared about. After I was asked by some TFL members about yeast water, I realized that I really didn't know what the nature of raisin yeast water was. I 'd like to leave my recent research and thoughts here for anyone who is interested in for reference.

How to make raisin yeast water

Ingredients:

  •   45 g    Raisins( * I use organic Thompson raisins. they are NOT coated with oil, I recommend to use organic one)
  •   Water  ( I used purified this time, I also use filtered water from a refrigerator. NO using chlorine water .
    •  A jar ( I use emptied jelly jars all the time.)
Method    

Day1:

 1) Sterilize your jar:   put the jar in the boiling water for a few minutes and take it out .     Leave it until it is dry.  2) Add the raisins and the water as to 1:1 ratio like the picture below.
(No chlorine water! It kills yeast!) 3)    Shook the jar vigorously  * Tighten the lid Before shakingAfter shaking vigorously  /   Close up4) Keep the jar at 82 F / 28℃. * Tighten the lid ( The right one is correct. the left jar is the other way to make yeast water )5) 4-5 hours later :  * Keep the jar at 82 F / 28℃. Tighten the lid  Before shaking After shaking vigorously * The raisins are soaked with the water. Now it is the time to add more water.6) Add  some purified water until double the raisins.  After shaking vigorously,* Keep the jar at 82 F / 28℃. Tighten the lid 


Day 2  7)  Shake the jar vigorously as many as you can. * Keep the jar at 82 F / 28℃. Tighten the lid

----   I did that was 6:30 am ~  8:20 pm ---    shook  the jar vigorously 13 times. * Tighten the lid* All of the raisins stayed up to the top of the water.     6:20 am  Before shaking 
 After shaking vigorously   * Tighten the lid


8) At the night *Close the lid not too tight not too loose. 
* I think that the yeast needs to get some little oxygen to breath to activate for over night so I didn'tclose the lid tight anymore because the raisins stayed up to the top of the water for a half day.Day 39) In the morning  Shake the jar vigorously.     *Close the lid not too tight not too loose Before shaking    close up After shaking vigorously      Close up10)   Refrigerate it when you hear shwwwwww... sounds while it was fermented at 82 F.).  *Close the lid tightly  after shaking vigorously.Day 411) in the morning: *Close the lid tightly after shaking vigorously andPut it back in the refrigerator . Before shaking  Close up After shaking vigorously     Close upDay 512) In the morning: Shake the jar vigorously.   Tighten the lid and put it back in the refrigerator.   Before shaking   * I smell a bit strong alcohol smell which means fully fermented but it needs more rest before baking bread.     After shaking vigorously  * The alcohol smells was weaken.( mild level)13) At the night( Approximately 12 hours later)-- READY TO BAKE!To make levain for my sandwich loaf with raisin yeast water.Levain:
  • King Arthur all purpose flour   149g
  •  Raisin yeast water                          107g
----------------The day before-----------1. Pour 107 g raisin yeast water into the container. The taste:  Sweet and little bit of alcohol.The result of the PH level test Between PH 5.5 and 5.75.Added 149 g KA AP  and made the levain.Viscosity: Hard. I had to knead by hand.* "Hard " means that there is a lot of sugar in the dough.------------------------------------------------------------------------------Next day--- Final dough
  •  King Arthur bread flour                       281g
  • 1 egg yolk + Whipping heavy cream=58g
  •  Water                                                            144g
  • Sugar                                                                 13g
  • Butter                                                                29g
  • Salt                                                                    6.8g
Method
  1.  Mix all the final ingredients and the levain except the butter and salt.
  2.  Autolyze 30minutes.
  3.  Add the salt and butter and knead until you pass a window pane test.
  4. Bulk fermentation at the room temperature until triples.
  5. Preshape
  6. Shape
  7. Bake  35 minutes at 410F until golden brown.    *Cold oven method:  Spray a couple time  in the oven and put the loaf in.  Set up 284F for 20 minutes. increase the temperature to 410F for 10 minutes, lotate 180 degree the loaf pan and bake 10 more minutes until golden brown.
The levain rose tripled ( 9 hours later)Bulk fermentation: The final dough rose almost tripled in 5 hours at 72-73F.Final proof: The dough rose over the top of the tin in 2 hours at 82F.Baked for 35 minutes at 410 F.( I couldn't use " cold oven method" because I was using the oven a hour ago before )When I ferment the final dough at colder temp, I can see the cracks.          The taste was really good. nice volume.  The crumb was not wet, it was nice texture.I smelled a bit of fruity smell from the raisins when I sliced it after 5 hours I baked, but the smell was very slightly and very pleasant.-------------------------------------------------------------  Comparison:5/267 :00 am--   From left: No lid / Vigorous shakes/ my old one - generous shakes10:30 am--  From left: No lid/ Vigorous shakes/ my old one5/27 5:50 am  From left: No lid/ Vigorous shakes/ my old one (I just refreshed)Comparison of the crumb:   ( 12 g sugar not 13g  used in the final dough)  Vigorous shakes    No lid* I didn't like No lid bread because I smelled strong yeast like Active dry yeast when I put it in my mouth.No lid raisin yeast water itself  has no strong yeast smell neither taste , which gave me a surprise.Our taste gives us more details than this PH test in my opinion.----------------------------------------------

For reference,  I want to mention about yeast water that I found from some Japanese sites  and the others from winery .

"Yeasts will activate in two different ways:
1. with oxygen:
{Sugar -C6H12O6+Oxygen--O2}→{ Carbon dioxide-Co2+Water -H2O} 
(* We call it " Breath" which means the yeast is active. )

2. with no oxygen:

{Sugar-C6H12O6 }→{Carbon dioxide gas 2(CO2) + Alcohol(Ethyl alcohol)-2(CH3CH2OH)}

(※ We call it "Alcohol fermentation")When there is no sugar in, it turns to acetic acid ( quite sour), except apple and raisin which contain malic acid. ( milder )

When we make raisin yeast water using a jar, The yeast water will activate with the oxygen in the jar first ( Breath), and occur alcohol fermentation when it is no oxygen in the jar. Alcohol has bactericidal action which prevents to have mold and unwanted bacteria. Natural yeast is tolerant to alcohol so that they live together, however, he doesn't grow without new oxygen.While alcohol fermentation is working, natural yeast stops growing, therefore, it is not time to congratulate yourself yet because of the bubbles ( carbon dioxide gas) , you have to get more oxygen to have your yeast water activate by loosing a lid to access air ( oxygen) into your yeast water.

To make non sour bread, grow Saccharomyces cerevisiae ( S.ellipsoides) in the raisin yeast BEFORE Lactic and acetic acid bacterias grow at proper temperature. Saccharomayces cerecisiae will be tolerant to them. ( Saccharomayces cerecisiae >Lactic acid and acetic bacteria)

*Lactic bacteria and acetic bacteria are in the air. Especially acetic bacteria increases in summer. They exist in the air and grow in all kind of fruit and vegetables and other kind of food that they contain glucose. To make kimchi, we use the power of lactic bacteria that is in the Chinese cabbage. Japanese sake is also used the power of lactic acid bacteria that is in the rice. Acetic bacteria will really activate at over 30℃. To make sweet raisin yeast water ( or other fruit yeast), We should fully grow Saccharomyces cerevisiae ( S.ellipsoides) in the raisin yeast ( or other fruit yeast) BEFORE lactic and acetic bacteria grow. Lactic bacteria is not bad when we make yogurt yeast to make sweet bread. When Lactic bacteria is fully grown in yogurt yeast, Other unwanted bacteria can't grow in the yogurt yeast because the lactic bacteria is tolerant to them at proper temperature. * Exception: Sourdough

-----------------------------------------------------------------------------------------------------*How I maintain my raisin yeast water: *Use a sterilized jar and filtered water. (no chlorine water) 

*And the raisins are NOT coated with OIL. Organic ones taste much better.


* I don't measure the water actually but by volume like the picture above.

Ingredients:This volume will be about
  • 13-25g raisin yeast water (5-7% -in the summer  10-11% in the winter) *  The temperature by the snake light differs from all season so that I adjust the raisin yeast water amount by the room temperature.
  • 45 g raisins                   (20%)
  • 225 g water                   ( 100%)
Method:1) Shake the jar vigorously after putting all the ingredients in the jar.2) Close the lid not too tight /not too loose and keep it at 76-82F around for overnight.3) Shake the jar vigorously and store it in the refrigerator. ( I don't discard the raisins in the jar)* It is very important to keep some sugar in your yeast water not to get your yeast water hungry. I use the refreshed raisin yeast water after 12 hours I store it in the refrigerator to stabilize.

4) Shake the jar vigorously every morning 1 time to get some f your raisin yeast water.     I shake it vigorously every morning and night which is  2 times in total  now.  (September,20011)

If you store it more than several days, I will  *refresh it before baking.*Using this maintain raisin yeast water method.

Here is the link that you might be interested in:http://en.wikipedia.org/wiki/Yeast--------------------------------------------------------------Other methods that I found in Japanese sites1)http://levadura.exblog.jp/12421595/

I read one of Japanese home baker’s method of making raisin yeast water: To make non sour (sweet) and well risen bread, she tighten the lid and shake the jar gently once or twice a day during the process, and she said" if you make bread with this yeast water, you will have dense bread because the yeast didn't get enough oxygen while it was fermented although the taste is wonderfully sweet. In according to make bread that has volume, she add mashed mixed fruit in the yeast water to ferment it again in a bowl that is covered with plastic wrap at room temperature .It sounds good, but it will give me more work. I rather make raisin yeast simply in good condition.

2) No lid method:

http://cookpad.com/recipe/543057 She tested 2 kind of methods between with lid and no lid like me.  She said that No lid doesn't have any alcohol smell and rise very well. She is right but I had a different result after baking. I smelled alcohol from the crumb and the crumb remains wetter in the crumb but I also think that no lid one rise well in the oven.

This is the result:

https://www.evernote.com/shard/s46/sh/aae4b7bd-4181-42f3-b4fd-af43f60b70d7/bfbb002b43291f87240bb662ec67d05e

----------------------------------------------------------------------------------

Q & A:

Q:  Does the taste of yeast water affect to the bread?

A: I say " Yes" That is why I smell and taste my raisin yeast water if it is fine. My raisin yeast water is  sweet with mild alcohol generally. When the raisin yeast water is just made, You may smell strong alcohol, but it will be milder and read to bake in the next day.  If you smell sour or funny, I strongly recommend you to throw away all of your raisin yeast water, and make a new one.

--------------------------------------------------------------

Q : Why do you shake it vigorously during the process?

A: I have two purposes. I can squeeze more sugar to feed the raisin yeast water by the vigorous shakes, which also activate the raisin yeast.I don't recommend this technique for fresh fruit yeast water which have bitter skins because the bitters remains in the yeast water and the bread.

----------------------------------------------------------------------------------------------

Q:  Can I use a water bottle to make raisin yeast water ?

A: I prefer a jar. It depends on you.  However, I highly recommend not to use a weak water bottle like "Walt-mart" brand.I tested it before. On the second day, I smelled some chemical from the bottle. Although I noticed that the raisin yeast water in the bottle had a lot of bubbles and very active, which reminded me of  the process to make beer.http://www.youtube.com/watch?v=sSrbukazO_Q

Day 1                   Day2 ------------------------------------------------------------Q:  How do make bread with raisin yeast water?A:  I use my yeast water like sourdough I used to have.Example: http://www.thefreshloaf.com/node/23726/thank-you-syd I also use my raisin yeast water as sherry wine or mirin ( sweet Japanese sake for cooking) to make teriyaki sauce, orange sour chicken sauce, and so on. I also keep my alcoholic raisins that are fermented in the jar for home made rum raisins. So I can make Daisy's Panettone.http://www.thfreshloaf.com/node/21104/my-first-panettone-milanese-notes-trial-run-formula-and-method-thanks-all-advice Once, I used 2 tbsp this rum syrup to fix the sour flavor when I made David's miche:http://www.thefreshloaf.com/node/23593/david039s-miche-raisin-yeast-water ( NO.5) Home made rum raisins.I add some sugar in whenever I add more alcoholic raisins.I discard the raisins that I make raisin yeast water from beginning because they are smashed and less sugar left in them.-------------------------------------------------

Q :  Is it okay to smell strong alcohol from my raisin yeast water?

A: Yes. When the raisin yeast water is just made, You may smell strong alcohol, but it will be milder and read to bake in the next day. Also,If your raisin yeast water is kept in the refrigerator for a couple days only, It will be fine. If you smell it strong, I will shake the jar vigorously. The smell will be weaken.   It is very important to see how active your raisin yeast water is. Very healthy one is the raisins keep floating  around the top of the water, and you can hear strong pops ( shwwww..) when you shake it and open it up.Here is the result of a sandwich loaf when I used my old raisin yeast water that was little strong alcohol smell.https://www.evernote.com/shard/s46/sh/039147ff-264d-4fa4-959d-65cf8cab1c3c/94659bd4a5655d3db0b0b2d4ddc79392------------------------------------------------------------Q:  How is it different from between non organic and organic raisins?

A: I have some experiments using Sun-maid raisins ( golden and regular ones)

Regular one is okay, but I tasted weird flavor in the bread a little bit when I compare to organic one.I strongly recommend not to use sun-maid golden raisins. It smelled and tasted very weird.

------------------------------------------------------------Q: Is it okay that my raisin yeast water sank on the bottom in the refrigerator?A: This is depends. If  all of the raisins doesn't float back up to the top of the water within a day after shaking vigorously, I think that the yeast is weak or some unwanted bacterias are in it.  I did throw it away and  made a new one when I had the problem. It happened when I didn't take care of the raisin yeast water for a couple weeks.------------------------------------------------------------Q; What temperature is better to make bread for raisin yeast water?

AFor Levain bread:

In the summer, I  use colder temperature around 70-73 F for bulk fermentation, 70-76 F around for final proof   .

In the winter, The temperature is around 76F for Bulk fermentation, 70-76F for final proof.

I think that raisin yeast water bread is not sour unless you retard it for a long time.  But it differs from what king of flour you use.  Rye and Whole wheat flour give it more acid or earthy flavor.

Happy baking,

Akiko

teketeke's picture
teketeke

  I wanted to thank Syd who gave me good information to shape a boule. I have had a trouble with it.

Syd's comment here : http://www.thefreshloaf.com/node/23590/pane-con-semola-rimacinata-di-grano-duro#comment-170093

I made Susan's Norwish Sourdough with raisin yeast water.  I wanted to use multi-build levain to get close to sourdough crumb, but I was really motivated to practice shaping a boule..

Susan's Norwish Sourdough here: http://www.wildyeastblog.com/2007/07/08/my-new-favorite-sourdough/  This is my favorite, too. Thank you, Susan!

Here is how I made:

Ingredients:

Levain

  • 113 g  KA AP
  • 68 g  Raisin yeast water with alcoholic raisins

Final dough:

  • 450 g  KA bread flour
  • 58 g    rye flour
  • 331 g   water   DDT 74F
  • 10g    Salt

Method:

  1. Make the levain  mix and leave it at room temperature 70-72F for overnight.
  2. Mix with final dough except the salt.
  3. Autolyze 30 minutes.
  4. Add the salt  and knead until pass a window pane.
  5. Bulk fermentation   4 hours ( 1 time S&F after 45 minutes)  at 73-74F.  * When I saw the dough in 45 minutes, the dough rose doubled already ( I would do S&F even the dough didn't rise much ), I did punch down and make a ball shape like doing S&F in the bowl gently because my family doesn't like to taste strong gluten developed in the crumb.
  6. Preshape 
  7. Bench time  20 minutes
  8. Shape
  9. Proof  1 hour at 76F
  10. Retard  4 hours  at 42.8F.
  11. Proof again at 76F for 40 minutes.
  12. Bake  465F 12 minutes with steam, decreased the temperature to 420F, continue to bake 30 more minutes.

I tasted good sourness from the rye flour. The crumb is softer.  I wonder if I retarded it overnight? 

I finally got the crumb that I was hoping for.  Thank you so much, Syd!

Happy baking,

Akiko

teketeke's picture
teketeke

Actually, Japanese call this "Tomato pretzl", I think that is come from pretzel. So, I will write it Pretzel here that is understandable for everyone, even though it doesn't look like pretzel that I usually get here. The texture is very crispy and keep the crispiness for days as same as Ron's *sourdough cracker. They all gone within a couple days. So I don't know the thing exactly. Ron's great formula

( *Here: http://www.thefreshloaf.com/node/22562/sourdough-crackers)

and ,I made a Japanese snack, Pocky recently ( Here: http://www.thefreshloaf.com/node/23615/strawberry-pocky-my-version-mixed-fruit-yeast-water ) After I posted strawberry pocky,  Robyn (RobynNZ )who gives us great information on TFL told me the great link of the pocky that we can make at home.  Thank you for all your help, Robyn. ( Bowー お辞儀)  ( Here :  http://www.notquitenigella.com/2008/12/01/pocky-christmas-forest-white-christmas-dark-christmas-chili-chocolate-honeycomb-and-green-tea-pocky/ )  That motivated me to make thinner strawberry pocky. Although I was intrigued to make healthier one because my daughter tends to suffer with irregularity.  My brother and mother who are in Japan love Tomato pretzel which is used tomatoes and vegetables..http://www.google.com/search?q=tomato+pretz&hl=en&pwst=1&rlz=1T4ADFA_enUS370US371&prmd=ivns&tbm=isch&tbo=u&source=univ&sa=X&ei=AvTbTa-0A9KCtgf6xKC4Dw&ved=0CDMQsAQ&biw=1259&bih=681   Tomatoes? Yes, I made tomato pretzel with tomato yeast that I used jump-start with my raisin yeast water.It is very thin sticks that I really wanted to make.     Here is the recipe: Ingredients: Levain:
  • Smashed ( 20g raisin yeast water + 80g grape tomatoes by FP )+ filtered water =100g
  • KA AP 100g
  • Honey 16g

* Note:  After I smashed the tomatoes with raisin yeast water by FP and taking them out, the actual weight was 82g around. So I added 18g filtered water to get total 100g.

Final dough:
  • 216g levain
  • 108g KA AP ( Levain 216 x0.5=108)
  • 43g butter
  • 4.3g salt
  • 0.6g black pepper ( as you like)
  • 0.4g vegetable broth powder or consomme powder ( as you like)

Optional : Topping for sesami seeds

Method:
  1. Make the levain : leave it at room temperature at 70F for 14-16 hours until doubled   The grape tomatoes + raisin yeast water + filtered water mixture. After I made the levain.                             .  Doubled.           
  2. Note: You can keep it in the refrigerator to adjust for you baking schedule.                                                                                       * I haven't left the dough for more than 4 hours. It may be suffered from sour if you leave it for 24 hours. My point is that not to get the levain hungry                                                                                                                                                                            
  3. Mix the levain with the final dough: Mix all the ingredients and knead until passing a window pane.                                            
  4.  Bulk fermentation: 4-5 hours until doubled at 73 F around.
  5.  Preheat & shape : Preheat the oven at 400F/200℃. Dump the dough in some sesami seads both sides and flatten the dough as much as you can. .                                                                                                                             2mm thick.                                                                                                                    
  6.  Make the string: Cut the dough to make a string by a pizza cutter or a knife.                                        
  7. Make thin and long strings: Roll the string using both hands like rolling the pie dough.
  8.  Bake : 380F/ 193℃ for 10-11 minutes until golden brown. Light yellow is not ready to take out of the oven yet. It may not be crispy ...                                                                                                                                                                                        
Note: When I make this tomato pretzel, I measure the levain's actual weight before mixing the final dough. I got this idea from Ron ( Ronray's great sourdough crackers) Thank you, Ron!Example:
  1.  Actual levain weight : 200g
  2.  200 x 0.5 = 100g -- Final dough's flour
    Threfore, Final dough:
  • Flour  200g ( 100g levain's flour + 100g final dough's flour which means the actual levain amount)               100%
  • Butter  40g                                                                                                20%
  • Salt  4g                                                                                                        2%
  • Black pepper 0.6g                                                                                    0.3%
  • Consomme or vegetable broth powder 0.4g                                              0.2%

-----------------------------------------------------------------------------------------------------

Thin pocky turned out crackers:

 When I achieve to make thin pocky that I want, I made a mistake at the shaping process. It ended up crackers.. but I though it will be good and easy to make. 

Here is how I made:

#Strawberry mix yeast water#   Smashed all the 4 ingredients by FP               

  • Raisin yeast water                20g
  • Fresh strawberries              5 pieces
  • Fresh lime juice                  2 drops
  • Honey                                 27g   

After taking out the yeast mixture from the FP ----Total 160g  

Ingredients:

 Levain

  •    Strawberry mixed yeast water         160g 
  •     KA AP                                               160g

 Final dough

  • Levain  287g ( that was the actual weight from the total levain 320g)
  • KA AP  144g
  • Butter     72g
  • Salt       5.2g
  • Sugar    8g

For topping    Some walnuts ( as you like)  or you can use any kind of nuts you like ..


Method:

1.    Make the levain : leave it at room temperature at 70F for 14-16 hours until tripled.  * strawberry mix yeast will rise well.

*  Note: You can keep it in the refrigerator to adjust for you baking schedule. * I haven't left the dough for more than 4 hours. It may be suffered from sour if you leave it for 24 hours. My point is that not to get the levain hungry

2.  Mix the levain with the final dough: Mix all the ingredients and knead until passing a window pane.

3. Bulk fermentation: 3-4 hours until doubled at 73 F around.   *It fermented faster.

4. Preheat & shape : Preheat the oven at 400F/200℃. Dump the dough in some walnuts or any kind of nuts that you like both sides and flatten the dough as much as you can. .   ** This method for when you use tiny seeds or making crackers!   To make pocky shape with bigger topping, It should be shaped before using the nuts. ***

  Chopping the walnuts...

 Dipping the dough in the walnuts..   That is not for shaping a stick!!  roll the dough until it is 3 mm thick.

  So I cut it into cracker -shape.  I also tried to make a stick .. but it was really hard.. because the big walnut doesn't stay in the dough nicely.. 

 I made holes in the cracker to have some air to make it good texture ( crispier)when I bite.

5. Bake : 380F/ 193℃ for 15-17 minutes until golden brown. Light color crust is not ready to take out of the oven yet. It may not be crispy ...  This oven temperature will be vary depends on your oven.  * If the crackers are not crispy enough even it is cooled, You can bake them again that will be super crispy. 

6. Place them on the rack to cool. When it is completely cool, put melted white chocolate in a ziplock and cut an edge like a triangle shape then drizzle it over the crackers.

 I still made the pocky but it was irregular shapes... I will update it when I am succeeded.

  It was the best flavor so far.. 


* In summer, This chocolate doesn't firm quickly, so I put them in the refrigerator. I also keep them in the refrigerator too when ants are looking for food in my house !   but, when I put the pocky with chocolate to firm in the refrigerator as soon as I drizzled, the chocolate didn't stick to the pocky. so I recommend to leave the pocky with the chocolate for 20 minutes before putting in the refrigerator.

Next day:  I tried another thin pocky again. Yesterday's crackers above were gone within the day I made. My son shared some of them with his friends.  I felt little guilty to give my daughter the kind of sweets..  Next time, I want to try Pizza pretz !! Thank you for reminding me! :P Great idea, Sue!

  Here is the result:


This ingredients are as same as the crackers above.  The method is almost the same with the cracker too except the shaping and   baking methods.

* Shape-  Roll it out until the dough thick is 3 mm around without any topping,and make a string shape, then dipping the string in the topping.

*Bake at 380F for 12-13 minutes until slightly golden brown. 


You can use any topping , any kind of chocolate for your taste and convenience.


----------------------------------------------------------------------------------------------

Happy baking,

Akiko

teketeke's picture
teketeke

Here are my experiments of David's miche that is absolutely delicious and became my most favorite hard bread. I, who was not a big fan of sour flavor in the bread look for sourer taste in this miche now. I think because of my raisin yeast water doesn't get so sour like acetic acid, it is more like malic acid when I retard it.

 David's miche here: http://www.thefreshloaf.com/node/21644/miche-hit

How I made these miche:

No 1. 4/19( Started at 8 AM) to 4/21:

  1. Step1 Mixed 26g KA AP/3g raisin yeast water +23g water → fermented for 10 hours at 76F.
  2. Step2 Mixed the step1/94g KA AP/94g water → Refrigerated(42.8F) as soon as I mixed them and fermented for 24 hours until doubled.
  3. Final dough: 586g KA bread flour/398g water/18g toasted wheat germ/15g salt


Method:

  1. Autolyzed for 40 minutes 
  2. Added salt and knead until passed a window pane 
  3.  Bulk fermentation 10 hours ( S&F 2 times interval 45 minutes)
  4.  Shape→ Proof in a refrigerator( 42.8F) for 12 hours 
  5. Next morning: Proof at 72-74 F for 1 hours 45 minutes-
  6. Bake I used the 2 pans like Dutch oven method.   

baked 20 minutes at 450F with steam, took the 2 pans and transfer the bread in the rack on the baking stone to bake more 40 minutes at 420F.

 It was little bit sour ( fruity) in 12 hours , but I did taste sour ( fruity) in 24 hours. It was a shocking moment to taste this wonderful bread. After we ate all this bread,I wanted to make more of this bread.

-------------------------------------------------------------

Then I did!

No.2  4/22( Start at 8:15am)-4/24:

  1. Step1 : Mixed 22g raisin yeast water/ 22g KA AP--- That was a mistake. I was about to make 26g KA AP/ 26g raisin yeast water.--Fermented it for 6 hours at 76F until doubled. I should have waited until tripled.
  2. Step2 Mixed the step1/94g KA AP/94g water- refrigerated as soon as I mixed them and fermented for 88 hours (4/26  6:12 AM) until doubled. I had to wait for long hours...
  3. Final dough: 586g KA bread flour/398g water/18g toasted wheat germ/15g salt.

Method:

  1. Autolyzed for 40 minutes
  2. Added salt and knead until passed a window pane.
  3.  Bulk fermentation 11 hours ( S&F Once after 45 minutes)
  4. Shape
  5. Proof in a refrigerator for 12 hours ( I put the shaped dough in a back pack and then kept in the refrigerator (50F) after I stored the dough in the refrigerator (42.8F) for several hours)
  6. Bake 20 minutes at 446F with steam, took the 2 pans and transfer the bread in the rack on the baking stone to bake more 40 minutes at 400F.

The taste was sweeter. When I tasted it in 12 hours, I didn't taste any sour from the raisins. 24 hours later, I tasted fruity sourness slightly.  I rather sourer for this bread. I baked at lower temperature to get brown crust, but I found out that I liked darker crust for this miche.

---------------------------------------------------------------------------------------------------------------------

No.3  and No. 4

5/2 (Started at 7pm)-5/7: I made 2 miche: One (R)- Retarded , the other one (NR)--not retarded.

1. Step1 Mixed 26g KA AP/26g raisin yeast water x2 ---

                  (R) Fermented it in the refrigerator for 59 hours(  5/5   6 am) until doubled.

                   ( NR) Fermented it at room temperature ( 68-70F) for 12 hours until tripled.

2. Step2 mixed the step1/71g KA AP, 23g KA whole wheat/94g water x2

            (R) Fermented it in the refrigerator for 47 hours until doubled.

            (NR)Fermented it for 4 hours at room temperature (70F) until tripled

3. Final dough: 586g KA bread flour/398g water/18g toasted wheat germ/15g salt


No.3 (NR)

  1. Autolyzed for 40 minutes
  2. Added salt and knead until passed a window pane
  3.  Bulk fermentation 11.5 hours at 68F ( S&F 1 time after 45 minutes)
  4. Shape
  5. Proof for 1 hour at 68F 
  6. Continute to proof for 3 hours at 60F
  7.  Bake 12 minutes at 465F with steam, took the top pan and bake 8 more minutes at 465F, took the bottom pan and trasfered the bread on the camp stove toaster  and continute to bake more 40 minutes.

24 hours later, The taste was sour ( fruity) slightly. I also tasted more flavor from the whole wheat that I put in the 2nd levain.  The crumb was not as moist as the others that I retarded, however it was delicious.


No.4 (R)

  1. Autolyzed for 40 minutes
  2. Added salt and knead until passed a window pane
  3. Bulk fermentation 10 hours at 70F ( S&F 1 time after 45 minutes)
  4. Shape 
  5.  Proof for 1 hours at76F
  6. Retarded (42.8F) for 6 hours, decreased the temperature to (50F) and continue to retard for 7hours.
  7. Bake 12 minutes at 465F with steam, took the top pan and bake 8 more minutes at 465F, took the bottom pan and trasfered the bread on the camp stove toaster and continute to bake more 40 minutes. 

I didn't degas much before I shaped.   24 hours later, I tasted sour ( fruity) like the first one. but I tasted more flavor from the whole wheat that I put it in the 2nd levain.

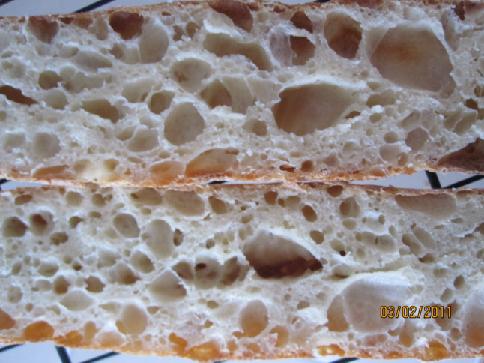
 The top (NR) : The bottom (R)

I liked (R) more than (NR). Retarding over night gives the crumb moist very well. 

---------------------------------------------------------------------------------------------------

No.5(5/12-5/14)

1. Step1 Mixed 26g KA AP/10g raisin yeast water +16g water for 12 hours.

2. Step2 mixed the step1/71g KA AP, 23g KA whole wheat/50g water+44g raisin yeast water.

    Fermented it at room temperature for 4 hours at 70F , decrease the temperature to 68F and fermented it more 6 hours .

   ( Yes, it became really sour ( acetic) !)

3. Final dough: 586g KA bread flour/ 190g raisin yeast water +208g water /18g toasted wheat germ/15g salt  I added 2 tbsp homemade rum syrup that I have kept alcoholic raisins which in my raisin yeast water with sugar.  I hoped that this yeasts which I used more raisin yeast water in the final dough and the rum syrup overcome the acetic bacteria...


Method:

  1. Autolyzed for 40 minutes
  2. Added salt and knead until passed a window pane
  3. Bulk fermentation 6 hours at 68F ( S&F 1 time after 45 minutes) until doubled
  4. Shape
  5. Proof for 6 hour at 68F
  6. Bake 12 minutes at 465F with steam, took the top pan and bake 8 more minutes at 465F, took the bottom pan and trasfered the bread on the camp stove toaster and continute to bake more 40 minutes.

It turned out pretty good. I only tasted fruity sourness ( sweet and sour) which was stronger than others above. but it was really good bread.

----------------------------------------------------------------------------------------------------

No.6 ( 5/11-5/15)

1. Step1 Mixed 26g KA AP/10g raisin yeast water +16g water for 11 hours until 2.5 tims in bulk.

2. Step2 mixed the step1/71g KA AP, 23g KA whole wheat/25g water+ 42g raisin yeast water.

             Fermented it in the refrigerator for 12 hours until doubled.

3. Final dough: 586g KA bread flour/398g water/18g toasted wheat germ/15g salt .


Method:

  1. Autolyzed for 40 minutes
  2. Added salt and knead until passed a window pane
  3. Bulk fermentation 9 hours at 68F ( S&F 1 time after 45 minutes) until doubled
  4. Shape
  5. Proof for 1 hour at 72F.
  6. Retarded (42.8F) it for 11 hours.
  7. Bake 12 minutes at 465F with steam, took the top pan and bake 8 more minutes at 465F, took the bottom pan and trasfered the bread on the camp stove toaster and continute to bake more 40 minutes.

24 hours later, The taste was very cloese to the one that I baked in 5/14.   But I like this better because the crumb had more moist.  

I still continue to play with this bread. :)

Thank you for sharing your wonderful miche, David!!  Thank you so much!

I also thank you everbody to read such a long story.

Best wishes,

Akiko

teketeke's picture
teketeke

Updated: 3/31/2011 


 Aki san no Baguette
I want to introduce one of amazing Japanese home bakers Aki who makes great baguettes that I have been trying get the crumb like hers.  I really thank Aki who let me post her great baguettes here. Here is  her blog and baguette's formulas.   And, Please leave a comment for her if you think that her baguettes are great. She will be happy to hear it from you, guys. :)

http://blog.goo.ne.jp/rinrinmaman01/e/359d5570d2dd2fb57929b74e58ed3153 

  Aki's strawberry yeast baguette:
Ingredients:  (straight method) Lenth about 40cm

  •  Flour  100% -( About125-150g for 1 baguette)( she uses flour for French bread like Lys Dor, Maison Kayser Traditional and so on. )
  • Water + Strawberry yeast water (10%)= 70-75%
  • Salt  less 2%

Method:   1. Mixing the ingredients. DDT: About 23℃ ( I mix the ingredients except the salt and  take autolyze for 30 minutes then I add the salt in it. I am not sure how she does)   

2.Bulk fermentation: Punch down every 20 minutes for 2 times at 23℃   

3.  Rest for 4 hours at 23℃  

4. Transfer the dough at 15℃ , and rest for 16-18 hours. * She put the dough in a refrigerator to keep the dough temperature down. If she keeps the dough at 15℃, the dough will be ready in 12 hours.  

5.  Divide  

6. Bench time  ( It is vary depends on the room temperature and the wild yeast's strenth that you use)

 7. Proof  at 23℃ ( It is also vary depends on the room temperature and the wild yeast's strenth that you use.)

8 Bake at 230℃ for about 20 minutes ( She uses steam)

* She also uses instant dry yeast ( She has used SAF blue instant yeast ): About 0.04% instant yeast as to 100% flour

* She degas the dough very well before shaping

---------------------

I have tried her baguettes about 10 times so far. Although I am not successful yet.  I hope that I am able to get close to her baguettes soon. 

This is the one that is my best one so far.    I made 2 baguttes.

KA Ap 180g / Rasin yeast water 36g/ Water  100g  ( 16℃)/ Salt 3g
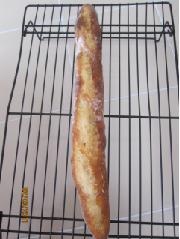
I bent the dough when I transfered it into the oven.   You can see the black spots in the crumb because I used alcoholic raisin from the raisin yeast water.  Aki doesn't use them.    I just punched it down once before I put the dough in the place at 14℃。 And I divided it in two after 24 hours ( yes, it took for a long time until the dough was doubled that was actually tripled! I realized it after I found Juergen's exprement http://tfl.thefreshloaf.com/node/22228/test-tube-baking-2-bulk-fermentation-doubling-size  Thank you, Juergen) Then   I did a letter fold then took a bench time for 30 minutes, and I hit the dough onto the work bench twice and  I did fold 1/3 from the bottome line, then I pinched the top and bottom sides and closed the seam very well, and I took 30 minutes for proof. Preheat 470F for 1 hour, using Syvia's steaming method and bake it at 470F for 7 minutes with the steam, and take the steaming towels and pan after that, decreased down to 450F  and bake more 3 more minutes, then I took the baking sheets out of the baguettes then baked 10 more minutes at 450F. Shut off the oven then left them in the oven for 5 more minutes.  

-----------------

Next :  This hydration is75.8% 

KA AP 120g  / Raisin yeast water (20%)+ water = 91g / Salt 2g 

I waited the dough until doubled.  It came out denser than the above.  I degased fliping the dough twice.

----------------------------------------------------------------------------------------------------------

In the same time, I have made my baguettes (http://www.thefreshloaf.com/node/19118 ) for updating.  I updated it in Japanese version here: http://cookpad.com/recipe/1168515


2 baguettes:

Poolish 

 KA AP  125g  / Water  DDT 20℃  93g / Active dry yeast 1~2g

Final dough

KA Ap  125g  / Water DDT 23℃ 93g / Active dry yeast 1~2g

Salt  3.8g

Method:

 1. Poolish (  Let it ferment until doubled)  I preferment the yeast and the water for 15 -20 minutes before mixing all the ingredients.

2. Adding the yeast and water into the poolish-- Rest  for 20 minutes --- Add the flour and salt

3. Knead for a few minutes --2 times  Strech and fold  every 20-30 minutes   

4. Bulk fermentation    at 25℃。

5. Continue to rest until 1.5 times in bulk at 25℃

6.Move the dough in the place at 14℃and rest until 2-2.5  times volume

7. Divide  in two:   1) A letter fold       or   2) Degas: hitting the dough on the work surface 2.3 times and make a rectangle shape.

8. Bench time   30 minutes at about 23℃.

9. Shape :  1)Degas like the above (2)-- 1/3 fold from the bottom.- Pinch the both side and close the seam very well.  or

                 2) 1/3 fold from the bottom, if you can fold it again toward to the middle.--- Pinch the both side and close the seam very well.

10. Proof  25 - 30 minutes  at 23℃

11.Bake :  Preheat 470F for 1 hour :  Bake at 470F with steam ( Sylvia's steaming method) for 7 minutes --- Take the steaming out-- decrease down to 450F and bake 3 more minutes - Take the parchment paper out --- bake more 10 minutes ---  Shut off the oven and leave it in the oven for 5 minutes.

I am testing about degassing a lot or not :

These are that I didn't degas a lot, just little.  Left: (2) version     Right(1) version   I took 30 minutes for proof.  The taste was awesome.

---------------------------------

Today:  I did degas a lot
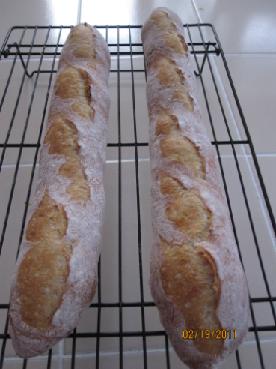
 

But I took almost 1 hour for proof..  Left:Shorter one - (1) version / Right: Longer one - (2) version.  These reminds me of Juergen's experiment:   http://www.thefreshloaf.com/node/22065/test-tube-baking-1-continued-white-french-bread-overproof    Yes, they are over proofed.. I also thank Eric who examine an excellent job on Juergen's post.  They didn't taste good because of the over proofed.  The bad thing was that I had to drag when I scored because the dough was really soft.

Now, I am going to test that the one is little degas and the other is degas a lot..   

ーーーーーーーーーーーーーーーー

2/20/2011  I couldn't bake my 2 baguettes to compare the test above.  But I baked Aki's baguette in the morning.

Here is the result:

 Aki san no baguette 2/20/2011

Ingredients:   

KA AP  120g   

Raisin yeast water 18g  ( 20%)   

Water   71g( 16℃)   

Salt 2g

2/18  6:30 am - Mix all the ingredients except the salt.-- Autolyze --         

        7:05 am- Added the salt--- mixing for 10 seconds by FP         

       8:00 am--  S&F   ( 23℃) -- I forgot to do it in 30 minutes---     

       8:30  am -- S&F  ( 23℃)         

      Rest----  23℃
      

    1:00pm -- Moved the dough in the basement  at 14℃.  

2/20  6:00am  3 folds ( a letter fold) -- bench time (The dough rose 2.5 times in bulk. )         

        7:05 am  Shape    Degas a lot ( Flipped over the dough twice and slapped the dough many times) and  fold 1/3 from the bottom and pinch the both sides then close the seam very well.-- proof---       

        7:50  Bake
---------------------------------


Now I am thinking:   

1. dough temp should be warmer before shaping to get the airy crumb or wait until the dough tripled.   

2. Degas a lot or less

3.  How to score it straightly without dragging. -------------- I used to put some shortening on the lame  before scoring. I better try it again to see how it works.
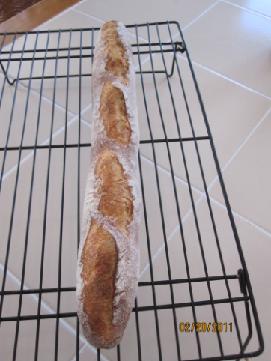


-------------------------------------------------

Degas test:

  After I wrote that I didn't bake the other my baguettes to compare the test of degassing, I changed my mind, then I started to bake them to test.  Here is the result:

   Poolish:     

 KAAP  125 g     

 Water  (16℃)      100g   (  I recommend to use less water around 94g water ) Now, I am testing to use 68% hydartion  3/2/2011  Because I want  firm strong gluten in the dough as same as Aki's baguette. 68% hydaration is the same firmness as 74-75% high hydration baguettes with natural yeast in my opinion.

  Active dry yeast  1/32 tsp     (  I took 19 hours to ferment)

------------------------------------------   

Final dough:  

 KAAP    70g  /  Pillsbury ( all flour ran out except this) 55g   

Water (16℃)   100g   (  I recommend to use less water  around 94g maximum) 

 Active dry yeast  0.1g

Salt    3.8g
----------------------------

 1. 2/19  Punch down every 30 minutes.  

2. Rest  :  1+2 =3 hours in total..( It was too short) at 23℃  

3.  Rest  at 14-15℃  

4. 2/22   Divide (  The actual dough weight was 408g   I divided it 204g each. The dough rose doubled.  

5. Bench 30 minutes  6. Shape and Proof for 30 minutes at 22℃

 ----------------------------------------------------------------
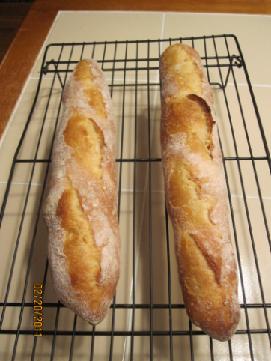
Left: Degas a lot : Flipping over twice and slapped the dough a lot. 

Right  Gentle degas : Just little pat to make a rectangle to shape.

---------------------------------------------------------------------------------
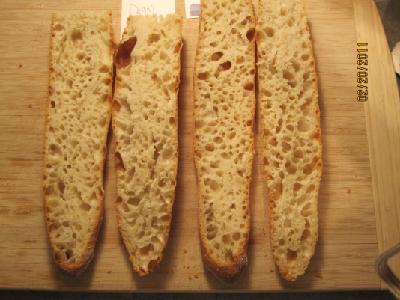
Today 2/21/2011


Left : Version 1 (started from a letter fold) with gentle degas 

 Right Version 2 (Started to make a rectangle shape to flatten) with gentle degas.     *  My lame was without the chop stick. I was holding it by my left hand. I didn't put shortening on it.

The actual weight was 425g  I divided it 212.5g each.  Yesterday, it was lighter because I used the other flour or today's dough took 2 days to ferment ??  I don't know...


These are on the left one.   I cut it when it was still hot.  My husband and my dogs were eating it when I saw them.

So, I cut the other one when it was still warm. My son and daguther wanted to eat, too.

Hmmmmm.... I will practice more... 

Thank you for reading, everybody!


ーーーーーーーーーーーーーーーーーーーーーーーーーー

Updating 3/1/2011

I got a book that AKi learned how to make the amazing baguettes from yesterday.  I can't tell everything of the method unfortunetely.

Here is the book.

 http://www.amazon.co.jp/Coupe-Junkies%E3%81%AE%E3%83%91%E3%83%B3-%E3%83%90%E3%82%B2%E3%83%83%E3%83%88%E3%83%BB%E3%82%AB%E3%83%B3%E3%83%91%E3%83%BC%E3%83%8B%E3%83%A5%E3%83%BB%E5%B1%B1%E9%A3%9F-%EF%BD%9E%E3%83%93%E3%83%93%E3%82%A2%E3%83%B3-%E3%81%9D%E3%82%89%E3%83%9E%E3%83%9E%E3%80%82%E3%81%AE%E5%BD%A2%E3%81%8B%E3%82%89%E5%85%A5%E3%82%8B%E3%83%91%E3%83%B3%E3%81%A5%E3%81%8F%E3%82%8A%EF%BD%9E/dp/4839935726

As Eric mentioned, You can degas firmly that is the key.   Flatten the dough - 3 folds -bench 30 minutes- shape - proof 30 minutes or so.- bake 

Luckly, You are able to see how to shape the dough on the sample of the book!!

http://www.amazon.co.jp/Coupe-Junkies%E3%81%AE%E3%83%91%E3%83%B3-%E3%83%90%E3%82%B2%E3%83%83%E3%83%88%E3%83%BB%E3%82%AB%E3%83%B3%E3%83%91%E3%83%BC%E3%83%8B%E3%83%A5%E3%83%BB%E5%B1%B1%E9%A3%9F-%EF%BD%9E%E3%83%93%E3%83%93%E3%82%A2%E3%83%B3-%E3%81%9D%E3%82%89%E3%83%9E%E3%83%9E%E3%80%82%E3%81%AE%E5%BD%A2%E3%81%8B%E3%82%89%E5%85%A5%E3%82%8B%E3%83%91%E3%83%B3%E3%81%A5%E3%81%8F%E3%82%8A%EF%BD%9E/dp/4839935726

Completely flatten the dough!

I used

260g KAAP

52g Raisin yeast water ( from refrigerator)

143g Water 16℃

4g Salt  (  1.5-1.8% as to 100% four... As you like)

  Mix except salt -- Autolize 30 mintues--- Fold interval 30 minutes x 2 times---- 5 hours buk fermentation  at 75F until the dough rose 1.5times

-------Move the dough in a colder place around 13-14℃ for over night (12 hours)--- divide-- preshape--bench 30 minutes -- shape -- proof 30 minutes-- bake

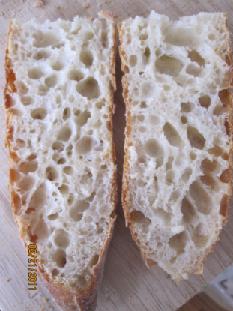
 on the left crumb : I prooved at 21℃ without any dump towels. Right crumb: At 21℃ with dump towels

 I prooved at 26℃ with dump towels.    I still test about this. But I think "With dump towel" make thin and crispy crust? 
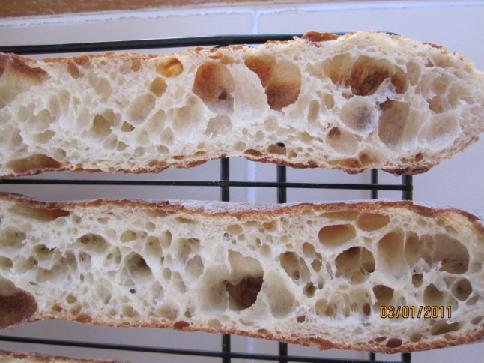
It have more big holes when I proof it at colder place? I don't know.. I just keep testing..

About taste: That is absolutely amazing.


----------------------------------------------------------------------------------------------------

Updated 3/2/2011

I made 68% hydration of my poolish baguette today.

Poolish

  • KA AP  70g
  • Water 48g ( 16℃)
  • Active dry yeast  0.07g

Final dough

  • KA AP 70g
  • Water 48g ( 16℃)
  • Active dry yeast 0.07g
  • Salt  ( I always use kosher sea salt)  2.3g (  I used 1.6% salt as to 100 % flour this time)

Method:

1. Mix the poolish ingredients ( DDT was 65F /18.3℃) Fermented at 76F/24.4℃ for about 15 hours.

2. Mix all the ingredients. After mixing ( folding?) for a few minutes with a dough cutter, The dough temperature (DT )was 65F/ 18.3℃

3. After 20 minutes: 1st S & F ( folding several times with a dough cutter)  DT was 68F/20℃    The room temperature was 76F/24.4℃- I used a light to warm it up

4. After 20 minutes : 2nd  S&F  ( folding several times with a dough cutter) DT was 65F/18.3℃  The room temperature was 76F/24.4℃ ( I don't know why the DT went down.)

5.Bulk fermentation:  2.5 hours at 78.8F/26℃ until doubled  ( If you want  light and softer crumb, you better let it rise at 82F/28℃, the time will be shorten) DT was 70F/21℃ when it is doubled.

6.Put the dough in a refrigerator ( the temperature was 6℃)for 5 hours.   DT was 48F/8.8℃ when I took it out of the refrigerator.

7.Preshape:  Degassed and made a letter fold. I waited until the dough temp got to 50F/10℃  just a couple minutes or so.( I have been successful when the dough temperature was 50F/10℃)

8.Shape folding  1/3 fold from the top side, lift the other side to cover that I already feld. Pinched very well.  DT was 65F/18.3℃ when I was about to shape.

9.Proof : 30 minutes at 70F/21℃.  I put the dough in a gabage bag to avoid to get dry.

10.Bake : Preheat 470F/243.3℃ for 1 hour ( I can't use maximum temperature. If you can, you better use maximum temperature for better result)

              Bake  7 minutes with steam (I used Sylvia's steaming method) at 470F/243.3℃-----> Take the steaming tool out and decreased down to 450F/232.2℃, bake 3 more minutes--

------------->Take the parchment paper and bake 10 more minutes-------> Shut off the oven left it in the oven for 3 minutes.
I am so glad that I had a lot of holes in the crumb, however, I am not a big fan of thick crust and too chewy texture.  I should have let it rise at higher temperature until 1.5 times in bulk, then let it rest at 50-57.2F/10-14℃ for overnight, Or I better use more water in the dough around 70-74% hydration.   I like the taste but it was sweet less than I usually get.   Now, I realize that I don't want to let the dough rest below 50F/10℃ anymore。I tested it before...

3/3/2011  Next day:  The crust and crumb are much better. The top's crumb is better texture than the bottom. The bottom's crumb was little wetter when I chewed it. I will make 68% hydration again, next time I will frement the dough at 28-30℃ around and let it rest at 10℃ for overnight or less.

-----------------------------------------------------

3/13/2011

I changed a little bit of Aki's method, but I finally could manage 10% raisin yeast baguette.

Ingredients:

 KA AP 130g

Rasin yeast water 14g

Water 76g  ( DDT 69F  /20.5℃)

Salt  2.1g

-------------------------------------

Method: ( I always set up at 6pm around so I can bake at 6am next morning)

1.  I mixed all the ingredients except the salt for a minute, then add the salt, mix it again for a few minutes with my hands  (Dough temperature(DT) 69F)

2.  S&F x2  every 30 minutes   ( I did in the air with my hands) ( DT was 70F both after the S&F)--Rest at  roomtemperature was 26-28℃ /78.8F-82F  for 4.5 hours until the dough is little flat and the surface is slightly bumpy.


3.I moved the dough at room temperature around 18-19℃ for about 8 hours

4. The dough in the morning:  I saw a lot of bubbles on the bottom. ( DT62.5F/16.9℃)

5. I put the dough on the floured wood board very gently. The bottom is face now. 

   Strech the dough X way to make a rectangle around 35cm x11cm is better ( I streched too much this time I did 41cmx11cm)

6.Using a ruler, make a fold like the picture. Pat the dough gently and

 Put tightly squeezed dump kitchen towels on the dough and take a bench time for 15-20 minutes ( I took 15 minutes )

7. After the bench time,

8. Using your finger tips, pat the dough gently... ( I feel like that I can shape the air in the crumb at this time) 

9. Puch the edge little harder and  Pat the rest of the dough with your finger tips again.  ( If I didn't do this process, the crumb was tight... I think that both sides dough need some space to have airy crumb when you roll. )

10. Brush off the excess flour and roll and pinch the seam very well.( This picture is a different one. I just want  show you how I pinch the dough)

11. Proof :  I pust a tightly squeezed dump kitchen towels on the linen, then I put it on the top of the refregerator for 35-40 minutes at 70-71F /21-21.7℃

12 Prepare the steaming towels ( Sylvia's steaming method), Scroing, then bake.

  I practice to score baguettes a lot using playdough playing with my daughter because I am not good at it. I used to drag so much.. A couple of my Cookpad friends gave me g reat advices. I am still afraid of it....

1. Score the right angle on wet dough.. ( 80-90 degrees)

 2. Slice the dough the same speed and depth  ( This is difficult for me... because my scoring is always deeper in the middle, then the top and end is shallow.. I RE-score the top and end lines from the other direction where I score first.)


This is my way.. You can make up other ideas to score the same depth each lines.   

 I recommend you to use bamboo skewers to detamine the length  ( probably 10-11.5cm?)and make a mark with a tooth pick or so. --This is from the book.

How do you slice when you score the dough? 

I found out that I can score very straight when I use No.1 way. My cookpad friend suggested me the way. That is very helpful.. I don't think that my way fit everybody but, It may help some TFL members.

---------------------------------------------------------------------------------------------------

3/28/2011

Here is the best crumb that I got on 27th. 

Ingredients:

 Raisin yeast water 14g

 Water    14℃              74g

KAAP                     130g

Salt                    2.1g

-------------------------

Method:

4:40pm: Mix all the ingredients except the salt--- Autolize for 10 minutes--- add the salt -- mixing by hand for 2 minutes.

4:55pm Bulk fermentation   DDT 70F   Room temperature 79F

5:40pm S & F  in the air    Room temperature 79F

6:00pm-  S&F   in the air    Room temperature 79F  

8:00pm Transfer the dough at the colder place ( 62.6F)-- Overnight

Next day

7:30am  Transfer the dough in the basement  ( 50F)  until  3:20 PM

3:20pm  Preshape ( Strech to make a rectangle shape, hold 2/3 ) 

Bench time 20 minutes

3:40pm Shape ( Roll it and close and pinch ) 

Proof

4:00PM  Bake

Recently, I score the line differently. I used to slice very straight, now I  make a curve to score like Tartine book's baguette. ( A crescent shape)

Best wishes,

Akiko


teketeke's picture
teketeke

I made SteveB's croissants today. Here is his formula and method.  http://www.breadcetera.com/?p=117  Thank you, Steve!

I highly recommend it! It was absolutely delicious! Although I used my raisin yeast water instead of the instant yeast, therefore I decreased the amount of sugar.  It is very easy to make raisin yeast water which means fruit yeast water.  I recommend to use orgainc ones that is much better taste than the others.  Here is the link of fruit yeast water that Ron and Daisy and I had worked on.  http://www.thefreshloaf.com/node/20460/banana-saga-%E9%95%B7%E7%AF%87%E6%95%85%E4%BA%8B   and  http://www.thefreshloaf.com/node/20693/culturing-growing-and-baking-range-wild-yeasts   You can read Wao's post that is helpful, too.  http://www.thefreshloaf.com/node/6012/baking-natural-wild-yeast-water-not-sourdough   Ron and Karin made some great breads using apple yeast water. Daisy and I have raisin yeast water that is one of powerful fruit yeasts.  If you are not fond of soury bread, or you are looking for a new thing, you may enjoy it.


 Here is my ingredients that I change are Bold letters.

Poolish

145 g I used KA AP flour

145 g Raisin yeast water

-------------------------------

Final dough

335 g I used Bread flour

115 g Water

65 g Milk

36 g Sugar

10 g Salt

20 g Butter

290 g Poolish (all of the above)

----------------------------------

Roll-in

225 g Butter

-----------------------------------------------------

I replaced new pictures that I took them in the morning. They look clear and nicer.


I will practice to shape the croissants more...  I have a problem when I let put the dough in a refrigerator before shaping because the dough is always dry when I take out the dough from the refrigerator so that I can see some crack when I am about to strech the dough to roll it into the croissant shape.  So I didn't put the dough in a refrigerator this time, I put the dough in a basement that was around 15℃. That is why these croissants look little shaky. 

 Brush your teeth after eating,please :)

Happy baking,

Akiko


-----------------------------

I tried this croissants again. My goal is like Mrs London's croissants that are totally art. Of course, the taste was wonderful.

You can see Mrs.London's croissants here.

http://www.realbakingwithrose.com/2010/09/upstate_new_york_splendors_par.html

Here is the pictures of Mrs London's croissant that I bought.

Here is my croissants that I tried a couple days ago.

My problem is shaping... Hmmmm..

------------------------------------------------

3/31/2011  I tried again..

 After I cut the dough triangle shapes, I put them in the refrigerator for a couple hours to shape nicely. I can't get such a length to roll many times.   I saw other Japanese home bakers shaping very well..  hmmm

While the dough was at proof, I had to leave the dough for 2.5 hours.I wanted 2 hours proofing time though. I can't tell if the tast is good or not because I haven't eaten it yet.

Next time, I may not put the triangle dough in a refrigerator because I saw some crumb are not flaky but doughy.  I don't know if the method produce doughy crumb..

I hope that it is good.  They will be our breakfast.. Giant croissants.

Best wishes,

Akiko

Pages

Subscribe to RSS - teketeke's blog