The Fresh Loaf

A Community of Amateur Bakers and Artisan Bread Enthusiasts.

Benito's blog

Benito's picture
Benito

I find that if I don’t make baguettes often enough I get very rusty. I haven’t made baguettes in about 4 months so was really very overdue. I’ve always thought that epis look really nice and never tried making one, so here is my first effort at an epi. I also hadn’t done a seeded crust in quite some time so that was also overdue.

For this bake of my favourite all white flour baguette I’ve increased the hydration to 75% which I have found helps with extensibility which is essential for shaping baguette. I’ve also pushed final proof by accident to 40%. I say by accident because I usual cold retard the dough when the dough has risen to 20% but because I was out and didn’t expect the dough to be so fast, it was up to 22%. You wouldn’t think that 2% would make much of a difference but it does. So when I took the dough out of the fridge today and started to do the divide, pre-shape and shaping the aliquot jar already showed 35% rise right after I shaped the third baguette. So I left them to proof at room temperature until 40%, then started pre-heating and cold retarded the dough once more while the oven pre-heated for an hour.

Overnight Levain build ferment 75°F 10-12 hours


When levain at peak, mix 28 g water with all the levain mixing to loosen.

In the morning, to your mixing bowl add 353 g water, salt 12 g and diastatic malt 5.8 g to dissolve, then add 527 g AP flour to combine. Allow to saltolyse for 20 mins. Next add the loosened levain, pinch and stretch and fold to combine in the bowl. Slap and fold x 100 then add hold back water 23 g gradually working in until fully absorbed then slap and fold x 100.

Bulk Fermentation 82*F until aliquot jar shows 20% rise.
Do folds every 20 mins doing 3 folds
Could do cold retard at this point for up to overnight. (Aliquot jar 20% rise)

Divide and pre-shape rest for 15 mins
Shape en couche with final proof until aliquot jar shows 40% rise then (optional) cold retard shaped baguettes en couche for at least 15 minutes for easier scoring.

Pre-heat oven 500F after 30 mins add Silvia towel in pan with boiling water.
Transfer baguettes from couche to peel on parchment
Score each baguette and transfer to oven, bake on steel.
Bake with steam pouring 1 cup of boiling water to cast iron skillet dropping temperature to 480
F.
The baguettes are baked with steam for 13 mins. The steam equipment is removed venting the oven of steam. Transfer the baguettes from the baking steel to next rack completing baking directly on a rack to minimize the browning of the bottom crust. The oven is dropped to 450ºF but convection is turned on and the baguettes bake for 10 mins rotating them halfway. The baguettes are rotated again if needed and baked for another 3 mins to achieve a rich colour crust.

To apply the seeds to the dough, place the shaped dough on a damp towel to moisten the dough. Transfer it to a cookie tray that has been loaded densely with the seeds. I like using a cookie tray with sides that way I can push the dough up against the sides to get some seeds on the sides of the dough.

For those who are interested in pH. The pH of the levain was 5.06 at mix and 4.07 at 3x rise and peak.

The pH of the dough was 5.44 after initial dough development was completed. At 22% rise and start of cold retard the pH was 4.56. Finally at the time of bake the pH was 4.37.

My index of bakes.

Benito's picture
Benito

I have always loved eating these delicious crispy flaky pancakes from my homeland and always wanted to try making them.  They are definitely best eaten right off the frying pan so they can’t be better than homemade.

J. Kenji Lopez-Alt’s recipe seemed quite straightforward so I decided I’d try his recipe but add some sesame seeds since I love them.  

Ingredients

For the Pancakes:

  • 2 cups all-purpose flour, plus extra for dusting work surface
  • 1 cup boiling water
  • Up to 1/4 cup toasted sesame seed oil
  • 2 cups thinly sliced scallions

For the Dipping Sauce:

  • 2 tablespoons soy sauce
  • 2 tablespoons Chinkiang or rice wine vinegar
  • 1 tablespoon finely sliced scallion greens
  • 1/2 teaspoon grated fresh ginger
  • 2 teaspoons sugar

To Cook:

  • 1/4 cup vegetable oil
  • Kosher salt


Directions

1. Place flour in bowl of food processor. With processor running, slowly drizzle in about 3/4 of the boiling water. Process for 15 seconds. If dough does not come together and ride around the blade, drizzle in more water a tablespoon at a time until it just comes together. (Alternatively, in a large bowl add flour and 3/4 of the boiling water. Stir with a wooden spoon or chopsticks until dough comes together, adding water a tablespoon at a time as needed.). I used my KA mixer with the spiral dough hook which did the job alright.  Transfer to a floured work surface and knead a few times to form a smooth ball. Transfer to a bowl, cover with a damp towel or plastic wrap, and allow to rest for 30 minutes at room temperature, or up to overnight in the fridge. 

2. Divide dough into four even pieces and shape each into a smooth ball. Working one ball at a time, roll out into a disk roughly 8-inches in diameter on a lightly floured surface. Using a pastry brush, paint a very thin layer of sesame oil over the top of the disk. Roll disk up like a jelly roll, then twist roll into a tight spiral, tucking the end underneath. Flatten gently with your hand, then re-roll into an 8-inch disk. 


3. Paint with another layer of sesame oil, sprinkle with 1/2 cup scallions, some sesame seeds and roll up like a jelly roll again. (When rolling this up with the scallions inside, it is OK to roll loosely with some air inside as this leads to a more flaky pancake). Twist into a spiral, (tuck the end underneath again), flatten gently, and re-roll into a 7-inch disk. Repeat steps two and three with remaining dough balls.  I found that when making the spiral that if I kept the sealed side of the dough on the inside of the spiral, it helped prevent blow outs from the seal when flattening the spiral.

4. In a small bowl, whisk together sauce ingredients and set aside at room temperature. 

5. Heat vegetable oil in an 8-inch nonstick, carbon steel, or cast-iron pan over medium-high heat until shimmering. Carefully slip pancake into hot oil. Cook, shaking pan gently, until first side is an even golden brown (about 2 minutes). Carefully flip with tongs (be careful not to splash the oil), and continue to cook, shaking pan gently, until second side is an even golden brown (about 2 minutes longer). Transfer to a paper towel-lined plate to drain. Season with salt and cut into 6 wedges. Repeat with remaining 3 pancakes. Serve immediately with dipping sauce. 


These turned out quite well, my partner and I devoured them.  I’ll definitely be making them again when the urge strikes.  


My index of bakes.

Benito's picture
Benito

I’ve just uploaded a new video to my YouTube channel about dough development.  Novice bakers might find it useful.  In the video I demonstrate some of the techniques I use to develop dough strength.  Hopefully someone finds it useful to them.

My index of bakes.

Benito's picture
Benito

These are the perfect buns to have with your Thanksgiving dinner which we just had this year in Canada.  At 30% whole wheat they have that extra flavour without being too whole wheat for those in your family who don’t like 100% whole wheat breads.  The tenderness achieved by the tangzhong, butter and milk make these so soft and fluffy and delicious, everyone will love them.

450 g for six or 900 g for 12 buns baked in cupcake pan

Levain

Mix the levain ingredients in a jar or pyrex container with space for at least 50% growth.

Press down with your knuckles to create a uniform surface and to push out air.

At room temperature, it typically takes 7-9 hours for this sweet stiff levain to be at peak.

Tangzhong 

In a sauce pan set on med heat with about 1.5 cm of water, place the bowl of your stand mixer creating a Bain Marie, whisk the milk and flour until blended. Then cook for several minutes until thickened, stirring regularly with a spoon or heat-resistant spatula. Let cool.


Dough

In the bowl of a stand mixer, add the milk (consider holding back 5 g of milk and adding later if this is the first time you’re making this), egg, tangzhong, salt, sugar and levain.  Mix and then break up the levain into many smaller pieces.  Next add the flour.  I like to use my spatula to mix until there aren’t many dry areas.  Allow the flour to hydrate (fermentolyse) for 20-30 minutes.  Mix on low speed and then medium speed until moderate gluten development this may take 5-10 mins.  You may want to scrape the sides of the bowl during the first 5 minutes of mixing.  Next add room temperature butter one pat at a time.  The dough may come apart, be patient, continue to mix until it comes together before drizzling or adding in more butter.  Once all the butter has been added and incorporated increase the speed gradually to medium.  Mix at medium speed until the gluten is well developed, approximately 10 mins.  You will want to check gluten development by windowpane during this time and stop mixing when you get a good windowpane.  You should be able to pull a good windowpane, not quite as good as a white flour because the bran will interrupt the windowpane somewhat.  This is a good time to add inclusions such as my favorite black sesame seeds, that way they do not interfere with the gluten development.  If you add inclusions mix until they are well incorporated in the dough.


On the counter, shape the dough into a tight ball, cover in the bowl and ferment for 2.5-3.5 hours at 82ºF.  There may be some rise visible at this stage.


You can next place the dough into the fridge to chill the dough for about 1.5 hours, this makes rolling the dough easier to shape.  Remember, if you do so the final proof will take longer.  Alternatively, you can do a cold retard in the fridge overnight, however, you may find that this increases the tang in your bread.


Prepare your pans by greasing them or line with parchment paper.  


Lightly flour the top of the dough. Scrape the dough out onto a clean counter top and divide it into 12. Shape each tightly into boules, allow to rest 5 mins. Using a rolling pin roll each ball out and then shape tightly into boules.  Place them into your prepared pan.


Cover and let proof for 6-8 hours at a warm temperature.  I proof at 82°F.  You will need longer than 3-4 hours if you chilled your dough for shaping. Proof until the dough passes the finger poke test.


Preheat the oven to 350F and brush the dough with the egg-milk wash.  Just prior to baking brush with the egg-milk wash again.


Bake the buns for 30-35 minutes or until the internal temperature is at least 190F. Shield your buns if they get brown early in the baking process. You can brush the top of the buns with butter if you wish at this point while the buns are still hot and sprinkle with flaked salt.

My index of bakes.

Benito's picture
Benito

Two of our close friends have birthdays this month. We decided to host a brunch for them, in part to give me an excuse to bake a challah loaf again. I thought I’d make a couple of changes to Maggie Glezer’s SD challah. Mostly I thought it needed more egg, so I increased the egg from 3 to four and reduced the water to compensate for the 72% of the egg which is water. I needed the challah to make a peach and blueberry strata. Basically this is a type of French toast that you bake in a pan using cubes of the challah. This makes for an easy meal that you prepare the night before and then bake the morning of the brunch.

I decided to coat only three of the strands of this six stranded challah for a different look.  It didn’t quite turn out the way I thought it might.  I started with the seeded vs unseeded strands in alternating positions.  I wonder if I’d started them three seeded on the left and then three unseeded on the right if it might have ended up looking more random.  I’ll have to try that next time and find out.

Procedures


  1. The night before baking, mix the starter and ferment it at 76°F for 8-12 hours.
  2. In the morning, in a large bowl or the bowl of a stand mixer, dissolve the starter in the water, then mix in the 4 eggs, salt, honey and oil until completely combined.
  3. Mix in all the bread flour until it forms a shaggy mass.
  4. Knead the dough on the bench or in a stand mixer until it is smooth and there is moderate gluten development. (Add small amounts of water or flour to achieve the desired consistency, better if you do not have to) The dough should be quite firm.
  5. Transfer the dough to a lightly oiled bowl and cover it tightly. Ferment for about 2 hours. It may not rise much.
  6. To make one loaf, divide the dough into two equal portions, and divide each portion into the number of pieces needed for the type of braiding you plan to do, so divide each by 3 to make 1 six strand braided loaf.
  7. Form each piece into a ball and allow them to rest, covered, for 10-20 minutes to relax the gluten.
  8. Form each piece into a strand about 14” long. (I like Glezer’s technique for this. On an un-floured board, flatten each piece with the palm of your hand. Using a rolling pin, roll out each piece to about ¼ inch thickness. Then roll up each piece into a tight tube. Using the palms of your hands, lengthen each piece by rolling each tube back and forth on the bench with light pressure. Start with your hands together in the middle of the tube and, as you roll it, move your hands gradually outward. Taper the ends of the tube by rotating your wrists slightly so that the thumb side of your hand is slightly elevated, as you near the ends of the tube.)
  9. Braid the loaves. Braiding somewhat loosely, not too tight.
  10. Place each loaf on parchment paper on cookie trays. Cover well with plastic wrap or place the pans in a food grade plastic bag, and proof at room temperature until the loaves have tripled in volume. In my oven with the light on and door cracked open, it takes 4-6 hours, be patient.
  11. If it’s almost tripled and when poked the dough only springs back a little, preheat the oven to 180°C/350°F. Gauge the dough again. Stick a finger lightly in the dough. If it makes an indentation that doesn’t spring back, the dough is ready to be baked. If not, wait a bit more.
  12. Pre-heat the oven to 350ºF with the rack in the lower third of the oven about 30 mins before final proof is complete.
  13. Brush each loaf with an egg and some milk, lightly beaten with a pinch of salt.
  14. Optionally, sprinkle the loaves with sesame seeds and/or poppy seeds.
  15. Bake until done – 25-40 minutes rotating half way, shield from above to slow browning… If baking as one large loaf may take a bit longer, bake until sounds hollow or reaches 190ºF in the middle.
  16. Cool completely before slicing.

My index of bakes.

Benito's picture
Benito

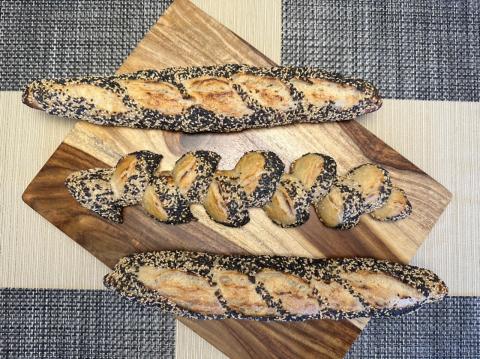
That’s a mouthful to say and a delicious mouthful to eat.  I have just retired from my full time practice of medicine at the end of last week.  My colleagues long complained that I didn’t bring enough baking into the office.  As you know, it can be challenging to bake during the work week so you can bring it something that is freshly baked.  Well since I’m now retired (I’ll return to work part time next year doing locums) I have time to bake during the week.

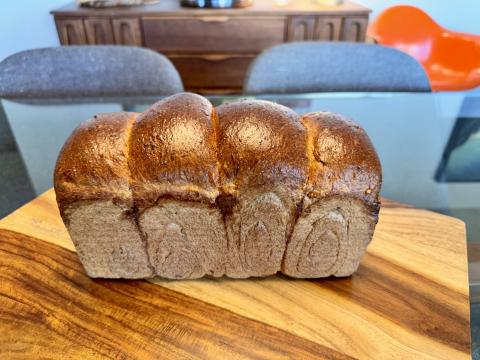
I know my staff and colleagues have a sweet tooth so I wanted to try a different sweet roll that I haven’t made before.  My source of organic stoneground whole wheat flour was totally out so I couldn’t bake with very much whole wheat so adjusted my recipe for this entirely bread flour version.  Since it is fall now, I thought what better to fill the rolls with but spiced apple and browned butter.

9” square pan


For the Filling:

1 stick unsalted butter

3 pounds Granny Smith Apples —peeled, cored and chopped into ¼-inch pieces

1 cup light brown sugar

1 tablespoon ground cinnamon

1-2 pinches of nutmeg 

1 teaspoon kosher salt


Make the filling: In a medium Dutch oven, melt the butter over medium-high heat and cook until it just begins to brown, 2 to 3 minutes. Add the remaining filling ingredients and cook, stirring often, until the apple are caramelized and the liquid has reduced to a thick syrup, 25 to 28 minutes. Let cool completely.


Method


1. Pre-cook Flour (Yudane) – 8:00 a.m. or night before and cover tightly.

Be sure to make the yudane ahead of time to give it time to cool before mixing. The texture of the mixture seems to improve if left to rest for at least one hour.

 Do ahead:  Alternatively, you could make the yudane the night before, let it cool, then cover and place it in the fridge. The next morning, let it warm to room temperature before mixing it into your dough.


Boil the water and pour it over the flour in the Kitchenaid mixing bowl. Stir with spatula (not a whisk as the Yudane will get stuck in the tines) until the mixture tightens up and all dry bits are incorporated. Let the pre-gelatinized flour cool on the counter until you mix the main dough. 


2. Mix 

To the cooled yudane, add milk, eggs, sugar and salt.  Mix to breakdown the eggs.  Add levain using your spatula cut the levain into small pieces.  Add bread flour, mix with the spatula until no dry flour remains.  Fermentolyse for 20 mins.  Using your KA mixer knead the dough until you can almost get a windowpane.  Then add the butter gradually to the dough in the stand mixer waiting until the previous addition is fully absorbed. 

The dough should be strong and smooth at the end of mixing with a good windowpane.  

Transfer your dough to a bulk fermentation container and cover.


3. Bulk Fermentation

At warm room temperature, around 82°F, bulk should take about 3 hours.

Give this dough three sets of coil folds at 30 minute intervals

After the third set, let the dough rest, covered, for the remainder of bulk fermentation.


4. Chill Dough

At this point, your dough should have risen in your bulk container, be puffy to the touch, and have smoothed out. If the dough still feels dense and tight, give it another 15 minutes and check again.

Place your covered bulk fermentation container in the refrigerator for at least one hour to fully chill the dough.


5. Roll and Shape

Before removing your dough from the refrigerator, make the filling. In a small mixing bowl, combine the following. It may seem like it's not enough filling to cover the entire surface of the dough—spread it thin.


The dough should be cold and firm to the touch; give it more time to chill if necessary.

Next, butter your baking pan (even if it’s nonstick) to ensure the rolls remove cleanly after baking or line with parchment paper.

This dough is very soft. Act quickly to roll, spread the filling, and cut before the dough warms and softens further. If it begins to soften, place it in the fridge to firm.

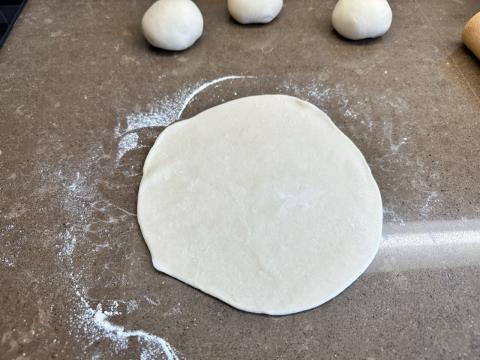
Remove your bulk fermentation container from the fridge, lightly flour your work surface in a large rectangle shape, and the top of the dough in the bowl. Then, gently scrape out the dough to the center of your floured rectangle. Lightly dust the top of the dough with flour, and using a rolling pin, roll the dough out to a 15″ x 15″ square.


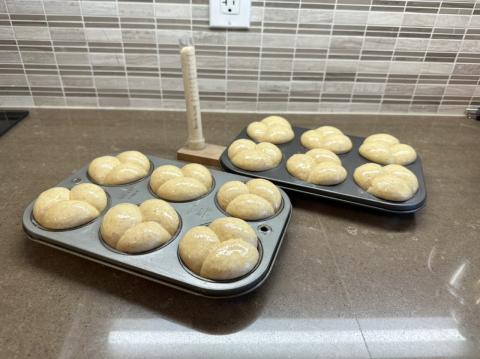
Spread the apple cinnamon filling over the dough, leaving a one cm border on all sides.  Roll the dough into a tight log and pinch to seal the seam.  Using dental floss, cut the roll into 9 equal pieces.  Place them into the prepared pan, cut side up.  Cover the pan to prevent the dough from drying out.


6. Warm Proof

Place the pan back in the 82°F proofing box.  Allow the rolls to fully proof, they should fill the pan and the spaces between them fully.  The dough should be marshmallowy soft.  This may take 5-7 hours.


Be sure to start preheating your oven at 400°F about 30 minutes before you feel the rolls will be fully proofed.


Bake

Preheat your oven, with a rack in the middle, to 400°F (200°C). After the warm proof, uncover your dough and gently press the tops of a few rolls. The fully proofed rolls will look very soft. The texture of the dough will be almost like a whipped mousse. Be sure to give them extra time in warm proof if necessary. If the dough needs more time to proof, cover the pan and give the dough another 15 to 30 minutes at a warm temperature and check again.

Once your oven is preheated, remove your pan from its bag, slide it into the oven, and bake for 30 to 35 minutes.


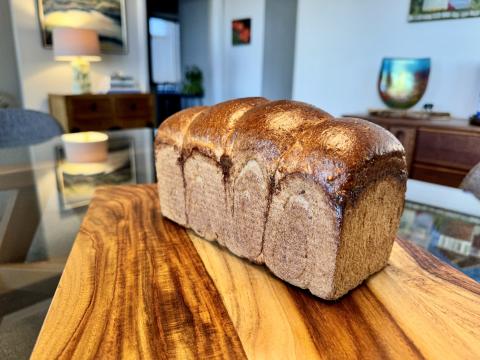
The rolls are finished baking when the tops are well-colored and the internal temperature is around 195°F (90°C). Remove the rolls from the oven, remove them from the pan and place them on a rack. Let the rolls cool for 5 to 10 minutes in the pan, then serve.

These are best the day they're made, and certainly fresh from the oven, but can be reheated in a warm oven a day or two after.


Prepare the Glaze

For the Glaze:

½ cup confectioners' sugar

½ cup honey

1 tablespoon whole milk

1 teaspoon kosher salt


Once the rolls are fully cooled out of the oven and on a rack, drizzle the glaze on the rolls. 

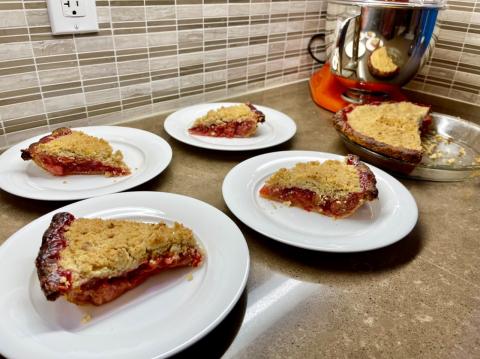
So these were a hit with everyone who had one.  The apple cinnamon with a hint of nutmeg tasted like autumn and was complimented by the honey glaze and buttery bread.

 My index of bakes.

Benito's picture
Benito

I have a small quantity of whole einkorn that I need to use up before it goes bad.  I decided I’d incorporate it into a milk bread with most of it being used in the tangzhong.  I decided to do it this way because einkorn doesn’t have the best gluten so won’t add much to the structure of the dough.  The rest of the einkorn goes into the stiff sweet levain along with all of the whole wheat.  The rest of the flour is bread flour comprising 73% of the total flour.  

To review, the idea of using a stiff sweet levain is that with sufficiently high sugar concentration, it will have a dehydrating effect on the microbes.  This effect is greater on the LAB compared with the yeast.  As a result, this levain is relatively deficient in LAB compared with a similar levain at the same hydration without the sugar.  A bread leavened with this style of levain will generally have less sour tang unless it over ferments.  I find that a Hokkaido milk bread is generally better without too much sour tang.

Unfortunately, this dough got away from me and over-fermented somewhat.  We can see this with the loss of definition between the four lobes.  Typically a well fermented bread with four lobes will have the appearance of four distinct “hills”.  If one under-ferments this bread there will be a lot of tearing between the hills and they might be quite exaggerated.  When over-fermented as this one was, you see a loss of definition of the hills.

Fortunately, this still baked up well and was extremely soft and fluffy.

For a 9”x4”x4” Pullman pan


Instructions

Levain

Mix the levain ingredients in a jar or pyrex container with space for at least 300% growth. 

Press down with your knuckles or silicone spatula to create a uniform surface and to push out air.

At a temperature of 76-78ºF, it typically takes up to 10-12 hours for this sweet stiff levain to be at peak.  For my starter I typically see 3-3.5 times increase in size at peak.  The levain will smell sweet with only a mild tang.

Tangzhong 

In a sauce pan set on medium heat, stir the milk and Whole Einkorn flour until blended. Then cook for several minutes until well thickened, stirring regularly with a spoon or heat-resistant spatula. Let cool in the pan or, for faster results, in a new bowl.  Theoretically it should reach 65ºC (149ºF) but I don’t find I need to measure the temperature as the tangzhong gelatinizes at this temperature.  You can prepare this the night before and refrigerate it, ensure that it is covered to prevent it from drying out.


If you plan on using a stand mixer to mix this dough, set up a Bain Marie and use your stand mixer’s bowl to prepare the tangzhong.


Dough

In the bowl of a stand mixer, add the milk (consider holding back 10 g of milk and adding later if this is the first time you’re making this), egg, tangzhong, salt, sugar and levain.  Mix and then break up the levain into many smaller pieces.  Next add the flours.  I like to use my spatula to mix until there aren’t many dry areas.  Allow the flour to hydrate (fermentolyse) for 20-30 minutes.  Mix on low speed and then medium speed until moderate gluten development this may take 5-10 mins.  You may want to scrape the sides of the bowl during the first 5 minutes of mixing.  Next add room temperature butter one pat at a time.  The dough may come apart, be patient, continue to mix until it comes together before adding in more butter.  Once all the butter has been added and incorporated increase the speed gradually to medium. Mix at medium speed until the gluten is well developed, approximately 10 mins.  You will want to check gluten development by windowpane during this time and stop mixing when you get a good windowpane.  You should be able to pull a good windowpane, not quite as good as a white flour because the bran will interrupt the windowpane somewhat. 


On the counter, shape the dough into a tight ball, cover in the bowl and ferment for 2 - 3 hours at 82ºF.  There should be some rise visible at this stage.


You can next place the dough into the fridge to chill the dough for about 1.5 hours, this makes rolling the dough easier to shape.  Remember, if you do so the final proof will take longer.  Alternatively, you can do a cold retard in the fridge overnight, however, you may find that this increases the tang in your bread.


Prepare your pans by greasing them with butter or line with parchment paper.  


Lightly flour the top of the dough. Scrape the dough out onto a clean counter top and divide it into four. I like to weigh them to have equal sized lobes. Shape each tightly into a boule, allow to rest 5 mins. Using a rolling pin roll each ball out and then letterfold. Turn 90* and using a rolling pin roll each out to at least 8”. Letterfold again from the sides so you have a long narrow dough. Then using a rolling pin, roll flatter but keeping the dough relatively narrow.  The reason to do this extra letterfold is that the shorter fatter rolls when placed in the pan will not touch the sides of the pan.  This allows the swirled ends to rise during final proof, this is only done for appearance sake and is not necessary.  Next roll each into a tight roll with some tension. Arrange the rolls of dough inside your lined pan alternating the direction of the swirls. This should allow a greater rise during proof and in the oven.


Cover and let proof for 4-6 hours at a warm temperature.  I proof at 82°F.  You will need longer than 4-6 hours if you chilled your dough for shaping. I proof until the top of the dough comes to within 1 cm of the top edge of the pan.


Preheat the oven to 350F and brush the dough with the egg-milk wash.  Just prior to baking brush with the egg-milk wash again.


Bake the loaves for 50 minutes or until the internal temperature is at least 190ºF, rotating as needed to get even browning. Shield your loaf if it gets brown early in the baking process. After 50 mins remove the bread from the pan and bake a further 10 mins by placing the loaf directly in the oven on the rack with the oven turned down to 325ºF. You can brush the top of the loaf with butter if you wish at this point while the bread is still hot to keep the top crust soft.

My index of bakes.

Benito's picture
Benito

I unfortunately am sick, but running out of bread, so I decided I needed to bake a loaf of bread that wouldn’t require excessive hands on time and allow for some inattention.  This type of bread does require great gluten development since it is fully wholegrain, so I use the KA mixer to do that which takes some load off of me.  I don’t need to measure pH or rise really with this since I know what the dough should look like in the pullman pan when it is done final proof.  I think it turned out well considering my lack of attention to it yesterday during fermentation.

Instructions

Levain

Mix the levain ingredients in a jar or pyrex container with space for at least 300% growth. 

Press down with your knuckles or silicone spatula to create a uniform surface and to push out air.

At a temperature of 76-78ºF, it typically takes up to 10-12 hours for this sweet stiff levain to be at peak.  For my starter I typically see 3-3.5 times increase in size at peak.  The levain will smell sweet with only a mild tang.

Tangzhong 

In a sauce pan set on medium heat, stir the milk and steel cut seven grain porridge mix until blended. Then cook for several minutes until well thickened, stirring regularly with a spoon or heat-resistant spatula. Let cool in the pan or, for faster results, in a new bowl.  Theoretically it should reach 65ºC (149ºF) but I don’t find I need to measure the temperature as the tangzhong gelatinizes at this temperature.  You can prepare this the night before and refrigerate it, ensure that it is covered to prevent it from drying out.


If you plan on using a stand mixer to mix this dough, set up a Bain Marie and use your stand mixer’s bowl to prepare the tangzhong.


Dough

In the bowl of a stand mixer, add the milk (consider holding back 10 g of milk and adding later if this is the first time you’re making this), egg, tangzhong, salt, sugar and levain.  Mix and then break up the levain into many smaller pieces.  Next add the flour and vital wheat gluten.  I like to use my spatula to mix until there aren’t many dry areas.  Allow the flour to hydrate (fermentolyse) for 20-30 minutes.  Mix on low speed and then medium speed until moderate gluten development this may take 5-10 mins.  You may want to scrape the sides of the bowl during the first 5 minutes of mixing.  Next add room temperature butter one pat at a time.  The dough may come apart, be patient, continue to mix until it comes together before adding in more butter.  Once all the butter has been added and incorporated increase the speed gradually to medium. Mix at medium speed until the gluten is well developed, approximately 10 mins.  You will want to check gluten development by windowpane during this time and stop mixing when you get a good windowpane.  You should be able to pull a good windowpane, not quite as good as a white flour because the bran will interrupt the windowpane somewhat. 


On the counter, shape the dough into a tight ball, cover in the bowl and ferment for 2 - 3 hours at 82ºF.  There should be some rise visible at this stage.


You can next place the dough into the fridge to chill the dough for about 1.5 hours, this makes rolling the dough easier to shape.  Remember, if you do so the final proof will take longer.  Alternatively, you can do a cold retard in the fridge overnight, however, you may find that this increases the tang in your bread.


Prepare your pans by greasing them with butter or line with parchment paper.  


Lightly flour the top of the dough. Scrape the dough out onto a clean counter top and divide it into four. I like to weigh them to have equal sized lobes. Shape each tightly into a boule, allow to rest 5 mins. Using a rolling pin roll each ball out and then letterfold. Turn 90* and using a rolling pin roll each out to at least 8”. Letterfold again from the sides so you have a long narrow dough. Then using a rolling pin, roll flatter but keeping the dough relatively narrow.  The reason to do this extra letterfold is that the shorter fatter rolls when placed in the pan will not touch the sides of the pan.  This allows the swirled ends to rise during final proof, this is only done for appearance sake and is not necessary.  Next roll each into a tight roll with some tension. Arrange the rolls of dough inside your lined pan alternating the direction of the swirls. This should allow a greater rise during proof and in the oven.


Cover and let proof for 3.5-4 hours at a warm temperature.  I proof at 82°F.  You will need longer than 3.5-4 hours if you chilled your dough for shaping. I proof until the top of the dough comes to within 1 cm of the top edge of the pan.


Preheat the oven to 350F and brush the dough with the egg-milk wash.  Just prior to baking brush with the egg-milk wash again.


Bake the loaves for 50 minutes or until the internal temperature is at least 190ºF, rotating as needed to get even browning. Shield your loaf if it gets brown early in the baking process. After 50 mins remove the bread from the pan and bake a further 10 mins by placing the loaf directly in the oven on the rack with the oven turned down to 325ºF. You can brush the top of the loaf with butter if you wish at this point while the bread is still hot to keep the top crust soft.

My Index of Bakes.

Benito's picture
Benito

I baked another Sour Cherry Rhubarb Streusel Pie for dessert last night but this time not vegan and used my usual all butter pastry and butter in the streusel topping. This has quickly become my favorite pie this summer.  I love the tart sweetness of the cherries and the distinctive rhubarb flavour.  The almond extract brings out the cherry flavour while the lemon brightens everything up.

Ingredients

  • 2 1/2 cups (12.5 ounces; 350g total) all-purpose flour, divided, 233 g with the butter and 117 g after.
  • 2 tablespoons (25g) sugar
  • 1 teaspoon (5g) kosher salt; for table salt use same weight or half as much by volume
  • 2 1/2 sticks (10 ounces; 280g) unsalted butter, cut into 1/4-inch pats (see note)
  • 6 tablespoons (3 ounces; 85 g or 85ml) cold water


Directions

  • Combine two thirds of flour  (233 g) with 25 g sugar and 5 g salt in the bowl of a food processor. Pulse twice to incorporate. Spread butter pats evenly over surface. Pulse until no dry flour remains and dough just begins to collect in clumps, about 25 short pulses. Use a rubber spatula to spread the dough evenly around the bowl of the food processor. Sprinkle with remaining flour (117 g) and pulse until dough is just barely broken up, about 5 short pulses. Transfer dough to a large bowl. 
  • Sprinkle with 85 g of cold water. Then, using a rubber spatula, fold and press dough until it comes together into a ball. Divide ball in half. Form each half into a 4-inch disk. Wrap tightly in plastic and refrigerate for at least 2 hours before rolling and baking. 

  • When ready to shape the dough, pull out one ball, set it on a well-floured work surface, and sprinkle with more flour. Use a tapered rolling pin to start rolling the dough out into a circle, lifting the dough and rotating it while rolling to achieve an even shape. Continue rolling, changing the angle of your rolling pin as you go to get an even shape and thickness. The finished dough should overhang your pie plate by an inch or two.

  • Pick up the dough by carefully rolling it around your rolling pin, using your bench scraper to help lift it off the work surface. Unroll it over a pie plate. Gently lift and fit the dough into the pie plate, getting down into the corners.  

  • For a single-crusted pie, use a pair of scissors to trim the dough so that it overhangs the edge by 1/2 inch all around. For a double-crusted pie, at this stage, fill it and drape your second round of pie dough over the top. Trim it to a 1/2-inch overhang along with the lower crust. Either way, tuck the overhanging edge(s) under itself all the way around the pie. 

  • Flute the edges of the pie crust using the forefinger of one hand and the thumb and forefinger of the other. The single-crust pie shell is ready to be blind-baked or filled. For a double-crusted pie, brush with an egg white, sprinkle with sugar, and cut vent holes in the top with a sharp knife before baking. 

Par-baking

Par-bake crust for 20 mins at 400°F with pie weights and the edge crust shielded right from the start.


Remove weights then bake further 5-10 mins until lightly golden.


Filling 

450 g pitted sour cherries

450 g rhubarb cut in 0.5-1 inch pieces

170 g sugar

2 tbsp or 40 g cornstarch 

A pinch of salt

1 tsp of almond extract


Juice of ½  lemon 

prepare the night before baking


Mix all of the above except cornstarch and allow the fruit to macerate releasing much of its juices.  Add cornstarch and mix to dissolve.  Cook on medium heat until the liquid just starts to thicken.  Remove from the heat until needed.


Streusel Topping for Pies

1⅔ cups streusel, to top Makes 1⅔ cups streusel, enough for one 9- or 10-inch pie topping

1 cup all-purpose flour

3 tablespoons packed light brown sugar

4 teaspoons granulated sugar

¼ teaspoon kosher salt

6 tablespoons unsalted butter, cut into ½-inch cubes, at room temperature

Prepare the night before baking and refrigerate.

Stir together the flour, brown and granulated sugars, and salt in a large bowl. Sprinkle in the butter pieces and toss to coat. Rub the butter into the dry ingredients with your fingertips until the butter is incorporated and the mixture is chunky but not homogenous.

Chill for at least 15 minutes before using.


The streusel will keep refrigerated for 5 days or frozen for 1 month.


Once the par-baked crust has cooled 20-30 mins fill crust with the filling spreading it evenly.  Top with the streusel.


Bake at 425°F for 20-25 mins with the edge shielded then 375°F until the juices are bubbling, 25-30 mins.  Allow to cool fully before slicing.


Benito's picture
Benito

I plan to make a barley risotto with lemon ricotta, sun dried tomatoes and spinach for dinner and wanted a bread to go along with it.  It has been a long time since I made a plain old country sourdough so decided that would go well with dinner. I made small changes to my usual country sourdough recipe for this bake.  I went back to using a liquid levain instead of a stiff levain just because I hadn’t done a liquid levain in a long long time.

Build overnight levain and ferment at 78°F for about 8-9 hours.

Overnight saltolyse of water, salt and flours.

In the morning add the levain to the saltolysed dough and knead until well developed.

Do a bench letterfold and then place in a proofing box at 82°F.

Do a coil fold every 30 mins until the dough is strong and holds its shape between folds.   I did five coil folds.

Shape the dough when it has risen about 40% or the pH has fallen about 1.1 since the beginning of bulk.  Place in a rice flour dusted banneton.

Monitor the pH and rise once the dough is in the banneton and start cold retard once the dough has risen to a total of 70% or the pH fallen a total of 1.4.


The next morning pre-heat the oven 500°F and set up for steam baking.  30 mins before ready to bake pour 1 L of boiling water into your metal loaf pan with the Sylvia towel rolled tightly inside to pre-steam the oven.  When the oven reaches 500°F flip the dough onto a parchment paper sheet, brush off excess rice flour, score and then brush water onto the dough but not the main score.  Transfer to the oven and onto the heated baking steel or stone.  Pour 250 mL of boiling water into your cast iron skillet.  Drop the temperature of the oven to 450°F baking with steam for 25 mins.  After 25 mins vent the steam and remove the steaming gear.  Drop the temperature to 420°F and bake for a further 20-25 mins, turning half way through and moving the bread to a rack instead of the baking steel.

My index of bakes.

Pages

Subscribe to RSS - Benito's blog