The Fresh Loaf

A Community of Amateur Bakers and Artisan Bread Enthusiasts.

Most bookmarked

mrpeabody's picture
mrpeabody

Chinese steamed sweet pastry (Bok Hong Tay)

OK, so I just posted a recipe for Mochi, which is a non-yeasted dough.  This is "The Fresh Loaf," so I should also give a recipe that is at least yeasted.  Here is my Mom's version of bok hong tay, a sweet steamed rice cake.  Its name is literally "white sweet pastry" in Chinese.  You sometimes see it in Chinese restaurants for dimsum.  My Mom always made it on the thin side, but the restaurants tend to make a thicker version. 

  • 4 c long grain rice
  • water
  • 1 pkg dry yeast (I've made this with regular and rapid-rise and they both work for this)
  • 4 c and 1 tablespoon sugar

Wash the rice well and then drain all water. Add to it 4 c of water and let the rice soak overnight in the water (room temperature).

The next day, put the rice-water mix in a blender and whip it smooth (hint: do this in small batches, with a rice-water slurry that is about 80-90% rice. This allows it to blend very smooth. Add the remaining water after it is all blended).

In a separate bowl, combine 1/2 c of lukewarm water, the dry yeast and 1 tbsp sugar. Wrap bowl with plastic wrap and let stand in a warm spot for approx 1 hr. Then add the proofed yeast mixture to the rest of the blended rice/water mixture and let stand at room temperature for 4-5 hrs.

In a separate bowl, mix 2 c water and 4 c sugar. If necessary, add heat to make all of the sugar dissolve. Be sure that the sugar syrup has cooled to room temperature before adding to the rice/water mixture. After adding the sugar syrup, let the mixture stand for another 1/2 hr before cooking the pastry.

To cook: Pour some of the mixture into a well-oiled cake pan (approx. 1/4 inch deep.  Again, my Mom prefered to make this on the thin side, but if you like, you can make it thicker, just adjust the cooking time). Steam the mixture for 15 min (be sure that the water is vigorously boiling). After the pastry is done, brush some oil on the top (note: if the oil had be previously heated to near smoking temp, and then cooled to room temperature, the resultant oil would taste better for brushing on the pastry.  I don't know why this is true, but according to my Mom that the way she always did it.).  When the bok hong tay has cooled down, cut out wedges of the pastry and serve. 

Enjoy, now I have to get back to work on my grant. 

Mr. Peabody

fsu1mikeg's picture
fsu1mikeg

My bread has fallen and it can't get up...

Hi, I hope this is the right forum to ask a question...

I am pretty new to bread baking, so I get stumped pretty easily.  I have been making Dreikornbrot (three seed bread) from the Local Breads recipe.  First time it came out pretty nice, but I decided it could've used a couple more minutes in the oven.  I used my first rye starter and it didn't even look ready (it was pretty stiff, unlike the "porridge-like" description from the book).  Nevertheless, it made a nice bread.  On subsequent refreshes, the starter looked perfect.  It was creamy and rose and developed the holes just like in the picture.  But the bread that resulted from those seemingly perfect starters didn't come out as good as the first try.  The dough rose great, but was much stickier and harder to handle during the forming stage.  The resulting bread tasted ok, but the roof sort of caved in after it was taken from the oven.  I assume this is because the dough was too moist and and the structure was too weak to keep it's shape?  Do I need to adjust the flour upwards to account for the more liquidy starter that I'm using?  Was the starter more correct in the stiffer form than the "porridge-like" form that Leader described?  I'm just a little perplexed and disappointed, because I love the bread and I want it to come out of the tin with the perfect "dome", and not a sinkhole.  Thanks in advance.

zhi.ann's picture
zhi.ann

would Artisan Bread in 5 Minutes work for me? if not, what would? *UPDATED with more ingredients*

I'm new to baking-bread-from-scratch but trying to learn...

I just moved to a rural area in China where they don't sell bread. My husband misses it a lot, so I'm trying to learn to make it. However, what I'm reading on here sounds a bit intimidating. I've baked yeast breads in the states, but I had any ingredient I could want and just did step by step recipe instructions, without trouble. Here, I just have the basics.

I asked around on grouprecipes.com's bread group about ideas. I was recommended to check into the Artisan Bread in 5 Minutes' master recipe and Irish Soda Bread (but I don't have cream of tartar here).

From what I've read online, the master recipe (and maybe some others?) would work for me in some ways, but not others. Here's what ingredients and equipment I do and do not have access to:

*UPDATE* - I looked around and found more available ingredients: soy flour, black and purple rice, sesame seeds, millet, sticky rice flour, corn flour and corn meal, lotus root starch, sorghum (milo) and sorghum flour.

INGREDIENTS I DO HAVE:

*white flour
*rolled oats (and a small mill if I need to grind them)
*buckwheat flour
*honey
*soy oil
*yogurt
*applesauce (can make it)
*fruits of all varieties, inc. dried like raisins
*white sugar
*brown sugar
*salt
*cinnamon (can buy the whole bark and use mill to make it ground)
*soy flour
*purple rice
*black rice
*sesame seeds
*(yellow) millet
*sticky rice flour
*corn flour
*corn meal
*lotus root starch
*sorghum (milo)
*sorghum flour

EQUIPMENT I HAVE:

*small countertop oven (with options for turning on both elements, just the top, or just the bottom)
*refrigerator
*electric stovetop
*cookiesheet
*rolling pin
*mixing bowls, spoons, that type of thing

I can get (from a city an hour and a half away):
*baking powder
*baking soda
*packets of dry yeast

I do NOT have & don't have access to:
*whole wheat flour
*bread flour
*shortening
*butter
*margarine
*sour cream
*cream of tartar
*'coarse' or kosher salt - not even sure what this is
*vanilla
*peel
*baking stone

Any ideas? I'm considering buying the book but not if I am lacking something for all the ingredients. General tips about baking without a baking stone, or about alternatives for it, and ingredient subtitutions related to my lists above, and that kind of thing are also appreciated. Thanks!

b_elgar's picture
b_elgar

Carold Field's Coccodrillo

Just to show that Carol Field has some great bread recipes that
work out well, we have the following saga...

Everyone here at home wanted Field's croccodrillo bread again. After a year or so
without making it, and returning to it last week, I remember why I
used to make it so often.

I have added a twist this year. After the final mix of the dough, I
let it retard in the fridge for at least 16 hours. It winds up being a
3 day bread, but it isn't as if I'm not baking other things in
between. Not only does it deepen the flavors even more, but it makes
it a more manageable dough to handle.

This weekend, the bread was begun with sourdough, rather than the dry
yeast called for.

Apologies for using tinypic, I have not masterd the photo upload here.

The poolish, just before the mix of the dough...
http://i32.tinypic.com/1gm7b4.jpg

I used to always use the Kenwood for the extended mix of this
incredibly gloppy dough, but had the Magic Mill out because I was
doing large batches of Anadama. That mixer came through like a champ
and the dough mixing was a sight to behold.

Round and Round she goes....
http://i29.tinypic.com/mwb0xl.jpg

This afternoon, we took it out of the fridge, shaped it (it is so very
much easier to shape and handle after the Big Chill) and let it sit
out to warm up and get burbling again.

Moon Pie...
http://i31.tinypic.com/33pbuy1.jpg

Time to split the dough mound and invert each half onto the parchment
covered peel.
http://i25.tinypic.com/117rzo9.jpg
http://i27.tinypic.com/3150ked.jpg

And here it is out of the oven...
http://i28.tinypic.com/jpfp7a.jpg

And the interior...
http://i25.tinypic.com/8xsndu.jpg

Tastes mighty good, this stuff...

Boron

dmsnyder's picture
dmsnyder

Hamelman's Miche, Ponte-a-Calliere with Golden Buffalo flour

Miche, Ponte-a-Calliere

Miche, Ponte-a-Calliere

Miche, Ponte-a-Calliere crumb

Miche, Ponte-a-Calliere crumb


I have made Hamelman's Miche, Ponte-a-Calliere several times. It has been one of my favorites. My previous breads have used 100% First Clear flour from King Arthur.

Several other bakers had enthused about Golden Buffalo flour from Heartland Mill, and their description made it sound ideal for this Miche, so that's what I tried for my first baking with this flour.

Golden Buffalo is more coarsely ground than most bread flours, other than pumpernickel. It absorbs lots of water. I followed Hamelman's formula however, resulting in a dryer dough than using First Clear. It was quite tacky, but not really a slack dough.

The crust color is really nice, I think. The crumb, while not as open as it is meant to be, is still nice and the chew is wonderful. It tasted really good 2 hours after baking. I bet it will taste even better today.

 Next time, I'm going for higher hydration and, if I remember, I will make a soaker with at least part of the flour, as suggested by bwraith.

David

dmsnyder's picture
dmsnyder

Golden buffalo flour advice?

I ordered Golden Buffalo flour from Heartland Mill after reading several very positive comments about it from other bakers on TFL. I have my first bread using Golden Buffalo fermenting. It is Hamelman's Miche, ponte-a-calliere, which I have made several times before, using King Arthur First Clear flour.


The Golden Buffalo flour seems to be a coarse grind, and the dough that resulted from using the weights of flour and water specified in Hamelman's formula is much less slack than that made with First Clear flour. How the baked bread differs from my past experience remains to be seen.


My question is: Have those of you (bwraith, zolablue, others) with Golden Buffalo experience found you have to add additional water to doughs made with this flour? Any other information about peculiarities of Golden Buffalo would be appreciated, too. 


David 

rainbowbrown's picture
rainbowbrown

Some notes on bagel making.

Sourdough Bagels

bagelsbagels

bagelsbagels

I made some sourdough bagels this morning. I used Bwraith's post, which was based on Susanfnp's post, as a guide: Sourdough Bagels Revisited. These were based on Silverton's recipe from _Breads from the La Brea Bakery_. After going back and forth reading Silverton's recipe and the modified ones, I decided to go with Bwraith's post exactly, well as exactly as I could. I made some slip-ups, which really affected my bagels. They taste great, but they are pretty open and bready and they puffed a little too much. I know precisely what my mistakes were and I thought I'd post them for others who might do some bagel making. All that I did wrong were small errors on my part, things like not taking notice of details in the write up and such. Anyhoo, here gos:

The write up called for 90% hydration starter. In my tendency to over look random details I refreshed my starter at 100%. I believe this is why they were bready. The idea of the dough having a slightly higher hydration was already blamed for breadiness in the discussions between Bwraith and Susanfnp and Bwraith discussed it throughout the comments, but it still went right out the other ear, since it was a difference in the starter.

I shaped some of them using the rope method used in the post and I shaped some of them using a method discussed in BBA where you make a roll and then poke a hole in it and twirl it around your finger. I think I like the rope method better, they were more consistently smooth. My mistake here though was I didn't make the center hole big enough and many of them closed up. Again, something discussed in the post, but I wasn't careful to take notice of it. They should have been about 2.5 inches and mine were only about 1.5 inches.

I believe I worked pretty quickly in getting them into the fridge after shaping and in going through the whole boiling baking process, but they still puffed too much. I think I'll blame this on the fact that my kitchen was 68 degrees and steamy. In fact my whole tiny apartment was steamy because of the big pot of boiling water. Next time I'll open the double doors next to my kitchen and let the chilly morning air in. I'm pretty sure the warm stuffiness of my kitchen gave them a good proofing environment for the four minutes that they sat out between the fridge and the oven.

I think that small slip-ups like these can be so easy to come across and I hope that discussing them will help them sink in more, making them easier to avoid in the future.

Now on to the good things:

I used 5% Giusto light rye flour, 15% Giusto whole wheat flour and 80% KA High Gluten flour, which all worked out great. They really taste quite awesome.

I used poppy seeds on some, ground flax seeds on some and kosher salt on some.

I refrigerated my parchment papered sheet pans before I did the shaping so that as I shaped I was putting the bagels on cold pans. I think this may have been a good idea, not quite sure though.

The only other time I have ever made bagels was about six years ago and was before I really began learning about baking. I just picked a recipe and followed it, not having any sort of understanding of what or why I was doing any of it. They turned out bad, real bad. So these bagels are pretty thrilling for me, and now that I know what I'm doing more in baking, I know what I need to do next time to fix it.

One more note is that I began kneading these in my Kitchen Aid and after three minutes the motor began to burn out, so I did the rest by hand. And this was with the hydration a bit too high.


Thank you Bwraith for your massively helpful write-up on your sourdough bagels. Reading it is actually what inspired me to try my hand at bagels again.

I also have a question about the KA high gluten flour. I don't have the Sir Lance A Lot, but the KA organic. The thing is it smelled a little odd to me. And I'm a little hesitant to admit that I know what it smelled like, but I do...it smelled like Jiffy boxed blueberry muffin mix. Anyone know why? The flour was malted and I don't know if I've ever used malted flour before, so I think it could have been that. I don't know...just curious.

And one more question.  As I was shaping, I found that most, but not all of the ropes were a little, I don't know, hollow-ish as I rolled them which made it a little difficult.  Anyone have any insight on this?  

Anonymous baker's picture
Anonymous baker (not verified)

Flours and measurements

New here and to baking bread.  I've been using all purpose unbleached flour are there any adjustments I should be making when a recipe calls for bread flour or all purpose flour?  Aslo is there any conversion charts on this site, I've noticed some recipes are given in pounds instead of cups, how many cups in a pound, grams in a tablspoon, etc?  Thanks in advance

qahtan's picture
qahtan

Should it or shouldn't it

 Although I have been making bread etc more years than I care to remember I have a question.

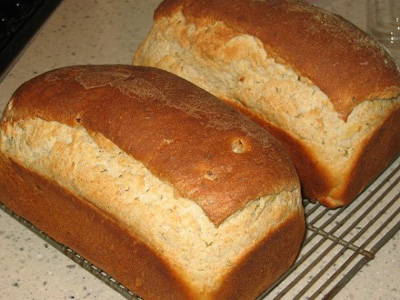
 I always like my loaves baked in pans to have that deep expansion place just under the crust like this of James beard  bread pictured from here in T F L.  Should it look like this or should it be how can I say 'closed'.  qahtan

sour cream bread

MaryinHammondsport's picture
MaryinHammondsport

A Quick Way to Convert Volume to Weight in Grams

I just had one of those "duh!" moments, and wanted to share.

If you have become enamoured of converting recipes to grams, as I have, you probably have noticed that there are no conversions tables that cover everything an adventurous baker might want to use. I've been relying on actually weighing out things and keeping notes. Then it hit me -- a resource I have used for other food calculations is available right on the Web and it covers everything you can possibly think of -- or almost.

Go to http://www.nutritiondata.com/

and you have easy access to the USDA tables of food data.

At the upper right on the Nutrition Data home page are two boxes where you can enter the food you are looking for. Suppose you want to convert 1/4 of pistachio nut meats to grams. Type in pistachio and pick the category Nuts and Seed Products in the drop down list, then hit Search. you will come up with 3 listings for pistachio nuts. Click on the one you want, and you will be taken to a page with all sorts of information, much of which is not relevant to bakers, but right near the top you will learn that 1 cup of pistachio nutmeats weights 123 grams. If your recipe calls for 1/4 cup, divide by 4 and you are there -- 31 grams.

i checked on what types of flours were listed; there are several dozens. From experience I know that must common ingredients are covered. I've used this resource for purposes other than baking for years, and there is very little that is not listed. I find the organization here much easier to deal with than the USDA site.

I'm just embarrassed that it took me so long to realize I could use it this way.

Mary in Hammondsport where sunshine is finally melting the half inch of ice that fell yesterday.

Pages