The Fresh Loaf

A Community of Amateur Bakers and Artisan Bread Enthusiasts.

Recent Blog Entries

dmsnyder's picture
dmsnyder

Pan de Cristal

David Snyder

September, 2023


Pan de Cristal is a bread that has intrigued me for some time. It is a white bread similar to an Italian ciabatta but of even higher hydration. I was a bit spooked by the anticipated challenge of handling such a wet dough until I viewed the instructional video made by Martin Philip, the fellow who took Jeffrey Hamelman’s place as head baker at King Arthur Bakers.


Here is a link to Martin’s video: Pan de Cristal demonstration video


And here’s a link to the recipe on Kingarthurbakers’ web site: Pan de Cristal Recipe


Pan de Cristal is based on a traditional Catalonian bread. The currently popular version derives from a recipe developed around 2010 by Jordi Nomen of Concept Pa Bakery in Barcelona. The original recipe may have included some sugar and some olive oil, but Martin’s version uses neither.


Versions of Pan de Cristal have been posted on The Fresh Loaf several times in past years. You may find these interesting and instructive.


I have now made Pan de Cristal two times. The second time I used 10% freshly milled hard Spring white whole wheat with no perceptible change in the bread - crust, crumb or flavor. This is a very nice bread. We have enjoyed it particularly for sandwiches. I have not yet used it for panini but plan to do so. Adding some olive oil and maybe some sugar are other variations to try.


Here are some more photos to encourage you to make this bread for yourself:


Happy Baking!


David

Yippee's picture
Yippee


Please see here and here to learn more about concentrated lactic acid sourdough (CLAS). 


While in Hong Kong, I sampled pineapple buns (called 'ball-law-bao' 菠蘿包 in Cantonese) from EVERY Chinese bakery I passed by. To my disappointment, they didn't live up to my childhood memories. Some lacked that satisfying bounce after a bite, and some had an odd taste in their pineapple crust. However, my disappointment quickly faded because I had found the perfect, authentic recipe to recreate the ball-law-bao of my youth. This recipe comes from the book Hong Kong Bread by Chef Yung Ling Yau. P.S. There's a newer edition of this book with a revised title and additional recipes, including two more of my childhood favorites: egg tarts and coconut tarts.

Since decent ball-law-bao is hard to come by, I feel compelled to share this recipe with those who long for the delectable taste of this classic treat. 


While working with Chef Yau's recipe, I noticed something interesting: no salt was used. Surprisingly, the absence of salt didn't result in any unusual taste, thanks to the sweetness of the bread that masked the blandness. However, it's worth noting that the blandness becomes quite apparent in other salt-free bread dough, like Montreal-style bagels. So, generally, it's not a good idea to skip the salt.


The format of today's CLAS version recipe differs from my usual ones, as I prepared the instructions for a friend who adores my ball-law-bao but lacks experience in bread baking.


Ingredients for the Pineapple Crust 

- enough for 16 buns; use half for one bake


- Pastry/cake flour: 168g

- Sugar: 112g

- Butter: 14g

- Milk powder: 14g

- Egg yolk: 1

- Lard: 66g

- Condensed milk: 28g

- Evaporated milk: 28g

- Ammonia carbonate: 2g (available at Michael’s or online)

- Baking soda: 1g

- Yields approximately 454g of crust


Instructions


1. Mix the above ingredients until they are just homogeneous.


2. Use half of the batch for one bake. The crust per bun should be approximately 28g. Roll it into a ball, flatten it into a disc by hand, then gently roll it out once. Rotate the disc 90 degrees and roll it out again. Repeat this process until you've come full circle. The discs should be large enough to cover the proven dough balls' top. Refrigerate the discs while the buns are proving.


3. Refrigerate the remaining crust for the next bake.


Hong Kong Pineapple Buns


Ingredients (for 8 buns):


A.

- All-purpose flour: 243g

- Whole egg: 1 (about 50-60g)

- Sugar: 38g


B.

- Warm water: 84g (divided)


C.

- Whole-wheat CLAS (flour + liquid): 19g

- Kosher salt: 3.8g (optional)

- GOLD yeast: 1.8g


D.

- Butter: 23g (diced)


E.

- Milk: 51g


Instructions:


1. Mix

  - Add ingredients from A. to the mixer with a paddle attachment.

  - Start the mixer.

  - Gradually add B. until a dough forms and all ingredients are moistened. Reserve any unused water for later use; you may not need all 84g, depending on how absorbent the flour is.


2. Rest

  - Cover the dough in the mixing bowl and let it rest at room temperature for 30 minutes to an hour.


3. Mix (again)

  - Switch to the dough hook.

  - Add C. and mix until all ingredients are well incorporated. Add a little water to moisten if needed.

  - Mix with the dough hook until the dough gains strength and starts pulling away from the mixing bowl's sides.

  - Gradually add D. until well incorporated.

  - Gradually drizzle E. while the mixer is running. Add more after each drizzle is well incorporated into the dough.

  - If, at any point, the machine sounds labored or heats up, stop mixing and put the mixing bowl into the fridge to cool for 10 minutes before resuming mixing.

  - If you feel that the dough can take in more water or it feels dry (though not likely), and you have water reserved from above, drizzle it into the dough while the mixer is running and mix until it’s well incorporated.


4. Bulk Ferment – 1st rise

  - Place the dough in a straight-sided container and let it rise in a warm place until the volume doubles.


5. Divide and Preheat Oven

  - Divide the dough into 8 portions, approximately 63g each, and shape them into dough balls.

  - Prepare the crust, dividing it into 8 portions, approximately 28g each. Flatten and roll them into discs large enough to cover the top of the dough balls.

  - Preheat the oven to 392°F (for a darker crust) or 375°F (for a golden crust).


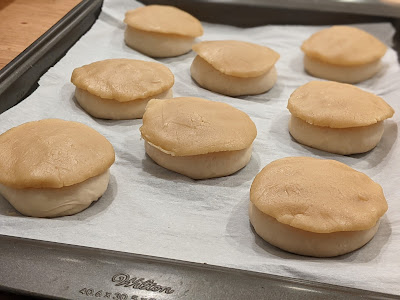
6. Final Proof - 2nd rise

  - Cover the dough balls and let them rise in a warm place (around 30°C) for about 30 minutes or until the dough appears slightly puffy.
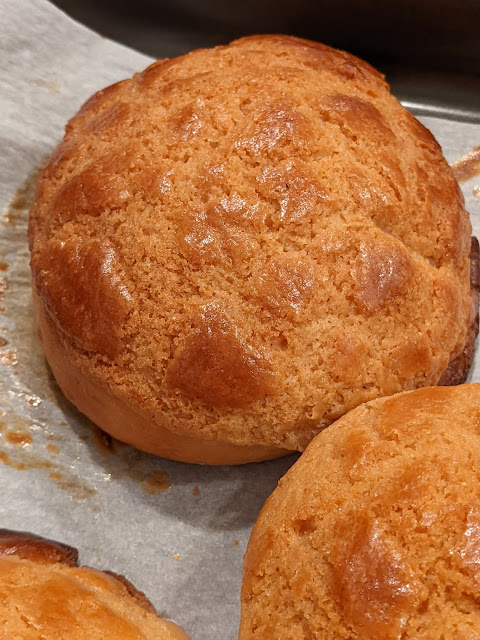
 

7. Bake

  - Place a crust disc on each dough ball.

  - Apply an egg wash (whole egg whisked) on top.

  - Bake on a sheet pan lined with parchment paper at 375°F for 15-20 minutes or until the top appears golden. Rotate halfway through.


P.S.20231205

Here's a video that tells the story of pineapple buns:

https://youtu.be/yTEnzSLh6Aw?feature=shared


I enjoy savoring a plain, warm bun with a thick slab of COLD butter,  known as 'ball-law-yau,' where 'yau' refers to oil (butter), as shown in the video below at 2:36:

https://youtu.be/9vcYsFKTmec?feature=shared


Hong Kong-style milk tea paired with 'ball-law-yau' is a classic afternoon tea combo. Have you tried it?


tpassin's picture
tpassin

After trying my hand at a 50% spelt loaf - see

https://www.thefreshloaf.com/node/72889/50-spelt

I made a similar loaf with 50% einkorn flour. The stone-ground flour comes from a local restored water mill.  I've read a lot, mainly on this site, about how einkorn flour is runny and sticky and won't hold its shape.  E.g.,

https://www.thefreshloaf.com/recent-blog-entries?page=1

I did recently make a loaf of mostly einkorn that I had to bake in a loaf pan - it had a very fine taste -  and I wondered if I could make a 50-50 formula hold a shape better.  I have also read that you won't really taste the einkorn difference until you get to a much higher percentage of einkorn flour.

The formula and procedure were nearly the same as for the 50% spelt loaf, with one exception I'll talk about in a minute.

Formula
========
220g sifted einkorn (Locke's mill)
all the soaker
200g white flour
150g white sourdough starter
270g water
10g salt

I increased the salt from 9g to 10g in the hope of strengthening the gluten.  My kitchen sifter sifted out about 7% of the flour weight, the same as for the spelt flour from the other post.  I poured 150% of the weight of the bran in boiling water to make a soaker, which I added back during initial kneading.

The big difference with the spelt loaf was that I didn't use bread flour for the 50% white component  By a mental lapse, I started adding all purpose flour, and only realized when I had put in 150g of the planned 200g. The remaining 50g was King Arthur bread flour, and I added another 10g for good measure.

Otherwise, the dough and its development went almost exactly like it did with the 50% spelt loaf.  I did proof it about an hour longer (I was out on a visit to a local farm market), and the bulk ferment volume had tripled.  Nothing wrong with the rising ability!  Overall, I did two stretch-and-fold sessions as for the spelt loaf.

Now for the shaping - gulp - the dough was pretty extensible and sure enough, didn't want to hold its form.  I rolled it and re-rolled it about 4 times and finally got to a point where I thought there might be some chance for a free-standing proof.  If it didn't work out, I figured I would convert the loaf to a pan loaf.

After 45 minutes, the loaf was proofed enough but it had spread out a lot sideways.  I suppose that was to be expected.  I thought it could make a successful bake anyway, so I went ahead and slashed it and baked with steam.  It baked to an internal temperature of 208° F in 30 minutes at 410° F.

You can see from the pictures that although the loaf did end up very wide, it rose decently and the crumb is quite open for this kind of flour.  I think this bread would work well in a pain rustique form factor.

The flavor?  It was very pleasant, but I thought the distinct einkorn taste was not very prominent.  This fits in with other's remarks that a higher percentage of einkorn is needed to let its distinctive flavor come forward.

CrustyJohn's picture
CrustyJohn

I've long been yearning to bake a nice perfectly rectangular rye loaf.  Earlier this year I finally bought a pullman loaf pan, but since starting to use it, I've discovered it's not so simple as just baking a loaf in such a pan.  Thus far the rye loaves I've baked in it have stopped their rises just a little short of the rim, thus resulting in a slightly domed top.  On the other end of the spectrum, a wheat loaf blew the lid off the top.  There's nothing wrong with rounded tops, but I wanted the Nordic esthetic.  I realized it's important to get the dough volume right.  With this loaf I finally did that.  For my loaf pan (the standard length pullman I believe), it seems to be 1000g of flour/seeds and whole or chopped grains

It was a three stage affair:

1.

100g Maine Grains rye flour

100g water

35 g starter

~let sit at room temp. (60s) overnight (~10 hrs)

2. add

400g seed & multigrain mix

50g barley

200g rye flour

mix thoroughly and let sit ~4 hrs at room temp (60s)

650g water

3. add

250g rye flour

mix thoroughly, place in oiled pan, smooth top with water and dough scraper.  Let rise until nearly at top of pan.  This happened sooner than I expected (about 3 hrs) so I put it in the refrigerator to put it on hold until I was ready to bake. 

Baked at ~450 for 40 min. then 400 for another 30-40 min.  Took the lid off for the a bit toward the end to brown it up.  Let cool in turned off oven.


The close reader may notice that missing from the list of ingredients is salt. This was not my intention, but the loaf still tastes quite good, probably better than a what loaf would taste sans salt.  I guess I'll have to bake another rye loaf!

aly-hassabelnaby's picture
aly-hassabelnaby

Hello everyone,

I've posted the latest recipe on my blog for a type of bread we have in Egypt called "Eish Senn". It's a pocket-style bread with lots of wheat bran mixed into the dough. Have a look and let me know if you give it a try and what do you think of the flavour?


The Breads of Egypt - Eish senn

The Roadside Pie King's picture
The Roadside Pi...

Sicilian semolina bread, with short fermentation biga. Same day bake. Commercial yeast leviened.


tpassin's picture
tpassin

For my first foray into baking with spelt flour, I made a loaf with 50% spelt, 50% bread flour.  The spelt was stone-ground from a local water mill.  Using a kitchen sifter I was able to sift out a little bran, which I scalded with water and left overnight.  The amount of extraction was only around 6 - 7%, though.  The bread flour was King Arthur's.  The total amount of flour exclusive of the starter was 420g plus a few more for the bran scald.

To try to counter the lower amount or grade of gluten that spelt is reputed to have, I used a little more salt than I usually would, a lightly lower hydration - 70% including the starter ingredients - and more starter (35%) than I otherwise would have to get a faster fermentation.  I also included the starter and salt in the initial mix.  This was a hand mix, just enough to hydrate the flour and mix everything reasonably uniformly. 

After a rest of 30 minutes, I kneaded and stretched the dough briefly, and then did two more S&F sessions after 30 and 45 minutes.  For this last one, the dough had enough extensibility that I stretched it between my hands so I could pull it out further than I could have using coil folds in its tub.

The dough had doubled in 4 hours, and I shaped it without needing a preform.  I stretched it and worked it enough that it seemed to have enough elasticity to proof free-form, and I shaped the dough into a batarde loaf.  After proofing covered for 45 minutes, I slashed it and started the bake with initial steam.

You can see from the photos that this all worked very well and produced an attractive, well risen loaf with a reasonably open crumb for this kind of flour.  The crumb seems a little soft. and it has a good flavor subtly richer than ordinary whole wheat usually does.  


CalBeachBaker's picture
CalBeachBaker

Today's bake: Honeyed Spelt and Oat Levain

Source: Sourdough Recipes for Rustic Fermented Breads Sweets, Savories, and More - Sarah Owens

Notes:

Substitutions:  None

Discussion: This is another bread from Sarah Owens that I have been planning on baking for some time. The crumb is nice and soft due to the oatmeal soaker and  ~20% spelt flour, with a slightly sweet flavor from the honey. The crust is nice and crunchy with toasty malt flavoring. This is a nice bread to toast up in the morning for breakfast or for lunch.

Make again? - Yes, definitely.

Changes/Recommendations:  A little less bake time.

Ratings:

Tony


Sugarowl's picture
Sugarowl

I attempted to make pizza with King Arthur 00 Pizza flour using their recipe on the back of the bag. The recipe was called "Detroit Style Pizza". I have no idea what that is but I had hoped it would make 1-12" pizza if I halved the recipe. It did not. Also, this was my first attempt at homemade pizza dough. It is not pretty and way too crispy. But for better or for worse here it is.

Next up, I made another 123 sourdough bread in a bread pan. My additions were: milk powder,regular Hershey's cocoa powder, and maple syrup. The liquid was a Guiness stout. The flour as mostly all purpose, with 20g rye, 10g wholewheat, and 30g bread flour.

Here's the recipe:

100g starter

200g Guiness beer

300g Flour (as said above)

2T of hershey's cocoa powder (regular kind)

1T milk powder

1T maple syrup

1tsp of salt

I mixed it all together for a bit, maybe 5 minutes. Then I let it sit out for an hour and then popped it into the fridge over night. This morning about 9am, I took it out and let it warm up. at 10am I did a lamination with it. Since I could stretch it thin, I shaped it and left it to rise in the baking tin. I then baked it at 350F for 10 minutes and then at 325F for 40 more minutes. I brushed butter on it at the 30 minute mark. My pans are dark, so I have to bake at a lower temperature. The internal temperature was 201F.

The bread is soft, with a light chocolatey flavor. It was not overly sour as it as last time when I made a plain white bread with a Yuengling lager. I'm guessing the "smooth" on the label means something? I don't know anything about beer. All I know is that I hope my father in law likes the other beers I had bought since I don't drink. I did find a non-alcoholic Guiness black label on the shelf, but I was unsure if it would perform the same or not.

So far the bread is good, but I think I'll leave the pizza part up to Dominoes for now since I may have gotten myself into a baking frenzy starting next week. Our church is having a fall festival and I volunteered to help them out if they wanted bake sale items for their pumpkin patch.I casually mentioned 3 dozen muffins and cookies. I'm thrilled they want some samples but also super nervous at the same time. Either way this will be a good way to test out if there is actually a demand for non-cake mix muffins in my area.

In other news, I've been working on a garden box and it's almost done. As soon as hubby puts the last of the supports in I'll order the compost/dirt from a local place that delivers. My kids want to plant sunflowers and other colorful flowers. I'm going to put veggies on my side, and being that I'm in zone 9 means I can still plant beans, corn, tomatoes, and possibly little squash if the weather stays warm this year. the kids are excited to see broccoli trees growing too. I try to grow interesting looking things, so I'm on the hunt for long eggplant and sesame seeds. One year we grew yard-long beans and we didn't harvest them soon enough. The kids ran around with "dreadlocks" on their heads. :D

jkandell's picture
jkandell

I‘ve been looking for a way to try out the Monheim Salt-sour process for a while, as I've been researching ways to get complex rye flavors without the pain of a 3-fold Detmolder. It's described as having a good aroma and being "almost as good" as a full detmold. And we recently had the perfect weather for it in Tucson: 90s in the day and 70s at night  The Salzsauer process is unusual in that it adds salt to the elaboration of the rye at 2% This is similar to what classic French bakers sometimes do with pain-au-levain in warm weather; or it might be thought of as a "rye pate fermentée". Because of the salt, the souring takes longer (18-24h) with the trade off of a longer period of stability.  Also due to the salt, one requires 10% of the flour in the inoculation (i.e. 20% seed starter if its 100% hydration, instead of a more typical 5% or 10%.). 

So I decided to adapt Hamelman's 70% Rye with Rye Chop Soaker from Bread to this method. For this riff I subbed out whole rye flour for the medium, and I substituted a Monheim Salzsauer process for the one-stage Detmolder. But--with 35% whole rye flour, 30% whole wheat flour 35% rye chops--should this be called a Mischbrot? Despite the fact it's almost 50% wheat (if you count the chops as an addition rather than a flour), it really doesn't have the smooth-grey color or texture of typical Mischbrot. Not that surprising given it's 100% whole grain including chops. Moreover, it tastes and looks quite similar to volkornbrot . So I'm sticking with the  Schwarzbrot label .

 Formula:

hamelman 70 percent rye mischbrot

Process:

Build the rye sour, with final elaboration 18-24h prior to baking, going from 95F down to low 70Fs over the range.  Because I bake infrequently, with a rye starter in the fridge, I first built it out at 1:2:2 an extra 12 hours earlier to get the ripe 36g inoculation needed for the final Salzsauer. Note that I took out an extra 9g for storage at the end of the first-build, rather than the usual second build, because I didn't want my storage chef to be salted. (If you have 36g active rye starter, jump right to the salzsauer, as this is in theory a one-step process.) 

Using 113F water in the final build will let things start at DT 95F snd gradually decrease. Let the final sour ferment for 18-24h until it smells good. (I left it outside in the 96F desert afternoon and it had dropped to 73F by next morning, at which point I brought it in for the remainder.) The literature says start 30-35C and drop to 20-25C.

Soak the rye chops about 6 hours prior. I used my coffee grinder to approximate chops, but it was closer to a mix of meal and chops. I used a cold soak with 2% salt. (If any water evaporates, add it in later.)

Mix the dough. It's 70% rye, no kneading needed. However, note the 78% hydration in the formula is the low end. Since it's rye you'll likely need to add lots more water to get the texture to where it's like clay that holds together but is loose enough it can expand.  In my case it took tons more water than stated, so was more of a bassinage. It's going into a loaf pan, don't worry about over-doing the hydration. I used 0.6% IDY, but I'm not sure it's needed. (I thought it interesting I had a higher percentage of salt in the levain than the final overall bread!)

Bulk ferment 30 minutes (with IDY). Proof in floured loaf pans 60m. No scoring of any kind needed. 

Bake 450F covered for 15m then drop heat to 410F or lower to finish for 40-60 minutes until it sounds evenly resonant (rather than a dull thud) when tapped on all sides and across the bottom. Take out of the pan for the last 15 minutes or so to dry out the sides. Cure for at least 24h covered in a towel before slicing. Peak flavor was about 3 days in.

Comments:

  • I'm now a fan of the Salzsauer process and will try it with other ryes. As advertised, it had a rich aroma together with a nice balanced sour flavor. I liked that it didn't take much fuss, just leave it out a day ahead of time. This would be great if you wanted to set things up on Friday to bake on a Sunday. I'm skeptical on how important the 95F > 70F is. That was fine this time, and the 95F isn't hard to achieve with hot water. But cooling it might prove a problem much of the year in my climate. The 1-step Detmold supposedly benefits from this same temperature drop to balance the lactic and acetic; but plenty of people just ferment 16-18h at 77F with 5% or 10% ASG; so I'm tempted to just leave it on the counter willy-nilly for 24h and see what happens.
    And do you really need the full 2% salt? I'm curious what exactly the salt does to the yeasts and enzymes-- I was surprised the salt-sour didn't have--for want of a better word--the neutral flavor or smell of a wheat pate fermentée. It was a real sour. And on first glance the odor and flavor did seem better--but I'll need to do more experiments. 
    Because I don't keep such large quantities of active starter, I ended up needing to use 2-stages anyway, so maybe a better comparison is versus 2-stage Detmold process that I also like a lot.  That one requires more temperature control though, whereas this just gradually falls.
  • The bread itself is a solid basic German rye!  Recommended, going into rotation. Aroma very nice around day 3, the flavor was sour but mellow, which surprised me given the 35% pre-fermented flour. The soaked chops were very subtle, mostly adding texture.  I couldn't taste the wheat, but I think it took the edge off of the sourness, making the bread somewhat more adaptable than a volkornbrot.
  • I think DSnyder's nailed the flavor: "The crust was firm but not hard. The crumb was soft and moist but slightly crumbly and less dense than I expected. The aroma is powerful with rye, yet the flavor is relatively mild. It is rye with no distinctive whole wheat tones, yet the whole wheat must have mellowed the rye flavor. There is a sweet note to the aftertaste. This bread has lots of character."
  • This formula is a good “base” recipe to explore German mixed ryes.  Using medium rye instead of whole would make a more standard graubrot / hausbrot. Taking out the wheat entirely would make a volkornbrot. Add flax or sunflower seeds at will. Add scald at will. For instance, I think Kellner’s  Sauerland Schwarzbrot is just a complicated version of the same formula? Unless I'm mistaken, that's even the monheim  sauersalz they're calling a "sponge" along with a bunch of other tricks? This one's a lot simpler though! 

 crumb very similar to volkornbrot

Pages

Subscribe to Recent Blog Entries