The Fresh Loaf

A Community of Amateur Bakers and Artisan Bread Enthusiasts.

dmsnyder's blog

dmsnyder's picture
dmsnyder

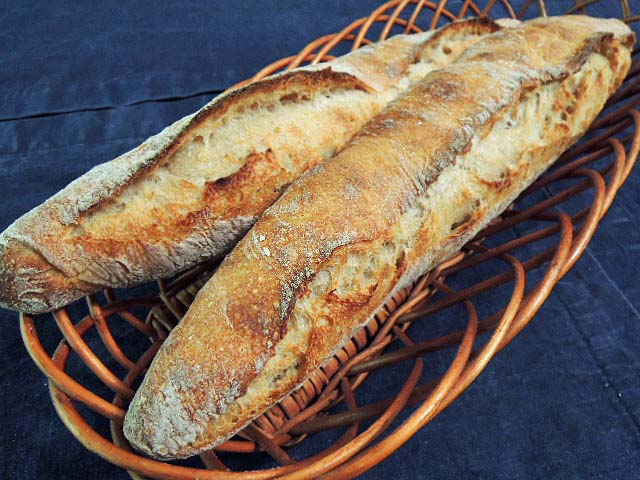
I have made baguettes following many different formulas. Some of the most interesting have been various versions of “pain à l'anciènne,” including those of Reinhart in The Bread Baker's Apprentice and of Leader in Local Breads. Sometime back in 2008, I found an e-mail that Peter Reinhart had sent to a bread bakers' Usenet mailing list in 2003 which described the formula for pain à l'anciènne as he got it directly from Philippe Gosselin. The version that ended up in BBA was simplified somewhat by Reinhart, adding all the ingredients before the mixing, omitting the double hydration and delayed addition of the salt.

When I first made baguettes from Gosselin's original method, they were the best-tasting ones I had ever made. I finally got to taste Gosselin's baguettes tradition (from the rue Caumartin shop) last year. To my taste, they had a bit of a tang suggesting they might have been made with levain, so I modified the formula to use a liquid levain and found I preferred the result to that leavened with commercial yeast. In fact, I preferred what I had baked to Gosselin's own.

This is the version I used for today's bake:

Ingredients

Wt.

Baker's %

Organic AP Flour

400 g

100

Ice Water

275 g

69

Salt

8.75 g

2

Liquid Levain

200 g

50

Instant yeast (optional)

¼ tsp


Total

883.75 g

221

Notes: Accounting for the flour and water in the levain, the total flour is 500 g and the total water is 375 g, making the actual dough hydration 75%. The actual salt percentage is 1.75%.

For today's bake, I made 3/4 of the dough amount in the table above.

I mixed the levain the night before starting on these and retarded it in the fridge overnight. 

Method

  1. The night before baking, mix the flour and levain with 225 g of ice water and immediately refrigerate.

  2. The next morning, add the salt and 50 g of ice water to the dough and mix thoroughly. (I did this by hand by squishing the dough between my fingers until the water was fully incorporated.)

  3. Place the dough in a lightly greased bowl with a tight cover.

  4. Ferment at room temperature until the dough has about doubled in volume. (3 hours for me) Do stretch and folds in the bowl every 30 minutes for the first two hours.

  5. An hour before baking, pre-heat the oven to 500ºF, with baking stone and steaming apparatus in place.

  6. Divide the dough into 4 more or less equal pieces and stretch each into a 12-14 inch long “baguette.”

  7. Score and bake immediately at 460ºF, with steam for 10 minutes, and for about 20 minutes total.

  8. Cool on a rack before eating.

Notes: In Step 7., I specify shaping the loaves by simply stretching the dough pieces into a rough baguette shape. This is a very slack dough and a challenge to handle as one might a lower-hydration baguette dough. If you are very comfortable handling slack dough, have a firm grasp of the “iron hand in a velvet glove” principal and are feeling up to the challenge, you can shape the pieces as you would shape a baguette ordinarily. That is, in fact, what I did for this bake.

You will also note that I scored these baguettes with a single, longitudinal slash. I find the results more satisfactory than the traditional 5 or 7 cuts when scoring a very sticky dough like this. However, the difference is merely cosmetic.


These baguettes had a chewy crust, except for the ears, which were crunchy. I think they could have baked 5 minutes longer, or I could have left them in the turned off oven for another 5-7 minutes to dry the crust. The crumb was nice and open. The flavor was sweet, complex and moderately tangy. I attribute this to a combination of factors – retarding the levain overnight and fermenting the dough, after the final mixing, at 85 dF.

This baguette is still a favorite.

David 

Submitted to YeastSpotting

dmsnyder's picture
dmsnyder

Last Friday and Saturday, I hopped over to San Mateo for the San Francisco Pen Show to indulge another of my addictions hobbies. We needed a fast breakfast to get an early start. So Thursday I baked ...

Cinnamon-Raisin-Walnut Bread from BBA

Returning Sunday, I activated my sourdough starter and mixed enough levain/biga for ...

My Pugliese Capriccioso (Formula here: Pugliese Capriccioso)

Baked Monday, and ...

San Francisco-style Sourdough (Formula here: My San Francisco Sourdough Quest, Take 4)

Baked Tuesday. My formula for the SF SD levain and the Pugliese biga are essentially identical, so I just mixed a double batch of levain and used it for both breads.

Tuesday night, I mixed a levain for more San Francisco Sourdough and made a couple boules with toasted walnuts. I added Walnuts at 40% of the total flour weight (185 g for my 1 kg recipe).They were retarded baked Wednesday. 

Happy baking!

David

dmsnyder's picture
dmsnyder

I am gradually aclimating to retirement. I still get twinges Sunday nights in anticipation of a non-existant Monday patient schedule. But this week I broke the thought habit of baking being exclusively a weekend activity. Maybe I over-compensated, but I don't think so.

Tuesday evening, I activated my starter and I put up a bulgar soaker and a whole wheat poolish in preparation for a Wednesday bake of my favorite 100% Whole Wheat Bread, the one in BBA.

100% Whole Wheat Bread 

100% Whole Wheat Bread crumb

This is probably my favorite bread for almond butter on toast, BLT's and Tuna Salad sandwiches. We had all of these this week.

Wednesday evening, I fed the starter at 100% hydration for Thursday's bake of San Joaquin Sourdoughs and started on txfarmer's 36+ hour baguettes for a Friday bake.

San Joaquin Sourdough Breads

This bread is good with everything. We had some with almond butter, more with penne with butternut squash, sage and hazelnuts and more with a salad lunch.

Thursday evening, I mixed a firm levain for Hamelman's Pain au Levain with Whole Wheat. Txfarmer's baguette dough was mixed, fermented and refrigerated.

We were invited to some friends' home for dinner Friday. The response to "What can we bring?" was not hard to guess. This morning, the baguettes and Pain au Levain for dinner tonight got baked.

Baguette Crust

Pain au Levain with Whole Wheat crust

Pain au Levain with Whole Wheat Crumb

 I have the walnuts toasted for Cinnamon-Raisin-Walnut Bread.

To top off the week, my son, Joel, sent me a photo of the latest bagels he and 3-year old Sasha made this week, and he expressed some interest in "trying" to bake sourdough breads. I'll take him some starter when we visit in November. What fun!

It's just that I can't figure how I ever had time to "work."

David

dmsnyder's picture
dmsnyder

Hamelman's "Vollkornbrot" is a 100% rye bread with sunflower seeds. The flour Hamelman calls for is "rye meal," which I just happend to have in quantity due to my error in ordering "medium rye meal" when I had intended to order "medium rye flour" from nybakers.com. Well, as Kubler-Ross wrote, "There are no mistakes, no coincidences. All events are blessings given to us to learn from."

As it happens, I have intended to work on baking 100% rye breads for some time, my  past attempts having been less than wonderful. Clearly, my unconscious mind highjacked my nybakers.com order. So, after blessing my unconscious ... or something like that ... I proceded to takle this project.

Hamelman's formula for Vollkornbrot calls for 68.4% rye meal and 31.6% rye chops. I had abundant rye meal (see above), and I had a pound of cracked rye from Central Milling, which I used in lieu of rye chops.  60% of the rye meal is pre-fermented. The cracked rye is included in the form of a 100% hydration soaker. The overall hydration of the dough is 82.1%.

Other than substituting cracked rye for rye chops, I followed Hamelman's formula and procedures to the letter. The dough was drier than I expected, but still very sticky. It had no difficulty holding together. I shaped it on a wet board with wet hands and, after shaping a log, placed it in a pullman pan and smoothed it out with a spatula. The top was dusted with more rye meal, as instructed by Hamelman. I baked it with steam for 15 minutes at 470 dF then for another 60 minutes at 380 dF. I then dumped the loaf out of the pan and baked another 15 minutes with the loaf sitting on a baking stone. This was to firm up the crust, although it was very firm already when taken out of the pan.

After baking and cooling on a rack for several hours, I wrapped the loaf in baker's linen and let it rest for about 30 hours before slicing. The crust was very firm and chewy. The crumb was very dense, as you can see, moist but not gummy. The aroma and flavor were earthy and slightly sweet. I had some for breakfast with cream cheese and smoked salmon and enjoyed it. I think this bread would make great Danish-style open face sandwiches.

I have never had this type of bread before, except once long ago from an imported package. So, I really don't have a good model with which to compare my bread. From what I've read and pictures I've seen, I think I hit the target. I wish I knew how close to the bullseye I got. This bake was certainly superior to my few previous attempts at a 100% rye bread.

I'm hoping TFL members with more experience than I have of this type of bread will offer constructive criticism and suggestions.

David

dmsnyder's picture
dmsnyder

Watching the development of baking skills and the endless creativity of TFL members gives me enormous enjoyment. When I find members using formulas or techniques I have contributed and taking them to new and exciting places, I am especially thrilled. I can think of no better example than what txfarmer has done with the Anis Bouabsa and Phillip Gosselin formulas I first explored as part of my “baguette quest” in the Spring and Summer of 2008. Her “36 hours+ sourdough baguettes” (See 36 hours+ sourdough baguette - everything I know in one bread for her original, basic formula.) have been visually stunning as well as technically intriguing. It was with great anticipation that I followed her formula and procedures this weekend to make a batch myself.

My only modification of txfarmer's procedure was that I fermented the dough prior to dividing and shaping at 85 dF for 1 hour. I generally scale baguettes to 250 g to fit my baking stone. Her formula makes about 900 g of dough. I divided this into 3 pieces of 299 g each and shaped them to (barely) fit on my stone. I baked the baguettes for 12 minutes with steam at 460 dF conventional bake then for another 12 minutes at 435 dF in a dry oven using convection bake. In hindsight, I should have baked them for about 2 minutes less. They sang when taken out to cool and smelled delicious!


The crust was very crunchy and the crumb satisfyingly open, although not as open as some of the amazing baguettes txfarmer has shown us. The flavor of the bread was complex, nutty and sweet with moderate sourdough tang.

I do believe I have a new favorite sourdough baguette.

 David


dmsnyder's picture
dmsnyder

Scoring hearth loaves made with high hydration doughs is a challenge. Expressions of frustration with this in TFL postings are not rare. Much good advice regarding how to accomplish nice scoring of wet, sticky dough has been offered, but it is scattered. So, I thought I would share my own advice on this subject in one place.

These two bâtards are San Joaquin Sourdoughs. (For the formula and procedures, please see San Joaquin Sourdough: Update. Today's bake was different only in that I used just 100 g of 100% hydration starter.) The effective hydration of this dough is 74.5%. It is a sticky dough and a good test of one's shaping and scoring abilities. Yet, as you can see, it is possible to get nicely shaped loaves from this dough with cuts that bloom nicely and form impressive ears.


The key points in achieving this are the following:

A Key Point

  1. Gluten must be well-developed by mixing and fermentation. Good dough “strength” is important for crumb structure, but also for successful shaping. It is even more critical in wet doughs, because these tend to spread out and form flat loaves if their shape is not supported by a good, strong sheath of gluten.

  2. Pre-shaping and shaping can add to dough strength through additional stretching of the dough in the process of forming the loaves. A wet dough like this needs to be tightly shaped. This is a challenge, because it also has to be handled gently. Rough handling will result in excessive de-gassing and a dense loaf. It will also tend to make the dough stick to your hands more. When it sticks, it tears and makes weak spots in the loaf surface which are likely to burst during oven spring. The goal is to form the tight gluten sheath by stretching the dough and sealing the seams while avoiding downward pressure on the dough pieces being shaped. “An iron hand in a velvet glove.” Dough sticking to your hands can be decreased by lightly flouring your hands, wetting them or oiling them. However, the most helpful trick is to touch the dough lightly and as briefly as possible each time.

  3. The loaves need to have lateral support during proofing. This is to prevent them from spreading out. Support can be provided by a banneton (proofing basket) or on baker's linen or parchment, where folds in the couche material, sometimes reinforced with rolled up towels or the like under the material, provide the support. (I suppose the “ultimate support” is provided by a loaf pan.)

  4. The ideal material to support proofing loaves is absorbent. Baker's linen, cloth-lined bannetons and floured, coiled cane brotformen all absorb some moisture from the surface of the loaves in contact with them. This makes that surface a bit less sticky and easier to score without the cut edges sticking to the blade excessively. (I do not want the loaf surface so dry it forms a “skin.”) I like to proof loaves with the surface I am going to score on the absorbent material. This means baguettes and bâtards are proofed smooth side down (seam side up). Note that baking parchment is not absorbent, so, while advantageous for other reasons, it is not ideal for this purpose.

  5. Loaves should not be over-proofed. A greatly over-proofed loaf may actually collapse and deflate when scored. Short of that, it will still have less oven spring and bloom. This is a relatively greater problem with high-hydration doughs which are more delicate to start with. I find the “poke test” as reliable as any other criterion for when a loaf is ready to bake. However, it is not quite as reliable with very wet doughs. Neither is the degree of dough expansion. You just have to learn through experience with each formula when it is perfectly proofed.

  6. Loaves should be scored immediately after transferring to a peel and immediately before loading in the oven. Letting high-hydration doughs sit too long on the peel is asking them to spread out, especially if they have been scored ,which disrupts the supportive gluten sheath.

  7. The wetter the dough, the shallower the cuts. This is not as critical for boules, but, for long loaves like baguettes and bâtards, if you want good bloom, and especially if you want good ear formation, The cuts need to be very shallow (about 1/4 inch deep) and at an acute angle (30-45 degrees). A deeper cut creates a heavy flap that will collapse of its own weight and seal over, rather than lifting up to form an ear as the cut blooms open. The cuts made on the loaves pictured here were barely perceptible on the unbaked loaf surface. Resist the temptation to re-cut!

  8. Minimize dough sticking to the blade and getting dragged, forming a ragged cut. The cuts need to be made swiftly and smoothly, without hesitation. A thin, extremely sharp blade is best. Some find serrated blades work well for them. I find a razor blade on a bendable metal handle works best for me. The cuts are made with the forward end of the blade only, not the whole length. Some find oiling or wetting the blade lessens sticking. I have not found this necessary.

  9. Humidify the oven with steam during the first part of the bake. This delays firming up of the crust which would restrict the loaf from expanding (oven spring) and the cuts from opening (bloom).

Most of these points apply to scoring in general. I have indicated where there are differences or special considerations applying to high-hydration doughs.

Finally, a mini-glossary:

Scoring refers to the cuts made on the surface of the loaf prior to baking. The primary purpose of scoring is to create an artificial weak spot and direct expansion of the loaf to it so the loaf doesn't burst at some random point. Secondarily, the scoring pattern influences the final shape of the loaf. And lastly, the pattern of cuts can be decorative and, if unique, can serve as a “signature” for the baker.

Oven spring is the expansion of the loaf when exposed to oven heat.

Bloom refers to the opening up of the scoring cuts during oven spring. The French term for this is grigne.


Ear, when pertaining to bread, is a flap of crust that separates from the surface during oven spring and bloom.

For additional information regarding scoring and a more basic introduction to this topic, please see The Scoring Tutorial Also, excellent examples of shaping and scoring can be found in videos on youtube.com, particularly those made by Ciril Hitz, and on the King Arthur Flour web site. I have not found any that address the peculiar challenges presented by higher-hydration doughs, however.

Happy baking!

David

dmsnyder's picture
dmsnyder

These photos were e-mailed to me and Glenn. My younger son, Joel - father of Naomi and Sasha, made Montreal bagels from the formula in ITJB this weekend. He must have had excellent shaping instruction from his daughters. They look better than most of mine.

David


dmsnyder's picture
dmsnyder

In a way, today was “really” the first day of my retirement. Our granddaughters are back in their parents' keeping. I'm not teaching this week. I discovered a couple of changes in my cooking and baking, compared to my approach pre-retirement.

The only quasi-business items on my to-do list involved phone calls only. So, I had lots of discretionary time. On Saturday, at the farmer's market, we had decided ratatouille omelets sounded like a great dinner for Monday night. I have always made a somewhat shortcut version in the past. Today, I did it “right,” following Julia Child's recipe to the letter - the eggplant, zucchini and onions/peppers/garlic mix each sautéed separately. No canned tomatoes, but a mix of vine-ripened heirloom tomatoes, peeled, seeded and hand cut in strips. No need to compromise to save time.

This morning, it occurred to me that our omelets really needed to be accompanied by fresh-baked baguettes. If I'd thought about it last night, I'd have made a poolish, but I didn't, so they needed to be “straight dough” baguettes. No need to run errands or prepare for the next work day. No problem at all.

I had made some surprisingly good straight dough baguettes before. They had lovely flavor but not very good crumb structure. Today, I made the version from Advanced Bread and Pastry. It is 70% hydration and calls for a very short mix and (for a yeasted baguette) a long, 3-hour bulk fermentation with 2-3 folds.


Ingredients

Baker's %

Wt (g)

AP flour

100

262

Water

70

184

Yeast (instant)

0.3

0.8

Salt

2

5

Malt (powdered, diastatic)

0.5

1

Total

172.8

452.8


  1. Mix flour and water to a shaggy mass. Cover and autolyse for 20 minutes.

  2. Add the yeast, salt and malt to the dough. Mix on low speed for 1-2 minutes, then on Speed 2 for 3.5 minutes.

  3. Transfer the dough to a lightly oiled bowl and cover.

  4. Bulk ferment for 3 hours with folds at 50, 100 and 150 minutes.

  5. Divide into two equal pieces and pre-shape as logs.

  6. Rest, covered, for 20-30 minutes.

  7. Shape as baguettes.

  8. Proof en couche, seam-side up, for 45 to 60 minutes.

  9. Bake at 460 dF for 22-25 minutes, with steam for the first half of the bake.


The loaves sang loudly when they were taken out of the oven. The crust was very crisp and thin. The crumb was somewhat open, more so than the other straight dough baguettes I've made. The flavor was quite good with noticeable sweetness. Really a classic baguette taste.

In hindsight, I think two folds would have been sufficient.

The ratatouille omelets were just delicious.


 A good day.

David

dmsnyder's picture
dmsnyder

Many TFL baker's have blogged on this bread, and for good reason. It is delicious. I haven't made it since last October. Today, I made three 568 g boules. I started with a liquid starter which I converted to a firm starter and fed twice before mixing the final dough. The formed loaves were cold retarded for about 16 hours then proofed at 85 dF for 2 1/2 hours before baking.

I have been making Hamelman's Pain au Levain frequently for many months and enjoying it a lot. This week, I just felt like something with more of a whole grain flavor and recalled this bread. Looking back at my earlier blog, today's bake was significantly better when tasted after a couple hours' cooling. There was none of what I had described as a "grassy" flavor. This bread was simply delicious with a sweet, nutty, crunchy crust and a  chewy crumb with a nice wheaty, mildly sour flavor. 

I'm going to stick with this one ... except I do want to try the mixed levain version again.

David

dmsnyder's picture
dmsnyder

I am retired. This is the first full week since I retired, July 31. Already I see big problems. I no longer have to limit my baking to weekends and vacations. In principle, I could be baking bread any day ... or every day. But, I do not need to be eating more bread than I have been eating. I will certainly be gifting more loaves, but I have to find a new equilibrium. Ah, well. Life is good.

Anyway, this explains how I happen to be baking bread mid-week. 

My San Francisco-style Sourdough quest of last Spring was a ton of fun. Of the various tweaks I tried, my favorite version was "Take 4." (For the formula and procedures, see: My San Francisco Sourdough Quest, Take 4.) I believe I have baked this version about 5 times now, and, for me, it has been pretty consistant in producing my personal ideal bread of this type. Today was no exception. Crunchy, sweet crust and moist, chewy, complex-flavored crumb with moderate sourness. Excellent keeping quality.

It's been very hot in Fresno. My fermentation times for the levain builds were shorter than those indicated in my methods. "Watch the dough, not the clock" applies to levains as it does to final doughs. The times were not so short I felt I had to refrigerate any build, but I would have done so if the times to maturity were so short I thought flavor would be compromised.

Diamond scoring pattern

Cross-hatched scoring pattern

Crust close-up for the bubbly crust lovers

SF-Style Sourdough crumb

I also made the Sourdough Seed Bread from Hamelman's Bread today. In the past, I have generally made this as 500-600 g boules. Today, I shaped two bâtards of 1 kg each.

Sourdough Seed Bread cross section

Sourdough Seed Bread, crumb close-up

This particular bread profits greatly from overnight cold retardation. It is not bad baked the day it's mixed, but it is fantastically delicious if allowed those extra hours of flavor development. 

There are some gastrointestinal conditions for which the standard advice is to avoid eating seeds. If you have the misfortune to suffer from one of these, I suggest you not eat this bread. However, the heavenly aroma of this bread when it is sliced still slightly warm from the oven is not to be missed. So, bake it even if you can't eat it. Give it away ... but only after cutting a loaf and taking a few deep breaths. 

Happy baking!

David

Pages

Subscribe to RSS - dmsnyder's blog