The Fresh Loaf

A Community of Amateur Bakers and Artisan Bread Enthusiasts.

dmsnyder's blog

dmsnyder's picture
dmsnyder

My series of San Francisco-style sourdough bread bakes has featured several variations of levain elaboration, leaving the final dough ingredients and procedures essentially constant. Today's variation involved using a firm starter to activate the stock starter and building the stiff levain which is mixed in the final dough in three steps, rather than two. In addition, rather than retarding an intermediate build, I retarded the stiff levain.

You may also note that the activation and intermediate builds used a flour mixture of 75% AP and 25% WW flour. Re-reading my class notes from the SFBI Artisan II workshop, I was reminded that this was the feeding mixture recommended by the SFBI instructor. I thought I would give it a try. 

Feeding the starter twice in 24 hours demonstrated a dramatic increase in the leavening power of the starter. The second feeding expanded dramatically faster than the first. And, even though the total fermentation time (not counting the overnight retardation) of the stiff levain was shorter than previous versions, it was very nicely expanded.

I started with my stock refrigerated 50% starter that had been fed last weekend. That feeding consisted of 50 g active starter, 100 g water and 200 g starter feeding mix. My stock starter feeding mix is 70% AP, 20% WW and 10% whole rye flour. 

I activated the starter with a feeding of 20 g stock starter, 25 g water, 37 g of AP and 13 g of WW flour. This was fermented at room temperature for 16 hours. I then built an intermediate starter using 40 g of the activated starter, 50 g of water, 75 g of AP and 25 g of WW flour. This second build was fermented at room temperature for 12 hours. I then mixed the stiff levain.

Stiff levain

Bakers' %

Wt (g)

for 1 kg

Wt (g)

for 2 kg

Bread flour

95

78

157

Medium rye flour

5

4

8

Water

50

41

82

Stiff starter

80

66

132

Total

230

189

379


  1. Dissolve the starter in the water. Add the flour and mix thoroughly until the flour has been completely incorporated and moistened.

  2. Ferment at room temperature for 6 hours, then refrigerate for 14 hours.

  3. Take the levain out of the refrigerator and ferment at 85ºF for 3 hours.

Final dough

Bakers' %

Wt (g)

for 1 kg

Wt (g)

for 2 kg

AP flour

90

416

832

WW Flour

10

46

92

Water

73

337

675

Salt

2.4

11

22

Stiff levain

41

189

379

Total

216.4

999

2000

Method

  1. In a stand mixer, mix the flour and water at low speed until it forms a shaggy mass.

  2. Cover and autolyse for 90 minutes

  3. Add the salt and levain and mix at low speed for 1-2 minutes, then increase the speed to medium (Speed 2 in a KitchenAid) and mix to get early window paning. (This took about 10 minutes.) Add flour and water as needed. The dough should be rather slack. It should clean the sides of the bowl but not the bottom.

  4. Transfer to a lightly floured board and do a stretch and fold and form a ball.

  5. Place the dough in a lightly oiled bowl and cover tightly.

  6. Ferment at 76º F for 3 1/2 to 4 hours with a stretch and fold at 50 and 100 minutes.

  7. Divide the dough as desired. (Note: I had made 2 kg of dough which I divided into 1 1 kg piece and two 500 g pieces.)

  8. Pre-shape as rounds and rest, covered, for 10 minutes.

  9. Shape as boules or bâtards and place in bannetons. Place bannetons in plastic bags.

  10. Proof at room temperature (68-70º F) for 2-3 hours.

  11. Cold retard the loaves overnight (12-14 hours).

  12. The next morning, proof the loaves at 85º F for 3 hours. (If you can't create a moist, 85 degree F environment, at least try to create one warmer than “room temperature.”)

  13. 45-60 minutes before baking, pre-heat the oven to 480º F with a baking stone and steaming apparatus in place.

  14. Transfer the loaves to a peel. Score the loaves as desired, turn down the oven to 460º F, steam the oven, and transfer the loaves to the baking stone.*

  15. After 15 minutes, remove the steaming apparatus, and turn down the oven to 435º F/Convection. (If you don't have a convection oven, leave the temperature at 460º F.)*

  16. Bake for another 15 minutes.*

  17. Turn off the oven, and leave the loaves on the stone, with the oven door ajar, for another 15 minutes.

  18. Transfer the loaves to a cooling rack, and cool thoroughly before slicing.

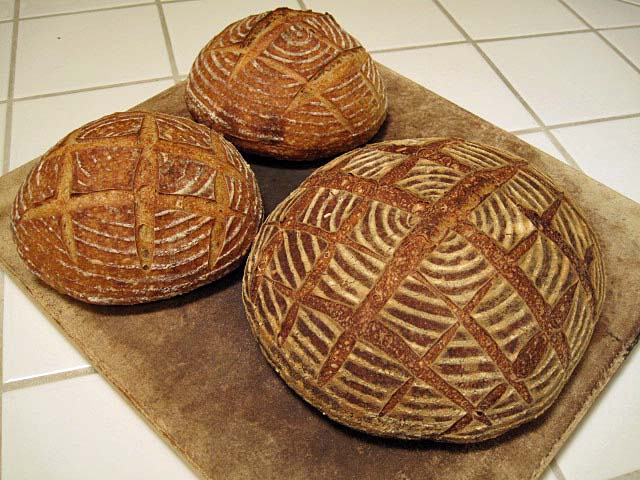
*Note: I baked the two smaller boules first – 15 minutes at 460ºF with steam, then 15 minutes at 435ºF convection bake. I then baked the 1 kg boule after reheating the oven for 25 minutes – 15 minutes at 450ºF, then another 25 minutes at 430ºF.


San Francisco-style Sourdough, large boule

San Francisco-style Sourdough, large boule crumb
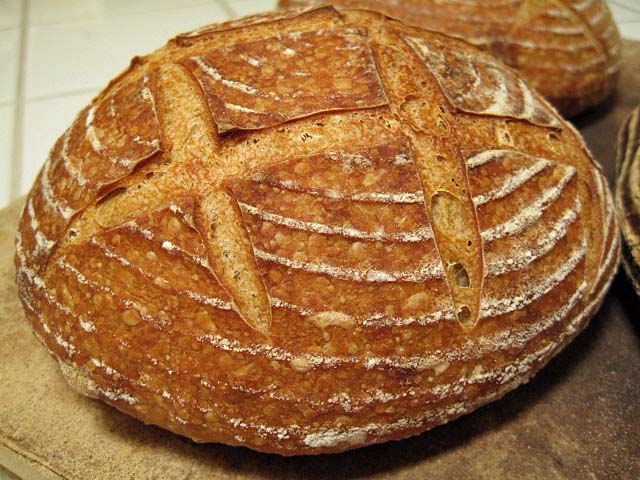
San Francisco-style Sourdough, small boule
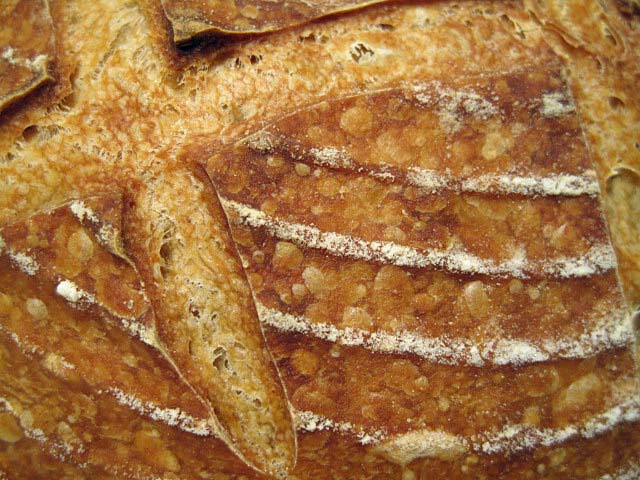
San Francisco-style Sourdough, small boule crust close-up
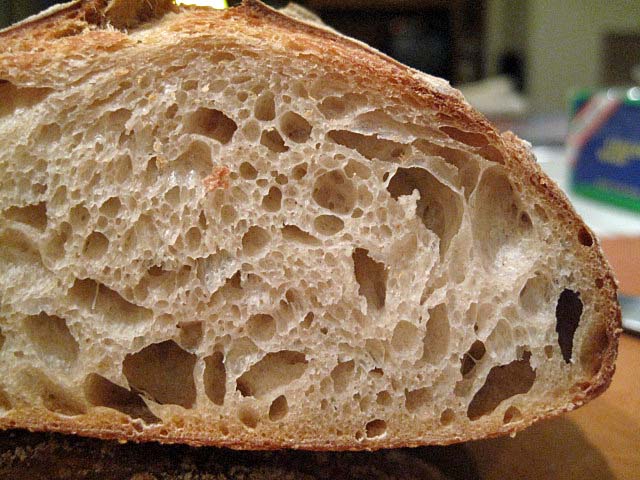
San Francisco-style Sourdough, small boule crumb
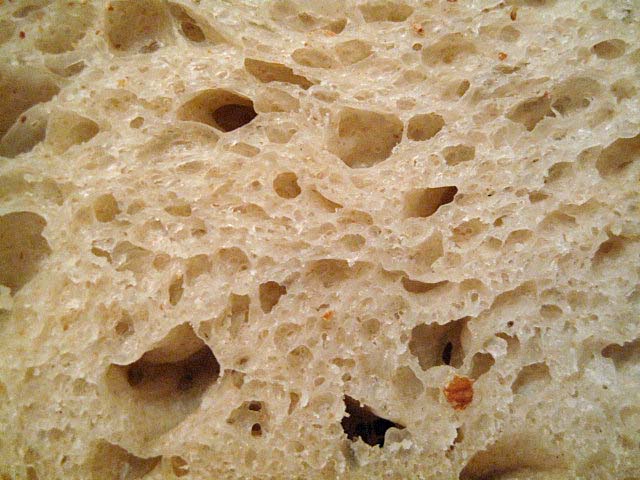
San Francisco-style Sourdough, small boule crumb close-up

The appearance of the loaves was like those previously baked, as were the crust and crumb structure. However, the flavor had a prominent sourdough tang. This bread was quite similar to the bake I blogged on March 19, 2012 (See: My San Francisco Sourdough Quest, Take 4)

This is the crunchy crust, chewy crumb, moderately sour loaf I was after … at least it's close. I cannot say it replicates the “Wharf Bread” from Parisian Bakery I ate in San Francisco years ago. It has a less sweet, more whole grain flavor. The crust is thicker and crunchier. The crumb structure is more open. But it's a keeper. This is the one I'll be making from now on ... or until I can't resist tweaking it further.

I think it would go great with Dungeness crab!

David

Submitted to YeastSpotting

dmsnyder's picture
dmsnyder

This weekend, I baked another version of my San Francisco-style Sourdough and Hamelman's Flaxseed Rye Bread. 

I baked two large bâtards of San Francisco-style sourdough bread. My procedures were modified to accommodate other demands on my time. My starter was fed only once before mixing the levain, and the activated starter was not retarded. The levain was retarded. The levain was then fermented at 76 rather than 85ºF. (I document these details for my own reference, to see if the differences make a difference. Others may find comparison of the procedures I used among my sequential bakes of this bread of some interest. Or not.)

Preliminaries

I started with my stock refrigerated 50% starter that had been fed two weeks ago. This feeding consisted of 50 g active starter, 100 g water and 200 g starter feeding mix. My starter feeding mix is 70% AP, 20% WW and 10% whole rye flour.

I activated the starter with a feeding of 40 g stock starter, 100 g water and 100 g starter feeding mix. This was fermented at room temperature for 16 hours, then refrigerated for about 20 hours. I then mixed the stiff levain.

Stiff levain

Bakers' %

Wt (g)

for 1 kg

Wt (g)

for 2 kg

Bread flour

95

78

157

Medium rye flour

5

4

8

Water (Warm)

50

41

82

Liquid starter

80

66

132

Total

230

189

379

  1. Dissolve the starter in the water. Add the flour and mix thoroughly until the flour has been completely incorporated and moistened.

  2. Ferment at room temperature for 6 hours. Refrigerate for 12 hours.

  3. Remove from refrigerator and ferment further for 3 hours at 76ºF.

Final dough

Bakers' %

Wt (g)

for 1 kg

Wt (g)

for 2 kg

AP flour

90

416

832

WW Flour

10

46

92

Water

73

337

675

Salt

2.4

11

22

Stiff levain

41

189

379

Total

216.4

953

2000

Method

  1. In a stand mixer, mix the flour and water at low speed until it forms a shaggy mass.

  2. Cover and autolyse for 40 minutes

  3. Add the salt and levain and mix at low speed for 1-2 minutes, then increase the speed to medium (Speed 2 in a KitchenAid) and mix for 6-8 minutes. Add flour and water as needed. The dough should be rather slack. It should clean the sides of the bowl but not the bottom. (Note: Today's dough was considerably looser than any of the previous mixes using this formula. It has been raining heavily. I assume my flours had a higher moisture content. I considered adding flour but did not.

  4. Transfer to a lightly floured board and do a stretch and fold and form a ball.

  5. Place the dough in a lightly oiled bowl and cover tightly.

  6. Ferment at 76º F for 31/2 to 4 hours with a stretch and fold at 45 and 95 minutes. (Note: Even after the first of these foldings, the dough was very smooth and had good strength. After the second folding, it was quite elastic.)

  7. Divide the dough into 2 equal pieces. (Note: I had made 2 kg of dough. I had decided to bake two large bâtards today rather than three or four smaller boules.)

  8. Pre-shape as rounds and rest, covered, for 10 minutes.

  9. Shape as boules or bâtards and place in bannetons. Place bannetons in plastic bags.

  10. Proof at room temperature (68-70º F) for 1-2 hours.

  11. Cold retard the loaves overnight.

  12. The next morning, proof the loaves at 85º F for 3 hours. (If you can't create a moist, 85 degree F environment, at least try to create one warmer than “room temperature.” For this bake, I took two loaves out of the fridge and started proofing them. I took the third loaf out about an hour later and stacked it balanced on top of the other two. I did one bake with the first two loaves and a second bake with the third loaf.)

  13. 45-60 minutes before baking, pre-heat the oven to 480º F with a baking stone and steaming apparatus in place.

  14. Transfer the loaves to a peel. Score the loaves as desired, turn down the oven to 450º F, steam the oven, and transfer the loaves to the baking stone. (Note: These loaves were baked at a lower temperature for a longer time because of their larger mass. A boule of the same weight would require an even longer bake because the center of the loaf is further from the oven heat.)

  15. After 15 minutes, remove the steaming apparatus, and turn down the oven to 425º F/Convection. (If you don't have a convection oven, leave the temperature at 450º F.)

  16. Bake for another 20-25 minutes.

  17. Turn off the oven, and leave the loaves on the stone, with the oven door ajar, for another 15 minutes.

  18. Transfer the loaves to a cooling rack, and cool thoroughly before slicing.

Comparing this bake to previous ones, the crust was thin and crunchy-chewy. The crumb was quite chewy. The flavor was good with a mild sourdough tang and a more prominent flavor from the whole grains. I think the differences are attributable to my having one less feeding of the firm starter and not fermenting it at the higher temperature.

Hamelman's Flaxseed Rye

Hamelman's Flaxseed Rye crumb

This bake was inspired by hansjoakim's recent bake of this bread. Looking through my TFL blog, I found I had only baked this bread once before, back in September, 2009. (See Hamelman's Flax seed rye bread - Thanks, hansjoakim!) That time, I made one large boule. I found the dough extremely slack. This time, I substituted first clear flour for the AP, and the dough was tacky but much less goopy. This time, I made two 500 g bâtards. I need to make more rye breads, if only to practice my "chevron cut" scoring until I get it right!

Recalling how delicious this bread was and how much my wife - not a big rye bread fan - enjoyed it, I am amazed that it's been so long since I baked it again. Once more, I must thank hansjoakim for the prompt to bake this delicious bread. 

The flavor of this bake was as good as I remembered. It was delicious just cooled and the next morning, toasted - a nice accompaniment to pickled herring and scrambled eggs. And, again, my wife enjoyed it a lot. It is telling that she chose it over the San Francisco Sourdough for her own breakfast.

David


dmsnyder's picture
dmsnyder

I have been meaning to make a Flemish Desem for years. I actually started making a Desem starter once from scratch, but lacked the persistance to follow through. Phil's recent blog on his Desem (See Honest bread - 100% whole-wheat desem bread and some country bread), with his gorgeous photos and clear instructions, got me back on the job. I baked a Desem according to his instructions today. It was marvelous!

I deviated from Phil's procedure in a few particulars.

1. I used a finely ground organic whole wheat flour from Central Milling rather than the freshly-milled flour Phil uses.

2. I mixed by machine rather than by hand. The autolyse was mixed in a KitchenAid stand mixer with the paddle. The final dough was mixed with the dough hook - at Speed one to incorporate the levain, salt and extra water and at Speed 2 for 6 minutes followed by a stretch and fold on the bench in place of hand mixing and kneading.

3. I proofed in a linen-lined banneton dusted with AP and Rice flour rather than WW or bran.

4. I baked entirely on my stone with steaming accomplished in my usual manner. I pre-heated the oven at 480 dF, baked with steam for 10 minutes. After 20 minutes, I turned the oven down to 400 dF and baked for another 20 minutes

Desem cross section

Desem crumb

Desem crumb close-up

The loaf had good oven spring. I cooled it for about 2 1/2 hours before slicing. It was still a bit warm in the middle when I sliced it, but I wanted to have a slice (or 3) with dinner. The crumb structure was pretty similar to Phil's, except for the tunneling under the crust, always a risk when you bake a loaf without scoring.

The flavor of the bread was delicious. It had a mild sourdough tang and a very prominant whole wheat flavor but with absolutely no grassiness or bitterness and with a lovely sweet undertone. My biggest fan and harshest critic, my wife, pronounced it "very good bread" and ate twice as much bread as she usually does at dinner.

This one joins my list of regular bakes. 

David

dmsnyder's picture
dmsnyder

San Francisco-style Sourdough Bread with and without Walnuts

This weekend, I continued trying variations of my San Francisco-style Sourdough Bread. Those who have followed this little adventure will note changes in my starter fermentation, the length of the autolyse and the use of this dough for a Sourdough Walnut Bread.

I started with my stock refrigerated 50% starter that had been fed last weekend. This feeding consisted of 50 g active starter, 100 g water and 200 g starter feeding mix. My starter feeding mix is 70% AP, 20% WW and 10% whole rye flour.

I activated the starter with a feeding of 40 g stock starter, 100 g water and 100 g starter feeding mix. This was fermented at room temperature for 8 hours. The starter was very active. It had tripled in volume and was bubbling. I then mixed the stiff levain.


Stiff levain

Bakers' %

Wt (g)

for 1 kg

Wt (g)

for 2 kg

Bread flour

95

78

157

Medium rye flour

5

4

8

Water

50

41

82

Stiff starter

80

66

132

Total

230

189

379


  1. Dissolve the starter in the water. Add the flour and mix thoroughly until the flour has been completely incorporated and moistened.

  2. Ferment at room temperature for 12 hours, then refrigerated overnight.


Final dough

Bakers' %

Wt (g)

for 1 kg

Wt (g)

for 2 kg

AP flour

90

416

832

WW Flour

10

46

92

Water

73

337

675

Salt

2.4

11

22

Stiff levain

41

189

379

Total

216.4

953

2000

Note: For today's bake, I actually mixed two 1 kg batches of dough. For one, I added about 20% (baker's percentage), or 110 g of lightly toasted walnut pieces. This was mixed at slow speed for a couple minutes after Step 3., below.

Method

  1. In a stand mixer, mix the flour and water at low speed until it forms a shaggy mass.

  2. Cover and autolyse for 20 minutes

  3. Add the salt and levain and mix at low speed for 1-2 minutes, then increase the speed to medium (Speed 2 in a KitchenAid) and mix for 5 minutes. Add flour and water as needed. The dough should be rather slack. It should clean the sides of the bowl but not the bottom.

  4. Transfer to a lightly floured board and do a stretch and fold and form a ball.

  5. Place the dough in a lightly oiled bowl and cover tightly.

  6. Ferment at 76º F for 31/2 to 4 hours with a stretch and fold at 50 and 100 minutes.

  7. Divide the walnut bread dough into two equal pieces. Leave the other dough in one piece.

  8. Pre-shape as rounds and rest, covered, for 10 minutes.

  9. Shape as boules or bâtards and place in bannetons. Place bannetons in plastic bags.

  10. Proof at room temperature (68-70º F) for 1-2 hours.

  11. Cold retard the loaves overnight.

  12. The next morning, proof the loaves at 85º F for 3-4 hours. (If you can't create a moist, 85 degree F environment, at least try to create one warmer than “room temperature.” For this bake, I took two loaves out of the fridge and started proofing them. I took the third loaf out about an hour later and stacked it balanced on top of the other two. I did one bake with the two loaves of walnut bread and a second bake with the third loaf.)

  13. 45-60 minutes before baking, pre-heat the oven to 500º F with a baking stone and steaming apparatus in place.

  14. Transfer the loaves to a peel. Score the loaves as desired, turn down the oven to 460º F for the smaller loaves or 450ºF for the larger one, steam the oven, and transfer the loaves to the baking stone.

  15. After 15 minutes, remove the steaming apparatus, and turn down the oven to 430º F/Convection. (If you don't have a convection oven, leave the temperature at 460º F.)

  16. Bake for another 15 minutes for the smaller loaves or 25 minutes for the larger loaf.

  17. Turn off the oven, and leave the loaves on the stone, with the oven door ajar, for another 15 minutes.

  18. Transfer the loaves to a cooling rack, and cool thoroughly before slicing.

 One of my personal objectives in making this bread for so many weeks running has been, first of all, to develop a formula and procedures that produce a particular style of bread, and secondly to see if I could make small changes that accommodate to my other needs without changing the end product too much.


The bread without walnuts was very similar to the last San Francisco-style Sourdough Bread I had baked. The crust was crunchy and nutty-flavored. The crumb was chewy-tender with a moderate sourdough tang and excellent, balanced flavor.


The bread with walnuts was just delicious. I love the flavor of toasted walnuts in sourdough bread. I don't know why I had waited so long to make it again.

Tonight we'll have an appetizer of sourdough walnut bread with an interesting Spanish goat cheese followed by roasted herbed chicken/gruyere panini and a green salad.

David


dmsnyder's picture
dmsnyder

Sourdough Bread made with Liquid Levain fed twice a day

from the SFBI Artisan II Workshop

Probably the key experience provided in the SFBI Artisan II workshop on sourdough baking was baking a series of breads with liquid versus firm starters, starters fed either once or twice a day and breads with different proportions of starter. Each variation produced breads with noticeably different flavor profiles.

Our instructor made it quite clear that he and his colleagues at the SFBI had a clear consensus that the best-tasting bread was produced using a liquid levain fed twice a day and with the liquid levain constituting 40-50% (baker's percentage) of the final dough. The dough had an overall hydration of 68%.

The characteristics of bread made in this manner were a very mild sourdough tang with a predominance of the “milky” sourness provided by lactic acid but a dominance of sweet, wheaty flavor over acidity.

It has been quite a while since I have made bread using this formula, although I did like it a lot. I made it again this weekend. I have made some minor modifications in the procedures prescribed by the SFBI. Note: Apparent discrepancies in the ingredient weights are due to scaling down from the original formula for a much larger dough batch and rounding.


Total Dough Formula

Baker's %

Wt (g)

AP flour

95

641

Rye flour

0.83

5

Water

68

438

Instant yeast (optional)

0.1

0.5

Salt

2.1

13

Total

166.03

1097.5


Levain

Baker's %

Wt (g)

AP flour

95

102

Rye flour

5

5

Water

100

108

Liquid starter

40

43

Total

240

258

Note: for the starter feedings, including the levain mix, I actually used my usual starter feeding mix of 70% AP, 20% WW and 10% Rye. So, in the levain, rather than the AP and Rye specified in the SFBI formula, I used 107 g of the above mix.

  1. Mix ingredients thoroughly.

  2. Ferment 12 hours at room temperature. (Note: Because of my own scheduling needs, I refrigerated the levain overnight before mixing the final dough. This was not the procedure at the SFBI, and it would be expected to make the bread somewhat more sour. If you can, omit this levain retardation.)

Final Dough

Baker's %

Wt (g)

AP flour

100

517

Water

60

310

Instant yeast (optional)

0.1

0.06

Liquid starter

50

259

Salt

2.5

13

Total

212.6

1099.06

Procedures

  1. Mix all ingredients except the salt (and the yeast, if you are using it) to a shaggy mass.

  2. Let rest, covered, for 20-60 minutes.

  3. Add the salt (and yeast, if you are using it) and mix at Speed 2 for 5-6 minutes. Adjust flour or water to achieve a medium consistency. (Note: I did not use added instant yeast.)

  4. Ferment for 2-3 hours at 76ºF with 1 or 2 folds, as needed to strengthen the dough. (Note: The fermentation time depends on whether you use the instant yeast and on your fermentation temperature. As usual, “Watch the dough, not the clock.” The dough should end up expanded by about 20% and should be somewhat light and gassy. If you ferment in a transparent container, your should see the dough to be well-populated with tiny bubbles.)

  5. Divide the dough into two equal pieces and pre-shape as boules.

  6. Let the pieces rest, covered, for 25-30 minutes.

  7. Shape as boules or bâtards.

  8. Proof for 90-120 minutes at 80ºF.

  9. Bake at 450ºF with steam for 25 minutes.

  10. Leave in the turned-off oven with the door ajar for another 10 minutes.

  11. Cool thoroughly on a rack before slicing.


The crust softened as the bread cooled. I think this was mostly because I adjusted the dough consistency by adding a little water. This made for a more open crumb but a less crunchy crust. The aroma of the cut loaf was very nice with a noticeable acetic acid aroma. However the flavor, while more tangy than this bread is meant to be, was still only mildly sour. Otherwise, it had the delicious sweet-wheaty flavor I remember.

This bread was lovely. I am happy with the results I got, but it merits another bake following the SFBI formula and procedures without my modifications.

 David


dmsnyder's picture
dmsnyder

I almost decided not to bake this past weekend, but I activated some starter, thinking I might make some sourdough pancakes for breakfast Sunday. But, then, there was this starter, and I thought maybe I'd bake something or other. Well, I might as well have some fresh-baked bread for Sunday dinner, and it had been a while since I'd given a loaf to my next door neighbor who really appreciates my breads. I guessed I'd make some San Francisco-style sourdough to share.

I didn't want to be completely tied to the time-demands of my dough, so I relaxed the rigorous procedures with which I had been working to accommodate the other things I wanted to do. I expected the bread to be “good” but maybe not quite as good as last week's bake.

To my surprise and delight, the bread turned out to be the best San Francisco-style sourdough I had ever baked. So I am documenting what I did and hope it's reproducible. And I'm sharing it with you all. The modifications in my procedures were determined by convenience of the moment. This was sort of “a shot in the dark that hit the bullseye.”

So, here are the formula and procedures for this bake:

I started with my stock refrigerated 50% starter that had been fed last weekend. This feeding consisted of 50 g active starter, 100 g water and 200 g starter feeding mix. My starter feeding mix is 70% AP, 20% WW and 10% whole rye flour.

I activated the starter with a feeding of 40 g stock starter, 100 g water and 100 g starter feeding mix. This was fermented at room temperature for 16 hours, then refrigerated for about 20 hours. I then mixed the stiff levain.

Stiff levain

Bakers' %

Wt (g)

for 1 kg

Wt (g)

for 2 kg

Bread flour

95

78

157

Medium rye flour

5

4

8

Water

50

41

82

Stiff starter

80

66

132

Total

230

189

379

  1.  Dissolve the starter in the water. Add the flour and mix thoroughly until the flour has been completely incorporated and moistened.

  2. Ferment at room temperature for 16 hours.

Final dough

Bakers' %

Wt (g)

for 1 kg

Wt (g)

for 2 kg

AP flour

90

416

832

WW Flour

10

46

92

Water

73

337

675

Salt

2.4

11

22

Stiff levain

41

189

379

Total

216.4

953

2000

Method

  1. In a stand mixer, mix the flour and water at low speed until it forms a shaggy mass.

  2. Cover and autolyse for 120 minutes

  3. Add the salt and levain and mix at low speed for 1-2 minutes, then increase the speed to medium (Speed 2 in a KitchenAid) and mix for 5 minutes. Add flour and water as needed. The dough should be rather slack. It should clean the sides of the bowl but not the bottom.

  4. Transfer to a lightly floured board and do a stretch and fold and form a ball.

  5. Place the dough in a lightly oiled bowl and cover tightly.

  6. Ferment at 76º F for 31/2 to 4 hours with a stretch and fold at 50 and 100 minutes.

  7. Divide the dough into three equal pieces. (Note: I had made 2 kg of dough.)

  8. Pre-shape as rounds and rest, covered, for 10 minutes.

  9. Shape as boules or bâtards and place in bannetons. Place bannetons in plastic bags.

  10. Proof at room temperature (68-70º F) for 1-2 hours.

  11. Cold retard the loaves overnight.

  12. The next morning, proof the loaves at 85º F for 3 hours. (If you can't create a moist, 85 degree F environment, at least try to create one warmer than “room temperature.” For this bake, I took two loaves out of the fridge and started proofing them. I took the third loaf out about an hour later and stacked it balanced on top of the other two. I did one bake with the first two loaves and a second bake with the third loaf.)

  13. 45-60 minutes before baking, pre-heat the oven to 480º F with a baking stone and steaming apparatus in place.

  14. Transfer the loaves to a peel. Score the loaves as desired, turn down the oven to 460º F, steam the oven, and transfer the loaves to the baking stone.

  15. After 15 minutes, remove the steaming apparatus, and turn down the oven to 435º F/Convection. (If you don't have a convection oven, leave the temperature at 460º F.)

  16. Bake for another 15 minutes.

  17. Turn off the oven, and leave the loaves on the stone, with the oven door ajar, for another 15 minutes.

  18. Transfer the loaves to a cooling rack, and cool thoroughly before slicing.


Note: Because these loaves were smaller than those baked in “Take 3,” the oven temperature was hotter , and the baking time was shorter. I also wanted a slightly darker crust, which this modification accomplished.

The crust was thick and very crunchy but not “hard.” The crumb was more open than my last bake. The crust had a sweet, nutty flavor. The crumb had sweetness with a definite whole grain wheat overtone and a more pronounced acetic acid tang. It had a wonderful cool mouth feel and was a bit more tender than the last bake.

This bread was close in flavor and texture to the best tasting bread I've ever had which was a half kilo of pain de campagne cut from an absolutely huge miche in Les Eyzies, France some 15 years ago. It's a taste I've never forgotten and often wished I could reproduce.

I need to make me a miche like this!

David

Submitted to YeastSpotting 

dmsnyder's picture
dmsnyder

I haven't baked anything but some of my personal "comfort food" breads for the past few weeks. These are just good almost any way - plain, with butter, toasted with almond butter and apricot preserves, French toast, as garlic bread, for panini ....

Hamelman's Pain au Levain

Hamelman's Pain au Levain crumb

SFBI Miche (made with half AP flour and half CM Organic Type 85)

SFBI Miche profile

SFBI Miche crumb

We have been enjoying them all week.

David

dmsnyder's picture
dmsnyder

I made two 1 kg boules of my San Francisco-Style Sourdough Bread this weekend. (For the formula, see: My San Francisco Sourdough Quest, Take 3) The formula and procedures were little changed. Some of the fermentation and retardation times and temperatures were changed slightly to fit into the times I (and the oven) had free, but the dough always had the final say as to when it was ready for the next step. 

These loaves were proofed in linen-lined bannetons. Overnight cold retarding was done after dividing and shaping a well-fermented dough. Final proof was for about 3 hours at temperatures varying from 68 to 85 degrees F, mostly at the higher temperature. (I baked each loaf seperately, so I had to use variations in temperature to have the second loaf at just the right degree of proofing when the oven was free and re-heated after baking the first loaf.  If you are curious, the loaf on the right was the first one baked.

I scored with a diamond pattern this week, rather than the square pattern of previous weeks' bakes. The loaves were baked at 450 degrees F for 45 minutes, the first 15 minutes with steam.

This weekend's mix had about 1% more whole wheat. I think I can see the effect of even this very small modification in the crumb, and I thought the flavor of the whole wheat came through a bit more. This bread was less like a 1960's-type San Francisco Sourdough and more like a French Pain de Campagne.

The crust was nice and crunchy. The crumb was cool and moderately chewy with a nice complex flavor and moderate sourdough tang.

David

dmsnyder's picture
dmsnyder

Baguettes made with San Francisco Sourdough dough

I do like sourdough baguettes. Since I'd developed a San Francisco-style Sourdough bread I was happy with, I decided to make some baguettes with this dough. I made one kg of dough and shaped half of it as a boule which was retarded overnight before baking. I divided the other half into two 250 g pieces and shaped them as baguettes, proofed them and baked them without retarding at 460 degrees F for 22 minutes. See my recent blog entries for the formula and procedures. (My San Francisco Sourdough Quest, Take 3

Baguettes on the peel, ready to score and load

Scored baguette, ready to load and bake

Baked baguette, cooling

Baguette crumb

The crust was slightly crunchy and chewy. The crumb was chewy with a nice flavor and a mild sourdough tang. These are definitely worth making again. Next time, I think I'll retard the shaped baguettes and also try baking at a slightly higher temperature to get a darker, crunchier crust.

The boule also turned out nicely, shown here with "a supporting cast" of San Joaquin Sourdough bâtards.

David


dmsnyder's picture
dmsnyder

San Francisco-style Sourdough Bread 2/12/2012

Today, I baked two more loaves of my evolving San Francisco-style Sourdough bread. (See: My San Francisco Sourdough Quest and My San Francisco Sourdough Quest, Take 2)

The only change in the formula was to double the amount of dough, so each loaf was twice the weight of those previously baked. As those who have followed this adventure may note, there were also some minor changes in the procedures. The only really important one was to bake the breads at a lower temperature for a longer time, as an accommodation to their larger mass.

Those who have asked for ingredient weights in metric measures will be happy to note that weights are now given in grams.

So, here are the formula and procedures for today's bake. I have adjusted the tables below for 1 kg and for a 2 kg batch of dough.


Stiff levain

Bakers' %

Wt (g)

for 1 kg

Wt (g)

for 2 kg

Bread flour

95

78

157

Medium rye flour

5

4

8

Water

50

41

82

Stiff starter

80

66

132

Total

230

189

379

  1. Dissolve the starter in the water. Add the flour and mix thoroughly until the flour has been completely incorporated and moistened.

  2. Ferment at room temperature for 6 hours.

  3. Cold retard overnight.

  4. The next day, take the levain out of the refrigerator and ferment at 76 degrees F for another 1-2 hours. The levain is ready when it has expanded about 3 times, and the surface is wrinkled (starting to collapse).

    Final dough

    Bakers' %

    Wt (g)

    for 1 kg

    Wt (g)

    for 2 kg

    AP flour

    90

    416

    832

    WW Flour

    10

    46

    92

    Water

    73

    337

    675

    Salt

    2.4

    11

    22

    Stiff levain

    41

    189

    379

    Total

    216.4

    953

    2000


    Method

  1. In a stand mixer, mix the flour and water at low speed until it forms a shaggy mass.

  2. Cover and autolyse for 20-60 minutes

  3. Add the salt and levain and mix at low speed for 1-2 minutes, then increase the speed to medium (Speed 2 in a KitchenAid) and mix for 5 minutes. Add flour and water as needed. The dough should be rather slack. It should clean the sides of the bowl but not the bottom.

  4. Transfer to a lightly floured board and do a stretch and fold and form a ball.

  5. Place the dough in a lightly oiled bowl and cover tightly.

  6. Ferment at 76º F for 3 hours with a stretch and fold at 1 hour.

  7. Divide the dough into two equal pieces.

  8. Pre-shape as rounds and rest, covered, for 10 minutes.

  9. Shape as boules or bâtards and place in bannetons. Place bannetons in plastic bags.

  10. Proof at room temperature (68-70º F) for 1-2 hours.

  11. Cold retard the loaves overnight.

  12. The next morning, proof the loaves at 85º F for 2-3 hours. (This is ideal, in my opinion. If you can't create a moist, 85 degree F environment, at least try to create one warmer than “room temperature.” For this bake, one loaf proofed at about 76 degrees and the other at 85 degrees F.)

  13. 45-60 minutes before baking, pre-heat the oven to 480º F with a baking stone and steaming apparatus in place.

  14. Transfer the loaves to a peel. Score the loaves as desired, turn down the oven to 440º F, and transfer them to the baking stone.

  15. Steam the oven.

  16. After 15 minutes, remove the steaming apparatus, and turn down the oven to 415º F/Convection. (If you don't have a convection oven, leave the temperature at 440º F.)

  17. Bake for another 30-35 minutes.

  18. Turn off the oven, and leave the loaves on the stone, with the oven door ajar, for another 15 minutes.

  19. Transfer the loaves to a cooling rack, and cool thoroughly before slicing.

Note: Because I was baking larger loaves, the oven temperature was set lower and the bake time was lengthened. Also note that, if you make two loaves of this size, it may be prudent to bake one at a time, unless your oven stone is larger than my 16 X 14 inch one.

Those who enjoy soft crust and cannot abide a sour-tasting sourdough would be well-advised to skip making this bread. On the other hand, it is as close to my ideal San Francisco-style sourdough as I expect to get.

San Francisco-style Sourdough Crumb

The crust was thick and very crunchy but not “hard.” The crumb was denser than my first attempt but somewhat open and fully aerated with varying sized alveolae. The crust had a sweet, nutty flavor. The crumb had sweetness but a moderately present acetic acid tang.

I can't promise I won't tweak this further or conduct experiments on, for example, the difference between proofing at room temperature, 76 degrees F and 85 degrees F. However, I expect to be making this bread regularly pretty much as I did this week.

I also baked the Tartine “Basic Country Bread” and Hamelman's “Pain au Levain” this weekend.

Tartine Basic Country Bread 

Tartine Basic Country Bread crumb

Pain au Levain, from Hamelman's Bread

Pain au Levain, from Hamelman's Bread, crumb

David

Submitted to YeastSpotting


Pages

Subscribe to RSS - dmsnyder's blog