The Fresh Loaf

A Community of Amateur Bakers and Artisan Bread Enthusiasts.

dmsnyder's blog

dmsnyder's picture
dmsnyder


Back in October, 2011, I baked a pugliese-type bread I enjoyed a lot. (See Pugliese Capriccioso) I gather from various TFL comments, a few other bakers have baked from my formula with good results. However, I wanted to bake this bread again using a more authentic biga rather than a liquid levain and at a somewhat higher hydration. Today, I did.

Biga Naturale Ingredients

Wt (g)

Baker's %

AP flour

48

100

Water

24

50

Active starter (50% hydration)

29

60

Total

101

210

  1. The day before baking, mix the biga.

  2. Ferment for 6 hours at 78ºF.

  3. Refrigerate overnight

Final Dough Ingredients

Wt (g)

Baker's %

AP flour

375

75

Fine durum flour

125

25

Water

400

80

Salt

10

2

Biga naturale (50% hydration)

100

20

Total

1010

202

Note: The biga consists of 67 g flour and 33 g water. Thus, the total flour in the dough is 567 g, and the total water is 433 g. Therefore, the actual final dough hydration is 76%. Likewise, the actual salt percentage is 1.8%.

Method

  1. Take the biga out of the refrigerator and let it warm up for about an hour.

  2. Mix the water and flours to a shaggy mass, cover and autolyse for 20-60 minutes.

  3. Sprinkle the salt over the dough and add the biga in chunks.

  4. Mix at Speed 1 for 1-2 minutes until the ingredients are well-mixed.

  5. Mix at Speed 2 for about 8 minutes. The dough will be quite slack. It will clean the sides of the bowl and form a ball on the dough hook, but a large portion of the dough will still be on the bottom of the bowl.

  6. Transfer the dough to a well-floured board, form into a ball by stretching and folding.

  7. Place in a lightly oiled bowl with a tight-fitting cover.

  8. Ferment at 78ºF for about 2 hours with a stretch and fold at 50 and 100 minutes.

  9. Pre-shape into a ball and let the dough rest for 10 minutes to relax the gluten. (This wasn't much of an issue. The dough was extremely relaxed and extensible.)

  10. Shape the dough as a tight boule and place it seam-side down in a floured banneton.

  11. Place the banneton in a food-safe plastic bag or cover with a damp towel. Proof the boule at 85ºF until the dough springs back slowly when you poke a finger into it. (About 2 hours)

  12. 45 minutes before baking, preheat the oven to 490ºF with a baking stone and steaming apparatus in place.

  13. Transfer the loaf to the baking stone, seam-side up, steam the oven and turn the temperature down to 460ºF.

  14. After 15 minutes, remove the steaming apparatus. Bake for another 30 minutes or until the loaf is done. The crust should be nicely colored. The internal temperature should be at least 205ºF.

  15. Leave the loaf on the baking stone with the oven turned off and the door ajar for another 10 minutes to dry the crust.

  16. Transfer the loaf to a cooling rack. Cool completely before slicing.


The dough was even more slack than the last bake, and it spread significantly when transferred to the peel. However, there was very nice oven spring. The boule ended up with about 4 times the height it started with. The folds did not open up like the last bake. This may have been partly due to longer proofing, but I probably sealed them too well in tightening the boule when shaping.

I would describe the crust, crumb and flavor as essentially identical to my first bake of this bread: Crunchy crust, cool, sweet, chewy crumb. Perhaps a subtle nuttiness from the durum flour. Pretty darn delicious! This bread is a strong contender for the list of breads I bake frequently.

David


dmsnyder's picture
dmsnyder

A couple weeks ago, I blogged on my attempt to make a San Francisco-style sourdough bread that  had a crunchy crust, moderate sourness and a nice, complex flavor. (See My San Francisco Sourdough Quest).

My quest  continued this weekend. The formula and method were amended in these ways:

1. Rather than activating my starter at 100% hydration and building my 50% hydration levain from that, I activated my stored 50% hydration starter at 50% hydration. In other words, I did two firm starter elaborations. These were fed at 12 hour intervals.

2. The levain was then fermented at room temperature for 16 hours and was not retarded.

3. The final dough was mixed substituting 10% whole wheat flour for some of the AP flour.

Otherwise, my formula and method were as described previously. I should point out that, with these changes, the only differences from the formula and method for San Francisco Sourdough found in Advanced Bread & Pastry were:

1. The substitution of some WW for AP flour,

2. The longer fermentation of the firm levain, and 

3. The higher fermentation and proofing temperatures or the final dough and formed loaves. 

The results were very similar, but the bread was substantially more sour. I'd rate it as moderately to very sour. The crumb was a little less open, presumably because the WW flour absorbed a little more water. I loved it. My wife loved it. I recommend it.

David


dmsnyder's picture
dmsnyder

Progress is being made!

After my disappointment with the Kline, et al San Francisco Sourdough method, I re-read and re-digested what I know about time, temperature, ingredients and the care and feeding of sourdough flora. I suppose the principal new concept to sink in was that the fermentation temperature matters a whole lot, and what's best for yeast growth is not best for lactobacillus growth, and what's best for lactobacillus multiplication is not what's best for acid production. In a way, I rediscovered something I found out several years ago but neglected to pursue. (Reading old blogs was interesting.) Those very smart fellows at Detmolder were on to something: You can have it all, if you do it in stages. I'm pretty sure that what I did was not the only way to achieve pretty much the same result. It may not be the best way, but it worked for me. Note that I achieved the necessary temperature control with a Brød & Taylor Folding Proofer, but you can achieve this with a home-made proofing box as well.

My goal has been to make a moderately sour, mostly white “San Francisco style” sourdough bread that has a crunchy crust, an open crumb and a nice, sweet, complex flavor, not just sourness. Today's bake achieved all of these characteristics, and I'm a very happy baker (and bread eater)!

I started with the “San Francisco Sourdough” formula in Michel Suas' Advanced Bread and Pastry, but modified the method, as described below:

My stock starter is 50% hydration. My sourdough starter is fed with a mix of 70% AP, 20% WW and 10% whole rye.

I started by refreshing my stock starter with 40 g starter, 100 g water and 100 g flour mix and fermenting it at room temperature for 12 hours. I used this to build the stiff levain. (Note: This is a liquid starter - 100% hydration.)


Stiff levain

Bakers' %

Wt (oz)

Bread flour

95

2.5

Medium rye flour

5

0.15

Water

50

1.25

Liquid starter

80

2.15

Total

230

6.05

  1. Dissolve the starter in the water. Add the flour and mix thoroughly until the flour has been completely incorporated and moistened.

  2. Ferment at room temperature for 6 hours.

  3. Cold retard overnight.

  4. The next day, take the levain out of the refrigerator and ferment at room temperature for another 2-4 hours. The levain is ready when it has expanded about 3 times, and the surface is wrinkled (starting to collapse). 

Final dough

Bakers' %

Wt (oz)

AP flour

100

14.85

Water

72.8

10.85

Salt

2.53

0.35

Stiff levain

40

6.05

Total

215.33

32.1

Method

  1. In a stand mixer, mix the flour and water at low speed until it forms a shaggy mass.

  2. Cover and autolyse for 1-2 hours. (Yup. I autolysed for 2 hours.)

  3. Add the salt and levain and mix at low speed for 1-2 minutes, then increase the speed to medium (Speed 2 in a KitchenAid) and mix for 5 minutes. Add flour and water as needed. The dough should be rather slack. It should clean the sides of the bowl but not the bottom.

  4. Transfer to a lightly floured board and do a stretch and fold and form a ball.

  5. Place the dough in a lightly oiled bowl and cover tightly.

  6. Ferment at 78º F for 3 hours with a stretch and fold at 1 hour.

  7. Divide the dough into two equal pieces.

  8. Pre-shape as rounds and rest, covered, for 10 minutes.

  9. Shape as boules or bâtards and place in bannetons. Place bannetons in plastic bags.

  10. Proof at room temperature (68-70º F) for 1-2 hours.

  11. Cold retard the loaves overnight.

  12. The next morning, proof the loaves at 85º F for 2-3 hours.

  13. 45-60 minutes before baking, pre-heat the oven to 480º F with a baking stone and steaming apparatus in place.

  14. Transfer the loaves to a peel. Score the loaves as desired, turn down the oven to 450º F, and transfer the loaves to the baking stone.

  15. Steam the oven.

  16. After 15 minutes, remove the steaming apparatus, and turn down the oven to 425º F/Convection. (If you don't have a convection oven, leave the temperature at 450º F.)

  17. Bake for another 25 minutes.

  18. Turn off the oven, and leave the loaves on the stone, with the oven door ajar, for another 10 minutes.

  19. Transfer the loaves to a cooling rack, and cool thoroughly before slicing.

San Francisco Sourdough (and New York Bagel from ITJB. This weekend's "Coast to Coast" baking.) 

San Francisco Sourdough Crumb

These loaves had a rather flat profile but did have fair oven spring and bloom. When sliced after cooling for 4 hours, the crust was crunchy. The crumb was open. The aroma was decidedly sour. The crumb was tender-chewy and cool in the mouth. The flavor of the crumb was a bit sweet and wheaty with a moderately sour after taste. The crust was nutty, but I would have personally enjoyed it more had it been darker, even though that would not have been strictly in the the “San Francisco Style” of old.

This method is spread over 3 days, so it requires some advance planning. Since it requires little time, except on the second day, it should be easy to fit into almost anyone's schedule. It this is the kind of bread you're after, it's definitely worth the effort.

Future plans

  1. Substitute 5-10% whole wheat for some of the AP flour in the final dough.

  2. Make some larger loaves.

 David

Submitted to YeastSpotting

Addendum added 2/4/2012: Please see My San Francisco Sourdough Quest, Take 2 for my next bake. The modifications resulted in improvements in the crumb and a more assertively sour bread.

dmsnyder's picture
dmsnyder

After the disappointment of the San Francisco Sourdough according to Kline, et al, it was even more of a pleasure than usual to pull this San Francisco Baking Institute Miche out of my oven.


The formula was the same as that I originally posted. (Miche from SFBI Artisan II - 2 kg) I've settled on a 50/50 mix of AP and Central Milling's “Type 85” organic, unmalted flour, as first suggested by brother Glenn. This has always provided a wonderful crust and crumb and a delicious flavor. I did alter the procedure in a few ways for this bake. I mixed the dough in my Bosch (for 5 minutes) rather than by hand, and I proofed the formed loaf at room temperature for a couple hours before retarding the loaf for about 12 hours. It then finished proofing in my Brod & Taylor Folding Proofer for about 3 hours at 85 degrees F before baking. At the end of proofing, the loaf was expanded by about 75%. The “poke test” indicated it was “fully proofed, yet there was great oven spring and bloom.


The crust was very crunchy after 18 hours' rest in bakers' linen. The crumb was chewy-tender, moist and cool in the mouth. The flavor was deliciously wheaty and complex with moderate sourness. What a delicious bread!

David

dmsnyder's picture
dmsnyder

San Francisco Sour Dough French Bread

according to

Kline, Sugihara and McCready

(The Bakers Digest, April, 1970)


In their 1970 Bakers Digest articles, Kline, Sugihara and McCready first deliniated the microbiology of San Francisco Sourdough bread. Their discovery of the special relationship between the dominant yeast – S. exeguna – and a unique species of Lactobacillus provided understanding of the special flavor of San Francisco sourdough and the stability of the sourdough cultures over time.

In the first of their articles, they also described the process San Francisco bakeries used to maintain their starters and make their breads. They describe the process as if all of the bakeries used the same process without actually stating this was the case. Regardless, the process they describe is significantly different in several respects from those found in any of the currently popular baking books in my collection. Because of that, and because I'm curious about whether the process they described can be successfully replicated in my own kitchen and produce bread like that of the traditional San Francisco sourdough breads with which I'm familial, I made a couple of loaves following their procedures.

The formulas and procedures described by Kline, et al. in the articles cited are as follows:

Sponge

Bakers' %

Firm starter

100

High-gluten flour

100

Water

46-52

  1. Ferment for 7-8 hours at 80º F

  2. In the bakery, fed every 8 hours

  3. Can feed less often by fermenting for 6 hours and retarding at 50-55ºF or fermenting 3-4 hours and retarding for longer times with refreshments 3-4 times per week, rather than 3 times per day.


Dough

Bakers' %

Sponge

20

AP flour

100

Water

60

Salt

2

  1. Mix ingredients (No mix method or time is given.)

  2. Rest for 30 minutes at room temperature.

  3. Divide and pre-shape.

  4. Proof for 1 hour at 90ºF

  5. Shape.

  6. Proof for 6-8 hours at 85-90º F.

  7. Score loaves and Bake with lots of steam for the first half of the bake at 375-390ºF for 45-55 minutes.

To make 2 kg of dough, I proceeded as follows: 

Sponge

Bakers' %

Wt (g)

Firm starter

100

88

High-gluten flour

100

88

Water

50

44

Total

250

220

1. I built the firm starter for the sponge with two elaborations, starting with my firm stored starter.

2. The sponge was mixed and fermented at 80º F for 10 hours.


Dough

Bakers' %

Wt (g)

Sponge

20

220

AP flour

100

1099

Water

60

659

Salt

2

22

Total

182

2000

Note: Accounting for the flour and water in the sponge, the actual final dough hydration was 58.9%.

Procedures

  1. All the dough ingredients except the salt were mixed and allowed to rest, covered, at room temperature for one hour.

  2. The salt was sprinkled over the dough and mixed in a Bosch Universal Plus mixer at First (lowest) speed for 1-2 minutes, then at Second speed for 5 minutes.

  3. The dough was then divided into two 1 kg pieces, pre-shaped as rounds and proofed at 90º F for 1 hour. (I placed the pieces on a bakers' linen-covered 1/4 sheet pan in a Brød & Taylor Folding Proofer.)

  4. The pieces were than shaped tightly as boules, transferred to floured bannetons and placed in plastic bags.

  5. The loaves were then proofed in the Folding Proofer at 85º F for 6 hours.

  6. 45 minutes before baking, the oven was pre-heated to 450º F/convection with a baking stone on the middle shelf and a cast iron skillet filled with lava rocks on the bottom shelf.

  7. The loaves were dusted with semolina, transferred to a peel, scored and loaded on the baking stone. A perforated pie tin filled with ice cubes was placed on the lava rocks. The oven was turned town to 380º F/conventional bake.

  8. After 23 minutes, the skillet was removed from the oven. The oven setting was changed to 360º F/convection bake, and the loaves were baked for another 22 minutes.

  9. The oven was turned off, but the loaves were left on the baking stone, with the oven door ajar, for another 15 minutes.

  10. The loaves were then cooled on a rack before slicing.

This is a low-hydration dough. After mixing, it was very smooth and barely tacky in consistency. It was still very dry and firm before the final shaping. After the six hours final proofing, the dough was very soft and puffy. I was afraid it was over-proofed and would deflate when scored or, at least, have poor oven spring and bloom. However, It took the scoring well and had good oven spring and bloom.

The baking temperature was lower than I usually employ for lean dough hearth loaves, and the crust color was thus lighter than most of my bakes. The crust color was quite characteristic of the San Francisco Sourdough breads I remember from the 1960's and 1970's. The loaf profile also was typical – a rather flat loaf.

The aroma of the vented oven air was remarkably sour during the final 10-15 minutes of the bake. The bread, once baked, cooled and sliced, revealed a very even crumb. The crust was somewhat crunchy but more chewy. The flavor was minimally sour and had little complexity or sweetness to it. All in all, a handsome loaf with undistinguished eating quality.

I expect I could tweak more sourness out of this dough by retarding the loaves overnight, but I don't particularly feel inclined to experiment further when there are so many other breads that are so much better.

 Comments regarding the process described would be very welcome. I am curious regarding the disparity between the San Francisco Sourdough's I have had, supposedly produced by this method, and what I baked at home. Any thoughts?

David


dmsnyder's picture
dmsnyder

A couple days ago, I blogged on my bake of a San Francisco sourdough bread based on Larraburu Bros. recipe as described in the 1978 Cereal Chemistry article by Galal, et al., as cited by Doc.Dough. (See San Francisco Sourdough Bread using Larraburu Bros. formula.) It was a delicious bread, but it lacked the sourdough tang usually associated with San Francisco sourdough. This blob describes some modifications of the recipe. I hoped to retain the good qualities of this bread while increasing the sourness somewhat.

In summary, the modifications were:

  1. Substitute some whole rye flour for some of the high-gluten flour in the sponge.

  2. Ferment the sponge at a lower (room) temperature for a longer time.

  3. Substitute some whole wheat flour for some of the AP flour in the final dough.

  4. Compare breads baked with and without an overnight cold retardation of the shaped loaves.

For three 667 g loaves:

Sponge (Stiff Levain)

Baker's %

Wt (g)

High-gluten flour

90

81

Whole rye flour

10

9

Water

50

44

Stiff starter

50

44

Total

200

178

Mix thoroughly and ferment for 12 hours at room temperature.

Final dough

Baker's %

Wt (g)

AP flour

90

1017

WW flour

10

113

Water

60

678

Salt

2

22

Sponge (stiff levain)

15

170

Total

177

2000


Procedure (Note: I actually mixed the dough in a Bosch Universal Plus, using the dough hook. I have left the instructions as if I had used a KitchenAid mixer. This amount of stiff dough would have challenged my KitchenAid. Also, I retarded one of the 3 loaves I made overnight in the refrigerator.)

  1. Mix the flours and water in a stand mixer with the paddle for 1-2 minutes at Speed 1.

  2. Cover the mixer bowl tightly and autolyse for 20-60 minutes. (I autolysed for 60 minutes.)

  3. Sprinkle the salt on the dough and add the sponge in chunks.

  4. Mix for 1-2 minutes with the paddle at Speed 1, then switch to the dough hook and mix for 5 minutes at Speed 2. Adjust the dough consistency by adding small amounts of water or flour, if needed. (I did not add either.) The dough should be tacky but not sticky. It should clean both the sides and bottom of the mixing bowl.

  5. Transfer the dough to a clean, lightly oiled bowl. Cover tightly.

  6. Ferment at 105º F for 2 1/2 to 3 hours in a humid environment. Stretch and fold once at 1 1/4 hours.

  7. Divide the dough into 3 equal pieces.

  8. Pre-shape the pieces round and cover with a towel or plasti-crap.

  9. Let the dough relax for 15-20 minutes.

  10. Shape as a boule or bâtard.

  11. Proof at 105º F in a floured banneton or en couche, covered, until the dough slowly fills a hole poked in it with a finger. (This was in 30 minutes, for me!)

  12. About 45 minutes before baking, pre-heat the oven to 480º F with a baking stone and steaming apparatus in place.

  13. Transfer the loaf to a peel and score it as desired.

  14. Transfer the loaf to the baking stone. Turn down the oven to 450º F.

  15. Bake with steam for 15 minutes. Remove your steaming apparatus, and bake for another 25 to 35 minutes until the crust is nicely colored and the internal temperature is at least 205º F.

  16. Turn off the oven, but leave the loaf on the baking stone with the oven door ajar for another 10-15 minutes.

  17. Transfer the loaf to a cooling rack, and cool completely (at least 2 hours) before slicing.
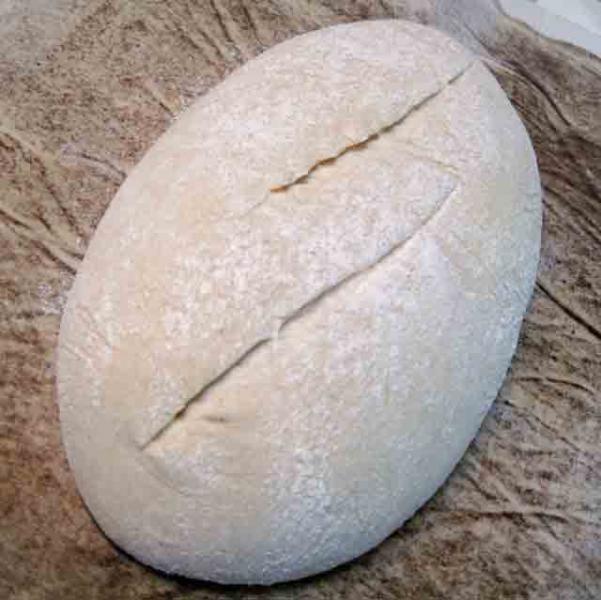
This bread came out very dark for reasons that are not clear to me. Again, the “poke test” failed me. The loaves seemed ready to bake after 30 minutes in the proofer, but their oven spring and bloom seemed to indicate under-proofing. The crust was nice and crisp. The flavor was different from the first bake, partly because of the rye and whole wheat flours, but it was also very slightly sour – more so the day after baking. I would still categorize it as “very slightly sour.”

Larraburu SFSD, modified formula 

Larraburu SFSD, modified formula crust

Larraburu SFSD, modified formula Crumb

I cold retarded one loaf from this batch for about 24 hours en couche, inside a plastic bag. Because of the apparent under-proofing problem described above, it then was warmed up at room temperature for about 90 minutes and proofed at 105º F for another 75 minutes. The smooth surface of the loaf which had been face down on the couche was significantly dried out. The couche had absorbed a lot of its moisture.

Because of my experience with the previous bake, described above, I baked this loaf at 440º F for a total of 30 minutes, leaving it in the turned off oven with the door ajar for 20 minutes. The oven spring and bloom were moderated by these changes. The color was pretty much perfect, to my taste.

Larraburu SFSD, modified formula and procedure

Larraburu SFSD, modified formula and procedure: Crumb

The aroma of the sliced bread was whole-wheaty and ... slightly sour. The crust was crunchy and the flavor of the crumb was decidedly sour ... very sour. It was a very different bread from the ones that had 1) not been cold retarded and 2) had been proofed for a very much shorter time at a warmer temperature.

I'm a very happy sourdough baker!

The next step will be to return to the original formula but use the present modified procedure.

David

Submittted to YeastSpotting


dmsnyder's picture
dmsnyder

Back in May, 2010, bnom posted a reminiscence of the San Francisco Sourdough bread baked by Larraburu Brothers Bakery, which went out of business about 30 years ago after a fire in their plant. (See Divine inspiration--for me it way Larraburu Brother's SF SD. What was it for you?) For many who grew up eating it, the Larraburu bread was the quintessential San Francisco Sourdough. Although the bakery is long-gone (and much lamented), Doc.Dough found a journal article from 1978 describing their formula and process, so we might attempt to reproduce this famous bread.

Doc.Dough's citation is quoted below, as follows:

Title: Lactic and volatile (C2-C5) organic acids of San Francisco sourdough French bread

Cereal Chemistry 55(4): 461-468; Copyright 1978 The American Association of Cereal Chemists

Authors: A. M. Galal, J. A. Johnson, and E. Varriano-Marston

The Larraburu Company produces San Francisco sourdough French bread by the sponge and dough process.  Each day a piece of straight dough or starter sponge known as the "Mother" is saved and refrigerated to be used as a starter sponge the following day.  This starter sponge is used to make more starter sponge as well as sponges for bread production.  The starter sponge consists of 100 parts of clear flour (14% protein), approximately 50 parts of water, and 50 parts of the starter sponge.  The ingredients are mixed and fermented for 9-10 hr at 80°F.  The bread dough is made by mixing 100 parts flour 12% protein, 60 parts of water, 15 parts of sponge, and 1.5-2% salt.  The dough rests 1 hr and then is divided, molded, and deposited on canvas dusted with corn meal or rice flour.  The dough is proofed for 4 hr at 105°F (41°C) and 96% relative humidity and baked at 420°F (216°C) for 40-50 min in a Perkins oven with direct injection of low pressure steam (5 psi).  Oven shelves were covered with Carborundum.

Specific instructions for mixing are not provided, but I would surmise that, because of the very short bulk fermentation and long proofing times, Larraburu Brothers used an intensive mix. This would result in a bread with high volume but a relatively dense, even crumb. I altered the procedure to use an autolyse, a less intensive mix, a longer bulk fermentation with a stretch and fold and a shorter proof. My intention was to bake a bread with a more open crumb structure and better flavor.

The autolyse allows the flour to absorb the water and for gluten to start developing. This head start on gluten development allows for a shorter mixing time to get to the desired stage of gluten development. Less mixing has two principal effects: 1) The gluten strands are less organized, resulting in a more open crumb with a random distribution of holes of varying size. 2) Less oxidation of the carotenoid pigments in the flour, resulting in a more yellow crumb color and better bread flavor.

Note that the fermentation and proofing temperature control was made possible by using a Brod & Taylor Proofing Box.

To make one 1 kg loaf:

Sponge (Stiff Levain)

Baker's %

Wt (g)

High-gluten flour

100

45

Water

50

22

Stiff starter

50

22

Total

200

89

Mix thoroughly and ferment for 9-10 hours at 80º F in a lightly oiled bowl, covered tightly.

Final dough

Baker's %

Wt (g)

AP flour

100

565

Water

60

339

Salt

2

11

Sponge (stiff levain)

15

85

Total

177

1000


Procedure

  1. Mix the flour and water in a stand mixer with the paddle for 1-2 minutes at Speed 1.

  2. Cover the mixer bowl tightly and autolyse for 20-60 minutes. (I autolysed for 60 minutes.)

  3. Sprinkle the salt on the dough and add the sponge in chunks.

  4. Mix for 1-2 minutes with the paddle at Speed 1, then switch to the dough hook and mix for 5 minutes at Speed 2. Adjust the dough consistency by adding small amounts of water or flour, if needed. (I did not add either.) The dough should be tacky but not sticky. It should clean both the sides and bottom of the mixing bowl.

  5. Transfer the dough to a clean, lightly oiled bowl. Cover tightly.

  6. Ferment at 105º F for 2 1/2 to 3 hours in a humid environment. Stretch and fold once at 1 1/4 hours.

  7. Pre-shape the dough round and cover with a towel or plasti-crap.

  8. Let the dough relax for 15-20 minutes.

  9. Shape as a boule or bâtard.

  10. Proof at 105º F in a floured banneton or en couche, covered, until the dough slowly fills a hole poked in it with a finger. (This was in 30 minutes, for me!)

  11. About 45 minutes before baking, pre-heat the oven to 480º F with a baking stone and steaming apparatus in place.

  12. Transfer the loaf to a peel and score it as desired.

  13. Transfer the loaf to the baking stone. Turn down the oven to 450º F.

  14. Bake with steam for 15 minutes. Remove your steaming apparatus, and bake for another 25 to 35 minutes until the crust is nicely colored and the internal temperature is at least 205º F.

  15. Turn off the oven, but leave the loaf on the baking stone with the oven door ajar for another 10-15 minutes.

  16. Transfer the loaf to a cooling rack, and cool completely (at least 2 hours) before slicing. 

Proofed, slashed and ready to bake

The bread had exuberant oven spring and bloom. In hindsight, it could have proofed for another 15 minutes or so without harm. I baked it for a total of 40 minutes. The crust was very firm, and the loaf sang nicely while cooling. The aroma was that of fresh-baked bread without any yeasty overtones. 

Crackley Crust
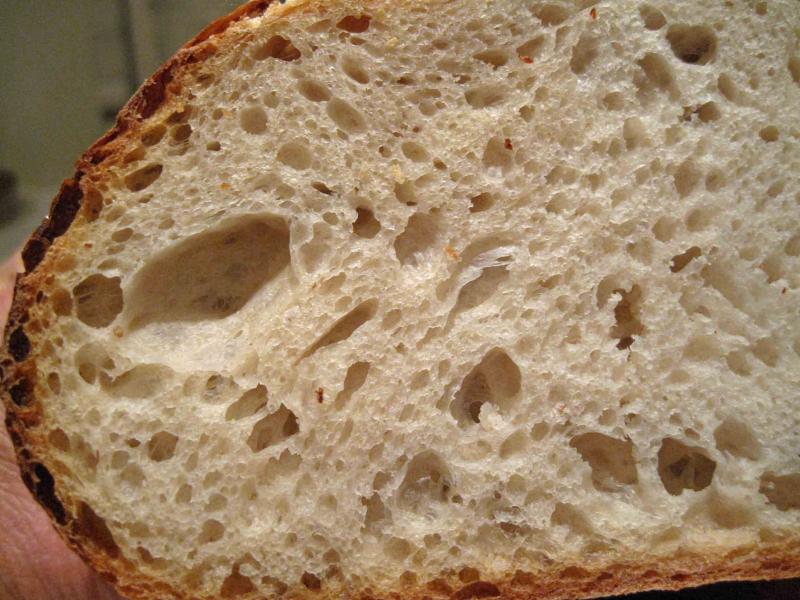
Classic SF SD crumb

I sliced and tasted the bread about 3 hours after it came out of the oven. The aroma of the bread was sweet and wheaty. The crust was very crunchy with a wonderful flavor I have had from the crusts of excellent bakery loaves but not before from my oven. The crumb was quite tender and cool-feeling. The flavor was sweet with only a hint of lactic acid, creamy-type sourness. I could discern no acetic acid presence at all, much to my surprise.

Now, that's not "bad!" I'd say this may be the best flavored French-style pain au levain I've ever made. But it does certainly not have the assertive, vinegary tang usually associated with San Francisco Sourdough. In fact, my wife, who is not at all fond of super-sour sourdoughs, said, "This is better than San Francisco Sourdough!" I try not to argue with her, but it's clearly a matter of taste. 

I'm going to give this recipe some thought and may tweak it to get more sourness, but, you know, I may make it just like this again too. It's really outstanding!

David

Submitted to YeastSpotting 

dmsnyder's picture
dmsnyder

You could call it "FICTION." (Fraternal Inspiration to Cook The Identical Offerings Nightly) But it's true. Brother Glenn and I end up baking the same breads or cooking the same dishes more often than one would expect by chance alone. 

My barbecued beef sandwiches are, strictly speaking, not identical to Glenn's. He used leftover rib roast. I used braised brisket. He made hoagie-type rolls from the Vienna Bread dough in BBA. I made double knotted rolls from the Medium Vienna Dough in Inside the Jewish Bakery. I served mine with baked yams and Curtido, a South American version of cole slaw.

The ITJB Medium Vienna dough was bulk fermented to triple (2 hours at 78 degrees F).

Yup. That's tripled.

Even though this is a rather low-hydration, stiff dough, full fermentation yields a roll that is light, airy and tender with delicious flavor, yet firm enough to not get soggy and fall apart when used to make a saucy sandwich. I scaled the rolls to 4 oz, 3/4 proofed them, egg washed twice, sprinkled with sesame seeds and baked them at 350 degrees for 17 minutes.

The brisket was prepared as follows:

2 lbs lean brisket, well-trimmed of fat.

3 cups sliced onions

4 cloves of garlic, crushed

2 medium carrots cut in 2 inch pieces

1 bay leaf

1/2 cup of dry wine (red, white or a mixture)

Water to just cover the other ingredients.

Note: No salt. The sauce provides plenty of salt and spice.

Place all the ingredients except the water in a heavy dutch oven with the brisket fat-side up. (I used a Le Creuset oval enameled cast iron oven.) Pour in enough water to barely cover the meat. Cover tightly. Bring to a boil on top of the stove then place in a pre-heated 350 degree F oven and bake until the meat is fork-tender (about 3 hours). Bake uncovered for the last 30 minutes or so to brown the meat and reduce the gravy somewhat.

Transfer the contents to another container to cool to room temperature, then cover and refrigerate overnight.

The next day, skim off any visible fat. Slice the brisket thinly, across the grain of the meat. Mix about a cup of barbecue sauce (I like "San Francisco's Original Firehouse No. 2 Bar-B-Que Sauce.") with a few tablespoons of gravy (without the veggies) to thin it in a cookpot large enough to hold the sauce and sliced brisket. Simmer partly covered on top of the stove to thoroughly heat the meat.

Heap meat and some sauce on rolls and serve immediately with side dishes of your choice.

Enjoy!

This week, I also made Hamelman's "Sourdough Seed Bread." I hadn't made this one in quite a while. It was even better than I remembered. Highly recommended!

David

Submitted to YeastSpotting


dmsnyder's picture
dmsnyder

Pecan Roll

Cheese Pocket 

Both these pastries were made with the Babka Dough from Inside the Jewish Bakery by Stanley Ginsburg and Norman Berg.

My wife and I have fond memories of the Pecan Rolls from the long-closed Fantasia Bakery in San Francisco. Theirs were made with danish pastry and were coated with a sticky bun type glaze. The ones I made today were simpler and less sweet. After mixing and fermenting the dough, I divided it, wrapped it in plasti-crap and refrigerated it overnight. The next day, I rolled out a 16 oz portion, coated it with KAF Cinnamon Smear, sprinkled on toasted pecan pieces, rolled up the dough and divided it into 12 portions. These were placed in a buttered muffin tin, egg washed and proofed. Before baking, I put pecan halves on the tops and egg washed again. The rolls were not glazed after baking.

Pecan Rolls, proofing in a Brod & Taylor Proofing Box

Ready to bake

Baked and Cooling

Pecan Roll Crumb

When I was much younger, my favorite pastry from Karsh's Bakery was their Cheese Pockets. The ones I made today used the same dough as the Pecan Rolls and the Cheese Filling from ITJB. The dough was rolled out and divided into 4 inch squares. About 2 tablespoons of the cheese filling was put in the middle of each square, and the corners were folded in, overlapping to completely cover the filling. The seams were pinched closed. The pieces were egg washed before proofing and, again, after being sprinkled with slivered almonds before baking. A streusel topping would have been more traditional.

Thesse are not the same as Karsh's. The pastry is much more flavorful, and the cheese filling is smoother and richer. In my wife's words, a more "elegant" version. She liked the pastry more and the filling less. For me, it's still "a work in progress." Meanwhile, I will certainly enjoy eating this iteration.

Cheese Pockets

A Sampler

David

Submitted to YeastSpotting

dmsnyder's picture
dmsnyder

After my recent less than satisfactory experience with gummy rye bread, I returned to an old, reliable favorite of mine - Hansjoakim's 70% Rye Bread.


Total formula

Amount

Baker's %

Medium rye flour

436 g

70

First clear flour

187 g

30

Water

467 g

75

Salt

11 g

1.8


Rye sour final build

Amount

Baker's %

Medium rye flour

218 g

100

Water

218 g

100

Ripe rye sour

11 g

5


Final dough

Amount

Baker's %

Medium rye flour

218 g

54

First clear flour

187 g

46

Water

249 g

61.5

Salt

11 g

2.7

Rye sour (all of the above)

447 g

110

Note: 35% of the total flour is from the rye sour.

Procedures:

  1. The day before baking, mix the final rye sour build. This should ferment at room temperature for 14-16 hours.

  2. I used a KitchenAid stand mixer, but these procedures could be done by “hand.” Mix all the ingredients in the final dough in a large bowl. If using a stand mixer, mix for 3 minutes with the paddle at Speed 1. Switch to the dough hook and mix for 5-6 minutes more at Speed 2. The dough at this point is a thick paste with little strength (gluten development providing extensibility and elasticity). Optionally, after mixing, you can knead briefly on a floured board with well-floured or wet hands.

  3. Transfer the dough to an oiled bowl, cover it tightly, and ferment for 1 hour.

  4. Transfer the dough to a floured board and pre-shape it into a single round. Cover with plasti-crap or a damp kitchen towel and rest for 5 minutes.

  5. Shape the dough into a boule and transfer to a well-floured brotform or banneton, seam-side down.

  6. Cover the boule with plasti-crap or a damp towel and proof for two hours. (My loaf was fully proofed in 1 hr and 30 min.)

  7. One hour before baking, pre-heat the oven to 250C/480F with a baking stone and your steaming method of choice in place.

  8. When ready to bake the bread, transfer the boule to a peel. Transfer the boule to the baking stone. Steam the oven. Turn the temperature down to 460ºF.

  9. After 10 minutes, remove your source of steam from the oven.

  10. After 15 minutes, turn the oven down to 225C/440F.

  11. Bake another 40-45 minutes. Monitor the loaf color, and, if it is darkening too quickly, turn the oven temperature down further. It would be well within the rye baking tradition to do this planfully in steps, ending up as low as 205C/400F for the last 10-15 minutes.

  12. The loaf is done when the crust feels firm, it gives a “hollow sound” when the bottom is thumped and the internal temperature is 205F or greater.

  13. When the loaf is done, turn off the oven, but leave the loaf in it with the door ajar for an additional 10 minutes.

  14. Transfer the loaf to a cooling rack and cool thoroughly before slicing. It will be best to leave it 24 hours, loosely wrapped in linen, before slicing.


    This is a delicious bread with a mild to moderate sourdough tang and earthy rye flavor. The crumb is tender and moist, but not at all gummy. It's my idea of a delicious high-percentage rye bread. It will be perfect for tomorrow's breakfast with cold-smoked salmon and for dinner with split pea soup.

    I also baked a couple loaves of the Tartine Basic Country Bread, another of my favorites.


    This time, I did not retard the loaves overnight. I don't recall if I've done this before, but I really enjoyed the result. Tasted two hours out of the oven, still a little warm, the flavor was spectacular. It was very mildly sour with a sweet, complex wheaty flavor. Either with or without retardation, this is a delicious bread.

    David

    Submitted to YeastSpotting


Pages

Subscribe to RSS - dmsnyder's blog