The Fresh Loaf

A Community of Amateur Bakers and Artisan Bread Enthusiasts.

dmsnyder's blog

dmsnyder's picture
dmsnyder

SFBI Artisan I, day 4


Yesterday, we looked at the effects of two variables - pâte fermentée and high-gluten flour - on one kind of bread - baguettes. Today, we used pâte fermentée as the constant, and made 5 different breads with it. They were:

1. Pan Bread. An enriched sandwich loaf.

2. Rye Bread: A French-style pan de seigle.

3. Whole Wheat Bread 

4. Egg Bread. Very enriched with sugar, eggs and butter and braided.

5. Multi-grain Bread. With a soaker of 3 seeds, rye, whole wheat and AP flour.


Plan for the day


Ripe Pâte Fermentée. (Incidentally, a good illustration of the chaotic pattern of un-organized gluten resulting from a short mix.)


We made multiple loaves of each. We made the pan bread using 3 different shaping methods. We used multiple scoring patterns with the the rye bread and  the whole wheat bread. So, we did 7 shapes, 12 scoring patterns, 5 kinds of dough and 20 loaves, in all. I was truly wiped out by the end of the day. 

My breads from today (absent the 3 pan loaves). Front to back: Multi-grain, Whole Wheat, Egg Bread and Rye Bread.


One of my Whole Wheat boules


Miyuki squeezed in a couple classroom sessions on different pre-ferments.

As a very special treat for me, Susan Tenney (SusanFNP) came over to SFBI to chat and stuck around helping Miyuki with racking the baked loaves. It was such a pleasure to meet her face to face. She is such a pillar of the home artisan baking world!

At the end of the day, before tasting all the types of breads we baked today, we mixed pre-ferments - pâte fermentée, poolish and sponge - for tomorrow, when we return to baguettes.

The "aha moment" of the day for me was finally really learning how to pre-shape and shape a boule correctly. It's about time, eh? Again, having Miyuki show me once was all it took. Having to then shape 10 boules help consolidate the technique. I learned more in an hour today about this technique then I've learned in the past 3 years. As Leadbelly said, "It's so easy when you know how." 


David

dmsnyder's picture
dmsnyder


SFBI Artisan I: day 3


On day 3 of the Aritisan I Workshop at SFBI, the didactic sessions covered "flour technology" with discussion of the different kinds of wheat, milling and other processes used by millers. In the lab, we again mixed 3 kinds of baguettes in order to compare the consequences of modifying the straight dough method by using high gluten four or by using an autolyse. In each case, while the formula was kept constant, mixing was varied as one would with these variations - longer mixing when using high-gluten flour and much shorter mixing when using an autolyse.
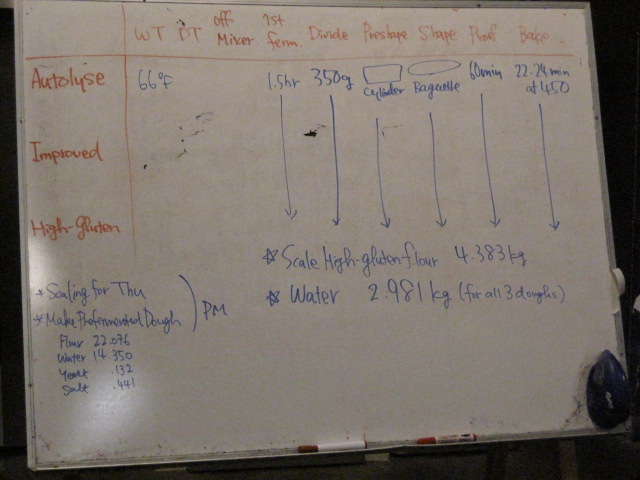
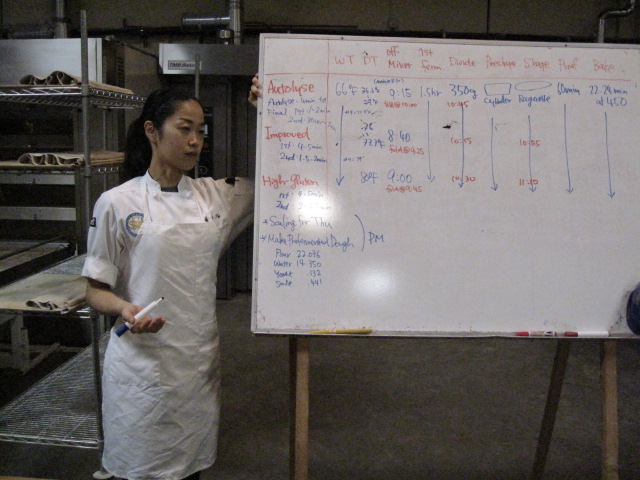


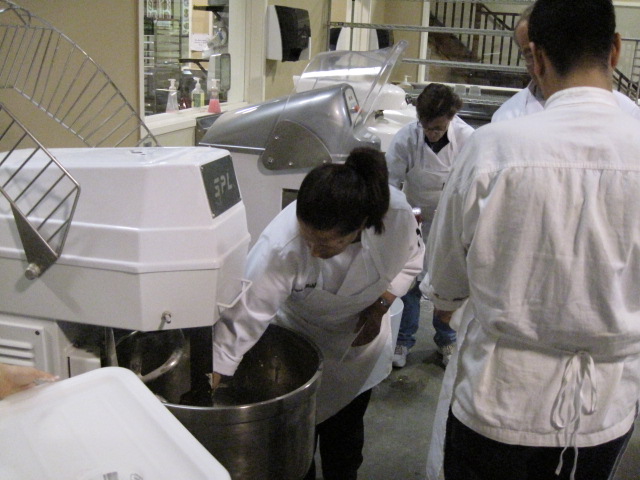
On Days 1 and 2, Miyuki did all the mixing. Today, we all got to use the big spiral mixers with much more (literally) hands on dough-feeling periodically to judge when the dough was adequately mixed.
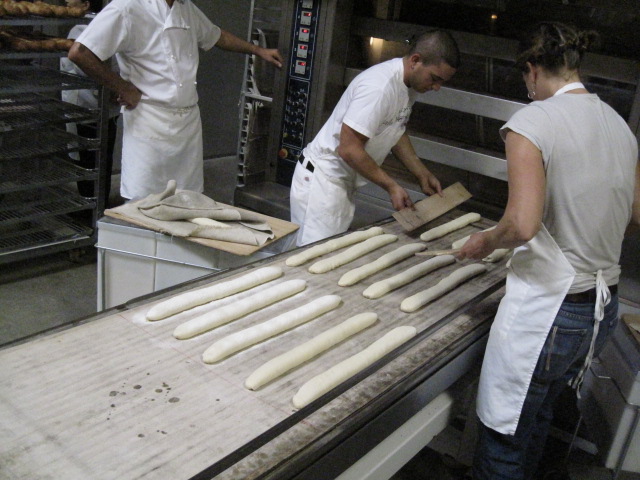


Transferring proofed baguettes to the loader
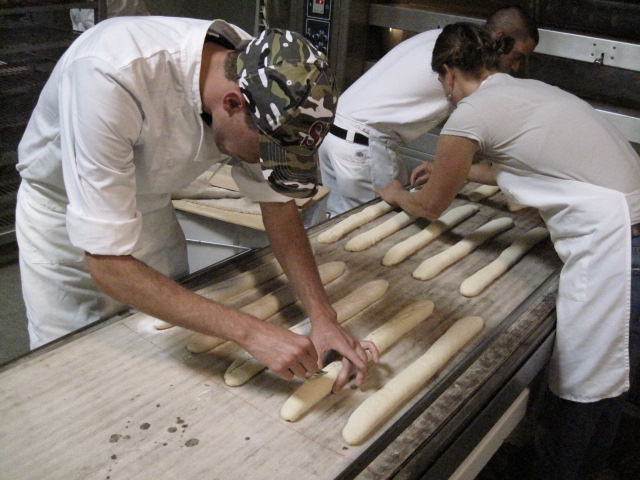
 

Scoring baguettes before loading


Just to clarify: When different methods were used, I made 5 baguettes with each dough, even though my photos only show (the best) 3 of each batch.

We were able to actually experience the different dough handling of each mix when stretch and folding, dividing, pre-shaping, shaping, scoring, etc. We could also see the consequences of these variations for loaf volume, crust color, cuts opening, crumb structure and color, aroma and flavor. Miyuki repeatedly quizzed us on the reasons we got the results we did for each of these variables.
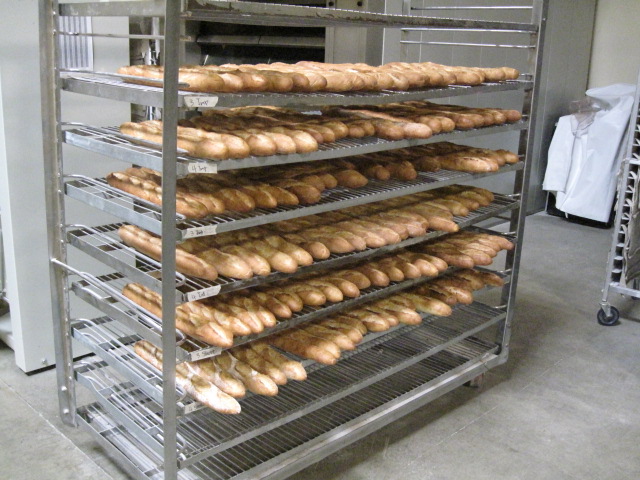
 

Our baguettes from today, cooling
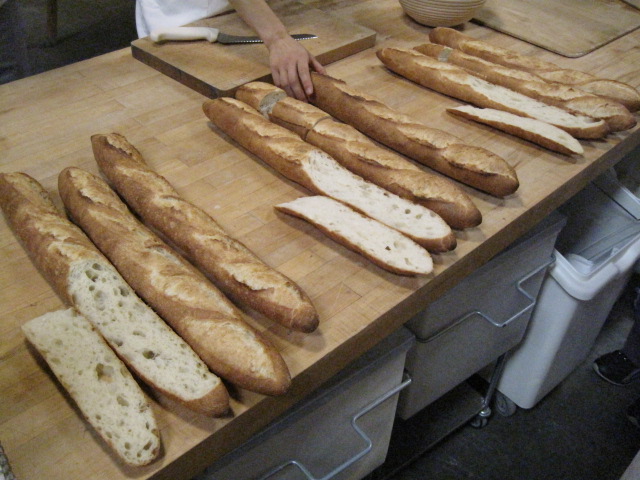
 

Comparing crumbs


Of course, we also worked on improving our dough handling skills. I felt pretty good about my improvements in consistent baguette shaping. My scoring was, overall, improved. My best scoring was, in Miyuki's words, "almost good."  But I think I know what I need to do to improve my scoring.
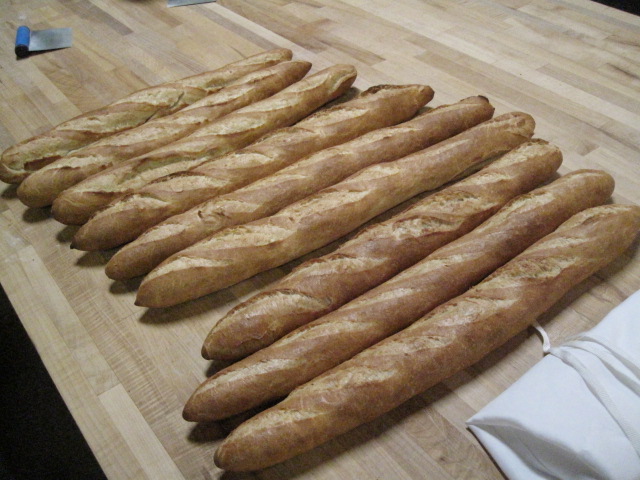
 

My baguettes (left to right: Improved mix, High-gluten flour and Autolyse). My baguettes today had more even thickness and length. Scoring still needs work.
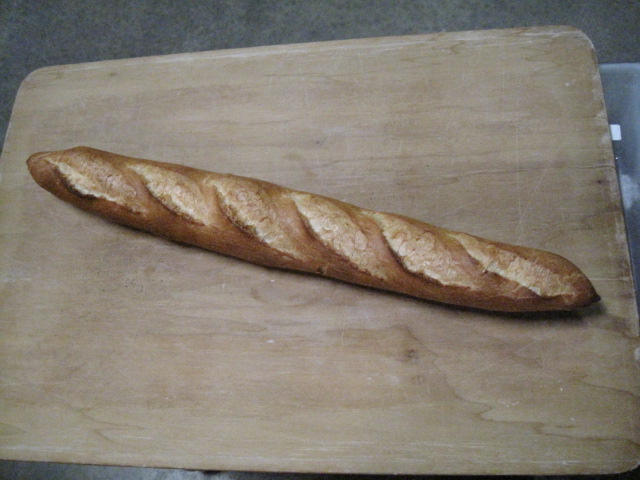
 

My best-looking baguette of the day.
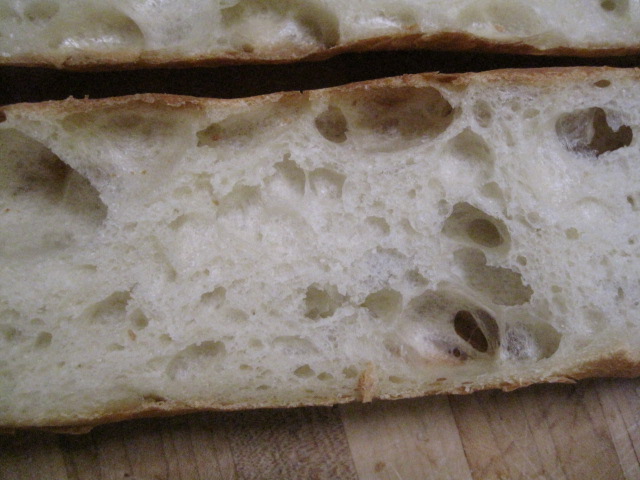
 

Intermediate mix baguette crumb


Tomorrow, we make 5 kinds of bread, none of which is baguettes!  


dmsnyder's picture
dmsnyder

SFBI Artisan I day 2


Today's emphasis was on the differences between Short, Intermediate and Intensive mixing. Each of us baked 5 baguettes with each type of mix. The formulas for each batch was slightly different - the shorter the mix, the longer the fermentation, the greater the number of folds, the higher the hydration and the less yeast.


Our lab, aerial view


Today's project


Stretching and folding the Improved Mix dough (Miyuki demonstrated, then each of us did it on our own batch.)


Our breads, cooling


Assessing the breads


Comparing crumbs (from left to right, short, improved and intensive mix)


Of course, the practice handling the dough with personal critique from Miyuki continued. I was amazed that, with 16 students, she clearly remembered what she had told each of us yesterday and compared today's production to yesterday's in incredible detail. (I chatted with one of the SFBI interns at a break. He clearly worships Miyuki as a very highly skilled baker and teacher. It's like she knows everything and does everything better than anyone - not just breads, but also pastries, cakes, venoiserie … everything. I can see it.)


Assessing each student's baguettes


My baguettes


Miyuki cutting one of my baguettes


After all the breads were baked, we assessed each one that Miyuki had made. Then, she evaluated the breads each of the students had made. I need to work on shaping and scoring consistency. She really liked the crumb of my Improved Mix baguette. Her comment after looking at it was, "You have really good dough handling." Ooooooh. That felt good!


My intermediate mix baguette crumb


David


dmsnyder's picture
dmsnyder


Wow! There is no way possible to describe today in full, even with photos. I'll try a summary.

The day started with coffee and fabulous raspberry muffins and meeting some of the other students. Once the class convened, after a brief but very warm greeting by Michel Suas (hisself!) we each introduced ourselves. About half the class are culinary professionals - some professional bakers. They came from Portland, Seattle, Pittsburg (PA) and elsewhere. Other students were chefs who wanted to add bread making skills. The other half were home bakers, some of whom sold their bread on a small scale.

The teacher was not one of the regular faculty. Miyuki is a graduate of Johnson & Wales and has worked in production at SFBI for 4 years. She occasionally fills in as an instructor. She was knowledgable, organized, responsive and clearly expert.

About half the day was spent in the classroom reviewing "the basics." It was like an executive summary of the chapters on the baking process, dough handling and ingredients in Advanced Bread & Pastry, except we could ask questions when we didn't understand or wanted more information. The other half was in the "lab." We worked today with a straight baguette dough Miyuki scaled and mixed. (Tomorrow we do it all.) The hands-on part was scaling, pre-shaping, shaping, proofing, transferring, scoring and baking. For every step, Miyuki demonstrated for the class then wandered among us to monitor our own attempts, correcting errors and answering questions. At the end of the day, when we all had our 5 baguettes, she assessed each student's shaping, scoring and crumb structure. If something was not perfect, she told us exactly how to correct the problem tomorrow. She instructed us in the criteria by which baguettes are judged in competition, including how to taste them.

It was wonderful to see Miyuki handling dough and shaping, but the biggest surprise was feeling the dough at various stages of an improved mix. Miyuki did use the window pane to demonstrate the degree of gluten development. The surprise was how low a level of gluten development she took as her end point for mixing.

My greatest pleasure was being able to shape full-sized baguettes rather than the demi-baguettes I must shape at home because of the narrowness of my baking stone and oven.

My biggest challenge (so far) has been in scoring, but I'll have plenty of opportunity to practice over the remainder of the workshop.

Here are a few photos of people, equipment and product. The baguettes pictured are the ones I made. They had the best flavor of any baguettes I've every tasted anywhere, but I'm promised improvement as the week progresses.


The Front Door


Our instructor


Loader and deck oven


Some of my classmates


My first full-sized baguettes, waiting for judgement


David


dmsnyder's picture
dmsnyder

We had a leisurely drive up to South San Francisco today for the SFBI Artisan I workshop which starts tomorrow and lasts 5 days. We're staying at one of the hotels nearby - 1.5 miles from SFBI itself.

We drove over to see where it is. SFBI is on a hill with a beautiful view of the hills West of the Bayshore Freeway (US Hwy 101). It's in the heart of the Bay Area biotech enclave. In fact, SFBI and TMB are essentially an island in the Genentech campus, which is huge. Immediately to the East is SF Bay. There's a wonderful walking path that goes for several miles along the bay here.

We drove into San Francisco for dinner at Out the Door, a wonderful Vietnamese restaurant in the food court adjacent to Bloomingdales. (Not your usual shopping mall food court, believe me!). We had had reservations at Fringale, a favorite French-Basque restaurant, but I got a phone call from them just before we were going to change clothes for dinner. Fringale had "an emergency" and was closed for the evening. I was thinking the chef had dropped dead or something, but it turned out the exhaust fan in their kitchen went out. Hopefully, it will get replaced tomorrow and we can get another reservation during the week. (They make a delicious duck confit served on a lentil ragout. I need some.)

So, I'll attend the first session of Artisan I starting at 0830 tomorrow. I've my brand new chef's jacket and beanie (Yes. Really.) in my back pack, along with the suggested note pad, marking pen and calculator. And two cameras.

I don't know who the instructors will be yet. I have expectations regarding the curriculum, but I'm prepared to be surprised and expect to have a blast.

David

dmsnyder's picture
dmsnyder

We're back from 5 days in Fort Bragg with family. I took along 7 breads and, because of menu compatibility and dining out, I only baked once while there. I made a couple loaves of Sourdough Italian Bread which went well with baked coho salmon and grilled veggies.

We did breakfast one day at the Fort Bragg Bakery. They make very good bread and pastries, as well as pizza. They do the pizza's in a gas fired oven built with bricks salvaged from the bakery that was on the same site a couple generations ago and eventually torn down.

On the drive home, Susan and I stopped for lunch at the Costeaux Bakery in Healdsburg. Along with our bill, the waiter left us a 2 lb sourdough epi to take with us. It was outstanding with a comfort food coming home dinner of scrambled eggs and tomatoes from our garden.

On a non-bread note I just have to share, I found myself taking all but a couple photos with my new iPhone 4. It's pretty amazing, especially the macro capability.

Begonia at the Fort Bragg Botanical Gardens

Fly on Begonia petal

So, we're back home, doing laundry and re-packing for my week at SFBI.

David

dmsnyder's picture
dmsnyder

I'm getting ready for a sizable family gathering in about 10 days. We are descending on my baby brother, who has a vacation home on the Northern California coast. We expect 15-20 hungry Snyders. I'll be baking while I'm up there, but we'll need something to snack on while the levain is ripening. So, I baked a few things to fend off starvation ... 

A couple Gérard Rubaud sourdough bâtards

Some San Joaquin Sourdough, of course

To go with appetizers, a few San Joaquin Sourdough mini-baguettes with seeds

I'm promised corned beef, if I bring the Corn Rye

And, if there's room, for dessert ...

Sour Cream Spritz Cookies, a New York Baker's test recipe (They go well with tree-ripened peaches.)

Lucky there's another day left to bake this weekend!

David

dmsnyder's picture
dmsnyder


I made my San Joaquin Sourdough today with a couple of modifications.


The last few bakes, I have substituted a liquid levain for the the firmer levain and also have used a higher percentage of levain, although, since I've used a liquid levain, the percentage of pre-fermented flour in the dough is actually lower. Also, note that, while the “final dough” hydration is 72%, the total dough hydration is actually closer to 78% because of the high-hydration levain. This is actually a somewhat higher hydration than my original formula for San Joaquin Sourdough.

The second modification was to cold retard the dough for a longer time – 36 hours as opposed to the 16-20 hours I have generally used. This was for my convenience, but I've also been curious about the effects of longer cold retardation on this dough.


Liquid Levain:

Baker's %

Weight (g)

Flour

100

60

Water

125

75

Starter

25

15

Total


150

Final Dough:

Baker's %

Weight (g)

AP Flour

90

450

Whole Rye Flour

10

50

Water

72

360

Salt

2

10

Pre-Ferment

30

150

Total


1020

Procedure

  1. Mix the liquid levain (1:5:4 – Starter:Water:Flour). Let it ferment at room temperature for 12 hours.

  2. Pour the water into a large mixing bowl. Add the starter and dissolve it in the water.

  3. Add the flours and mix to a shaggy mass. Cover tightly and let it sit for 20-60 minutes.

  4. Sprinkle the salt over the dough and mix thoroughly using the “stretch and fold in the bowl” technique. Let it rest for 30 minutes.

  5. Repeat the “stretch and fold in the bowl” for 30 strokes 2 more times at 30 minute intervals.

  6. Transfer the dough to a lightly floured board, and do a stretch and fold.

  7. Return the dough to the bowl and cover.

  8. After 45 minutes, repeat the stretch and fold on the board.

  9. Reform the dough into a ball and replace it in the bowl.

  10. Allow the dough to continue fermenting until the volume has increased 25%.

  11. Cold retard the dough for about 36 hours.

  12. Take the dough out of the refrigerator and immediately transfer it to a lightly floured board.

  13. Divide the dough into two equal pieces and pre-shape them into logs or rounds, depending on whether you want to make boules or bâtards. Cover the pieces with plasti-crap and let them rest for 60 minutes. (Give them a shorter rest if the kitchen is very warm. You don't want them to expand very much, if any.)

  14. Pre-heat the oven to 500ºF with a baking stone and your steaming method of choice in place.

  15. Shape the pieces and place them in bannetons or on a couche. Cover the loaves and proof them until they have expanded by 50-70%. (30-45 minutes)

  16. Pre-steam the oven. The transfer the loaves to a peel (or equivalent). Score them, and load them onto your baking stone.

  17. Steam the oven. Turn the oven down to 460ºF.

  18. After 12 minutes, remove your steaming apparatus. Turn the loaves 180º, if necessary for even browning.

  19. Continue to bake the loaves for another 15-18 minutes or until their internal temperature is 205ºF.

  20. Transfer the loaves to a cooling rack.

  21. Cool the loaves completely before slicing.

Because I was planning on a longer cold fermentation, I refrigerated the dough sooner than I would have otherwise – when it had expanded about 25%. In the refrigerator, the dough continued to expand, but very slowly. At 24 hours, it had expanded to 150% its original volume. At 36 hours, it had doubled in volume.

The dough was of about the same consistency as usual. This is a sticky dough, at 78% hydration, but it was easy to handle with lightly floured hands. The dough had nice extensibility but excellent strength. The pre-shaped pieces and shaped loaves held their shapes very well. I could not say that the longer cold retardation resulted in any problematic gluten degradation.

The crumb was as expected with this bread. There was no evident effect from the longer retardation. The flavor, on the other hand, was distinctly tangier. The initial flavor was the lovely, complex flavor of the San Joaquin Sourdough. The moderate sourness came through a bit later, and the flavor lingered on the palate for an exceptionally long time.

I would certainly recommend trying this version to any who have enjoyed the San Joaquin Sourdough before and favor a more assertive sourdough tang to their bread.

David

Submitted to YeastSpotting


dmsnyder's picture
dmsnyder

We're back from Portland after a relaxing week in the city and at the beach. 

It's really hard to decide where to have breakfast - at Stumptown Downtown for the best espresso (and good bagels or decent pastries) or the Pearl Bakery for the best bread and pastries (and decent espresso). We opted for the Pearl Bakery.

Gibassier and Cappuccino at Pearl Bakery

We then visited the Clear Creek Distillery and had a guided tour by the proprietor, Steve McCarthy, with whom I had gone to college. We tasted the most extraordinary pear liqueur and pear brandy and cassis liqueur and grappa and ... I can't remember what else, for some reason.

The pot stills are imported from Germany and are the same as have been used for hundreds of years to distill eau de vie, except for the modern electronics, of course.

Barrel aging room with Steve, my wife (on the left) and DIL (in the middle). Steve's the one with the beard.

We had lunch after this at the St. Honoré bakery-café. Yummy bread and a smoked duck breast salade. Bakery in action for entertainment.

Scoring boules at the St. Honoré Bakery

My grandson had just finished a week at "Rock and Roll University." We attended the final concert.

Theo's the vocalist.

Then, off to Neskowin for 4th of July fireworks (viewed from our terrace).

We did some wonderful day hikes.

Cascade Head

I got in a bit of baking. An unfamiliar oven is always a challenge. This Italian Bread was baked using Susan's Magic Bowl technique.

We had a wonderful time. It was hard to leave. It always is.

Mt. Hood from PDX

Now to try to catch up with the NYBaker recipe tests.

David

dmsnyder's picture
dmsnyder


These rolls are a riff off the test recipe called "Seven Sisters" from Norm Berg and Stan Ginzburg's much-anticipated New York Jewish bakery history/cookbook. I cannot divulge the whole recipe, but I think it's okay to say those are basically cinnamon rolls made with babka dough and baked in a cluster.

After eating some (I'm not telling how many.) of the Seven Sisters, my wife made a number of suggestions: 

1. Make them again!

2. Make them less sweet.

3. I like them more nutty. (That's why she sticks with me. It's not 'cause I'm so sweet.)

4. Make the rolls separated. The browned outside is the best.

Made up, egg washed and ready for the final proof

I had found that, at least in my oven, the rolls' tops browned too quickly, while the sides were still quite pale. So, in addition to complying with request #4, I also baked them at 25ºF cooler than the Seven Sisters.

I used the same filling, except I used over twice as much pecans. I borrowed a trick from SusanFNP and left half the pecans in large pieces and finely chopped the other half.

Just out of the oven. Ready to rack and glaze.

In compliance with request #2, I glazed the rolls much more sparingly after baking. In fact, I left two un-glazed, as specified by Version 1.1 of the above fix list.

I think both versions - "Seven Sisters" and "Eight Distant Cousins" - are pretty darn good. My wife loved the less sweet and more nutty version, even with the glaze.


David


Pages

Subscribe to RSS - dmsnyder's blog