The Fresh Loaf

A Community of Amateur Bakers and Artisan Bread Enthusiasts.

dmsnyder's blog

dmsnyder's picture
dmsnyder

Brother Glenn coerced me into making Challah over Thanksgiving. Prior to that, the only Challah I'd made in recent years was Maggie Glezer's sourdough challah, which I like a lot, but it does have a distinct tang. So, we made the yeasted version of Glezer's own challah, and it was good. Trying a different formula prompted me to try others.

Today, I made the Challah from Jeffrey Hamelman's "Bread." It is made with high-gluten flour. I mixed this very stiff dough in a Bosch Universal Plus. The mixer rocked and rolled, but it didn't "walk." I don't think my KitchenAid could have handled it. The ropes were a challenge to roll out. They required several rests to relax the gluten enough to permit sufficient lengthening. It braided nicely. I wish I could say the same for the braider! I'm sure I didn't lay out the ropes correctly. Back to the books.

Anyway, this formula makes about 3 1/2 lbs of dough. I made two Challot. They had huge oven spring, and I think they turned out pretty well, in spite of my ineptitude in braiding. Most important, they have a delicious flavor. This challah is less sweet than Glezer's. The crumb is more open but much chewier - no surprise given the high-gluten flour. I'm betting it makes wonderful toast and French toast!

Addendum: The challah did make wonderful toast. The crumb was quite tender. The chewiness is no longer there.

David

dmsnyder's picture
dmsnyder

Today I baked in the Lodge Combo Cookers for the first time. I debated what bread to bake and decided on the San Joaquin Sourdough. The results pleased me.

The boules weighed 510 g each before baking. The oven was pre-heated to 500ºF. When proofed the loaves were transferred to the shallow half of the combo cookers which were not pre-heated, scored, covered and baked at 480ºF for 20 minutes covered, then another 15 minutes uncovered.

Boules proofed

Ready to bake

Uncovered after 20 minutes at 480ºF

Out of the oven after another 15 minutes baking uncovered

Crumb

I'm happy to find that the Combo Cookers work well with smaller loaves that do not cover the base. I did shape these with a very tight gluten sheath, so, even though this is a pretty high hydration bread, the loaves did not spread when transferred to the Cooker bases.

David

dmsnyder's picture
dmsnyder

Thanksgiving day 2010

Rotisserie barbecued turkey (okay, so it's not bread)

Glenn (on the left) meets turkey (on the right). 

Day after Thanksgiving breakfast

San Joaquin Sourdough Baguette

Cinnamon rolls & Pecan rolls (made in muffin tins using NY Baker's Babka dough)

Cinnamon rolls, for kids who don't eat nuts

Pecan rolls, for the rest of us

Glenn makes challah

He's on a roll!

You should have seen the one that got away!

Here's the proof

Ready to bake

Cooling

Challah c rumb

The challah made fantastic turkey sandwiches!

And, for dessert, the much anticipated Apple Crostada, inspired by trailrunner!

Apple Crostada!

Delicious! It had the flakiest, best tasting crust ever!

For better or worse, as I was enjoying a second slice while mentally reviewing the recipe, I realized a stick of butter actually is 8 tablespoons, not 4 tablespoons. That means I used 9 tablespoons of butter rather than the 5 T Caroline's recipe specified. No wonder the crust was so flakey!

David

dmsnyder's picture
dmsnyder

The recent discussions regarding baking breads in hot versus cold Dutch ovens - those from "Tartine Bread" in particular - prompted today's experiment.

I made two boules of the Country Rye from "Tartine Bread." One I baked starting in a room temperature enameled cast iron Dutch oven. The other I baked in the same Dutch oven, pre-heated. The breads were identical in weight. They were cold retarded overnight in bannetons and then proofed at room temperature for 2 hours before the first bake. The loaf baked in the pre-heated dutch oven proofed for 45 minutes longer, while the other loaf was baking. The second loaf was baked for 7 minutes longer than the first loaf, to get a darker crust.

Boule baked in cool Dutch oven on the left. Boule baked in pre-heated Dutch oven on the right.

In spite of the fact that the loaf baked first was relatively under-proofed, the loaf baked second, in a pre-heated Dutch oven, got slightly better bloom and oven spring. I won't be slicing these until next week. They are for my Thanksgiving guests. So, I don't know if there is any difference in the crumb structure.

Overall, I'm happy with both loaves. The differences are very small - arguably of no significance. While pre-heating the Dutch oven does appear to result in slightly better oven spring, the convenience of not having to pre-heat the Dutch oven may be more advantageous for many bakers.

Addendum: Okay. So, I'm weak. I had to try the bread, since it was the firs time I'd baked it.

The crust is crunchy-chewy. The crumb is less open than the "Basic Country Bread," as expected. The 17% (by Robertson's way of doing baker's math) whole rye does make a difference. The crumb is very cool and tender. The aroma is rather sour, but the flavor is less so. The surprise was the prominent whole wheat flavor tone, even though all the WW is in the levain, and it only amounts to 50 g out of a total of 1100 g (my way of doing baker's math). I expect the flavors to meld by breakfast time tomorrow. I think this will make great toast with Almond butter and apricot preserves.

Country Rye, cut loaf

Country rye, crumb

David

Submitted to YeastSpotting

dmsnyder's picture
dmsnyder

As most of you are aware, Thanksgiving is celebrated in the U.S. of A. next Thursday. Family gatherings and big dinners are traditional, although the foods that are traditional vary considerably by region and from family to family. These traditions usually involve a lot of cooking, but they make menu planning relatively simple, unless you have family members with a variety of food allergies or other aversions. 

There are also traditions regarding foods eaten, not on Thanksgiving, but on the surrounding days. I'm not aware of a lot of these. The one that comes to mind is going out for Chinese food the Friday after Thanksgiving. This is an American Jewish tradition. I have no idea what Chinese-Americans traditionally eat the night after Thanksgiving.

These days, with the increased mobility of American families, the Thanksgiving gathering often involves relatives traveling great distances in order to be together for the holiday. This also means the gathering is more than a one day affair. And that means meal planning and cooking need to be done for much more than the one big Thanksgiving dinner.

We will have family starting to arrive next Tuesday, and the last will leave the Saturday or Sunday after Thanksgiving. We want to have time to play with the grandchildren and visit with the grown-ups. So, we're spending this weekend preparing food to be frozen, so we don't spend all next week in the kitchen.

I started 2 days ago (Wednesday), feeding 2 different starters. Last night, I mixed the dough for San Joaquin Sourdough. This will be baked tomorrow as baguettes to make into French toast. Susan made a vegetarian stock to use for our Thanksgiving stuffing and for a potage. (One daughter-in-law is a vegetarian.)

Today, I built up a starter which will be used tomorrow to make Country Rye Breads from "Tartine Bread." I have the flour for this pre-weighed on the counter.

I also made a batch of NY Baker's babka dough and made up the cake crumb/sugar/cinnamon filling too.Tomorrow, I'll make up pecan rolls, but stop before cutting the rolls and freeze the logs to cut, proof and bake while company is here. 

I then made pasta dough for fresh tagliatelle for Tuesday night's dinner. The bolognese sauce is simmering now. I'll stir in some pesto before serving. (No pesto for the kosher daughter-in-law. It has cheese in it.) Tomorrow, I'll roll out, cut and dry the noodles.

I'd planned to also make a batch of the pie crust using trailrunner's recipe, but my wife hijacked the Cuisinart to grind hazelnuts for a Frangipani-Pear Cake. So, that's added to tomorrow's fun.
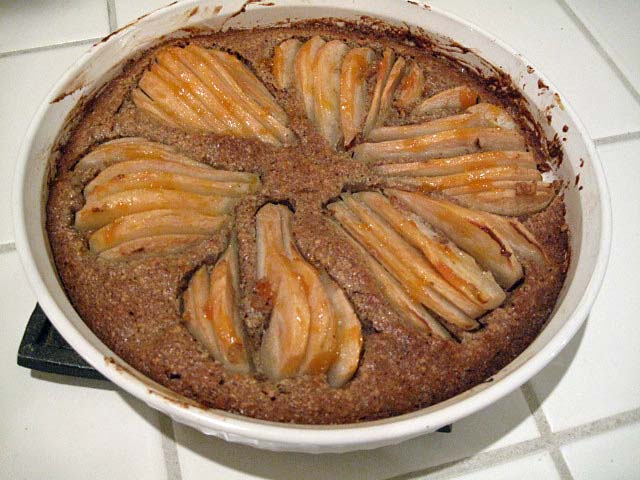
Sufficient excuse for not making pie crust today

Let's see ... That just leaves making Turkey stock (for brother Glenn's best ever gravy) and a big pot of Potage (from Patricia Wells. HIGHLY recommended!) for lunch or dinner one day, baking two kinds of bread, making the pie crust dough and putting together the pecan roll logs for the next two days. All this in between other necessary errands, naturally.

Hey! I forgot the bagels! Maybe we'll make them along with the Challah, rye bread, Apple Crostada and knotted rolls Glenn wants me to show him how to make ... next Friday. 

Happy getting ready for Thanksgiving to everyone!

David

dmsnyder's picture
dmsnyder

It's been quite a while since I've made a rye bread, and I've been missing it. I've been admiring the ryes other TFL members have been making, especially those with a very high percentage of rye. I've also noted the comments about the special sweet flavors reported when hot rye soakers or mashes have been included.

This weekend, I made Hamelman's “80% Rye with a Rye-flour Soaker” from “Bread.” This is the first time I've made a bread with over 70% rye flour and the first time I've used a hot rye soaker. The results were just astonishing. This is my new favorite rye bread.

I proofed the loaves seam side down, so the seam side was up when the breads baked. I did not score or dock the loaves but let them “burst” willy nilly. As occurred the last time I did this, I'd sealed the seams too well, and the loaves didn't burst as much as I'd hoped. None the less, I got really good oven spring, and the loaves had a high profile when sliced.

After the loaves were baked and cooled, I wrapped them in a spare raw linen couche for about 24 hours before slicing. The crust had softened and was nice and chewy. The crumb was pretty much as expected.

The flavor was notably sweet but with a nice tang and earthy rye flavor. It is delicious just plain and made a wonderful sandwich with smoked turkey breast. I'm anticipating great enjoyment when I have some with cream cheese and smoked salmon for breakfast tomorrow.

David

dmsnyder's picture
dmsnyder


I have made the Basic Country Bread from Chad Robertson's “Tartine Bread” twice before. (See: Tartine Basic Country Bread as Bâtards and Oven steaming using the SFBI method) However, I did not bake the loaves in the cast iron “cloche” that Robertson prescribes. I baked them on a pre-heated baking stone and used the SFBI oven steaming method or the "magic bowl" technique.

Caroline (“trailrunner” on TFL) recently blogged on Vermont Sourdough with Increased Whole Grain from Hamelman's “Bread” which she baked in Dutch Ovens – one cast iron and the other enameled cast iron. Her beautiful loaves finally pushed me to try this method with the Basic Country Bread. (See: David's Vermont SD w/ increased rye ---response to cast iron bake)

Caroline used an heirloom cast iron Dutch oven and a Le Creuset Dutch oven. There was no difference in her results. I decided to try a similar experiment with two other cloches: A 5 qt Copco enameled cast iron pot that was a wedding present (which means we've had it for going on 44 years) and a 4 qt Calphalon anodized aluminum all purpose pan.

Copco enameled cast iron on the left and Calphalon Anodized Aluminum Dutch Ovens

I made the dough according to Robertson's instructions. I followed Carolyn's well-described method for baking, except that I placed my cloches right on the oven rack, rather than on a baking stone.

Loaves uncovered after baking 20 minutes covered at 460ºF.

I baked the loaves for an additional 25 minutes after uncovering them to achieve the crust coloration seen below. I think I could have baked a bit longer to get as dark a crust as those in pictured in "Tartine Bread."

Loaf baked in Copco, on the left, and loaf baked in Calphalon, on the right

Both loaves had great oven spring and bloom. The one baked in the Copco oven had significantly great height, but I don't know whether this had anything to do with differences in thermal properties between the two "cloches" or simply reflects differences in their shape and/or volume. Certainly, there was no significant difference in the crust appearance.

The prolonged high heat did discolor the handles of the Calphalon pan. The Copco interior discolored quite a lot. I don't know if this was from the heat or, possibly, from the parchment paper. Anyone who can share experience with this would be appreciated.

The crust is staying crisp as the bread cools. The crumb is well aerated but less open than that of the bâtards I made. It is tender and has a lovely wheaty-sweet flavor with a mild but definite sourdough tang.

I must say I am very favorably impressed with the results of baking this bread in the Dutch ovens. I think the oven spring and bloom are remarkable and much more dramatic than what I have seen with baking on an oven stone covered with a stainless steel bowl. I'll have to try this technique with other breads, but trailrunner's results with the lower hydration Vermont Sourdough certainly suggest my experience will be repeated.

Thanks for the prompt, trailrunner!

David

Submitted to YeastSpotting


dmsnyder's picture
dmsnyder


Chad Robertson's Basic Country Bread from “Tartine Bread” has been a hit among TFL members, and with good reason. It's a wonderful bread, and Robertson's description of how to make it is clear and detailed. He not only describes what to do but also why. He provides variations on his procedures in recognition of the realities of the home baker's scheduling issues and describes their effects on the end product.

Robertson recommended a baking procedure that replicates the result of baking in a commercial gas oven for the home baker. His procedure utilizes a cast iron covered Dutch oven. This particular equipment dictates that the loaves be shaped as boules.

I have made Robertson's Basic Country Bread once before and found it delicious. Its most amazing virtue, to me, is how long it stays moist. I made 2 boules before. However, at the bakery, Robertson shapes this bread as bâtards.

Today, I made the Basic Country Bread as bâtards. They were proofed on a linen couche. The oven was steamed using the SFBI method I've described in another entry(Oven steaming using the SFBI method.). I baked, as prescribed by Robertson, at 450ºF but switched to a dry oven at 15 minutes and baked for a total of 35 minutes.

The crust was very firm initially and sang softly while cooling. It softened with cooling. The crumb was very open – as pictured in “Tartine Bread.” The aroma was very wheaty, and the flavor was very nice, with mild sourdough tang.

This is a bread I'll be making again, no doubt with variations in flour mix and steaming methods. I would like to get a bread whose crust stays crisp longer.

David


dmsnyder's picture
dmsnyder


I've been thinking about baking a sourdough nut bread for some weeks. They are so nice plain and with cheese. With lots of family expected for several days around Thanksgiving, I'll want a variety of breads I can take out of the freezer to serve with meals and for snacks. I like to serve sourdough nut breads with hors d'oeuvres.

I thought over the breads with nuts I've made before but decided to try something new: a French-style (not too sour) Pain au Levain with hazelnuts and currants.

I based the bread on Hamelman's Pain au Levain from “Bread.” I added about 25% nuts and currants to the dough at the end of mixing and followed Hamelman's procedure for bulk fermentation, proofing and baking.


Levain build

Wt.

Baker's %

KAF AP flour

4.6 oz

93.50%

Medium rye flour

0.3 oz

6.50%

Water

3 oz

60.00%

Mature (stiff) starter

1 oz

20.00%

Total

8.9 oz


Final dough

Wt.

KAF AP flour

1 lb, 9.8 oz

Medium rye flour

1.3 oz

Water

1 lb, 1.8 oz

Salt

0.6 oz

Levain

7.9 oz

Roasted hazelnuts

4 oz

Zante currants

4 oz

Total

3 lb, 13.4 oz

Procedure

  1. Mix the final levain build 12 hours before the final mix. Cover the bowl and let it ferment at room temperature (about 70ºF).

  2. Mix all the ingredients except the salt and levain to a shaggy mass. Cover and let rest (autolyse) for 20-60 minutes.

  3. Sprinkle the salt over the dough and distribute chunks of the levain over the dough. If using a stand mixer, mix with the paddle at Speed 1 for 1-2 minutes to incorporate the added ingredients and then with the dough hook for about 6 minutes at Speed 2. There should be moderate gluten development. Add the hazelnuts and currants and mix for another 2 minutes or so at low speed. Desired dough temperature is 76ºF.

  4. Transfer the dough to a lightly floured board and knead briefly to evenly distribute the nuts and currants. Then round it up and place it in a lightly oiled bowl and cover tightly.

  5. Bulk ferment for 2 ½ hours with two folds at 50 minute intervals.

  6. Divide the dough into two equal pieces and preshape as rounds or logs. Let the pieces rest for 20 minutes.

  7. Shape each piece as a boule or bâtard and place en couche or in a banneton. Cover with plastic or a towel.

  8. Proof the loaves for 2 to 2 ½ hours.

  9. Preheat the oven to 500ºF with a baking stone and steaming apparatus in place 45 to 60 minutes before baking.

  10. When proofed, transfer the loaves to a peel, score them and transfer them to the baking stone.

  11. Turn the oven down to 440ºF and bake with steam for 15 minutes, then in a dry oven for another 25-30 minutes.

  12. Transfer the loaves to a cooling rack, and cool completely before slicing.


    Notes on my baking procedure

  • To steam the oven, I use a cast iron skillet filled with lava rocks. This is pre-heated along with the baking stone. Right after the loaves are loaded on the stone, I place a perforated pie pan with 10-12 ice cubes on top of the lava rocks.

  • I start my bake with the oven at conventional setting. At the end of the steaming period, I switch the oven to convection bake and lower the temperature 25ºF.

  • For this bake, when the loaves were fully baked, I turned off the oven and left the loaves on the

    stone with the oven door ajar for 10 minutes.


We tasted the bread when (almost completely) cooled. The crust is very crunchy. The crumb was denser than I had hoped, although this is a rather low-hydration bread. My experience with nutted breads has always been that the crumb tends to be less open than expected, so now I expect it.


The crumb was very chewy. The flavor of the bread was lovely, with no perceptible sourness, except for the sweet-sour flavor of the currents. At this point, the bread, nuts and currents each contributes its distinctive flavor. Quite nice.


I'm looking forward to having this bread toasted for breakfast. 


David


Submitted to YeastSpotting


dmsnyder's picture
dmsnyder

Traditional baguette, Dragon tail and Épi de Blé (left to right)

These baguettes were made with my San Joaquin Sourdough dough. I shaped a traditional baguette, an épi de blé (sheaf of wheat) and a dragon tail. Each was scaled to 248 g. They were baked with steam for 10 minutes at 460ºF conventional bake and in a dry oven for 10 minutes at 435ºF convection bake. My formula for San Joaquin Sourdough is available here: San Joaquin Sourdough, updated However, for those attempting these shapes for the first time, I recommend using a lower hydration dough such as Pat's (proth5). That formula can be found here: Baguette crumb - 65% hydration dough

Instructions for making an épi

1. Shape a baguette and proof it.

2. Transfer a baguette to your peel.

3. Starting at the left end (if you are right handed) or at the far end, if the baguette is oriented perpendicular to your body, make evenly spaced cuts along the baguette with a sharp scissors. The scissors should cut at about a 45º angle, almost but not completely through the loaf. With each cut, the cut part is rotated away from the long axis of the loaf, alternating right and left.

4. Load the épi onto your baking stone and bake as you would a regular baguette.

Instructions for making a dragon tail baguette

The dragon tail is made in the same way as the épi, except, rather than rotating the cut pieces, the tip of each is folded back over the body, away from the cut surface. Here is a photograph of Miyuki Togi, my SFBI instructor, forming a dragon tail:

SusanFNP has made an instructional video for shaping a Dragon Tail baguette which is highly recommended. Dragon Tail Baguette Shaping Video

Dragon tail, close-up 1

Dragon tail, close-up 2

Enjoy!

David

Submitted to YeastSpotting

Pages

Subscribe to RSS - dmsnyder's blog