The Fresh Loaf

A Community of Amateur Bakers and Artisan Bread Enthusiasts.

dmsnyder's blog

dmsnyder's picture
dmsnyder

This weekend, I baked a couple of breads I have enjoyed, but both were made with variations.

I have made the 100% whole wheat bread from Peter Reinhart's Whole Grain Baking a couple of times before with fresh-milled flour (100% Whole Wheat Bread from WGB, made with fresh-milled flour). I think it makes a delicious bread. This weekend, I wanted to make it with finer-milled flour and with a whole wheat starter, rather than a yeasted "biga."

The flour was milled from hard red winter wheat using the KitchenAid grain mill attachment. I milled the berries once on a medium setting and then twice on the finest setting. The result was a fairly fine flour, but still not as fine as KAF Organic Whole Wheat flour, for example. The levain had a somewhat gritty consistency. It ripened quite a bit faster than the yeasted biga does for this bread. The dough was quite soft and very manageable, but while quite extensible, had little elasticity. It was difficult to judge the proofing because the dough never was really springy. The modest oven spring I got suggests I may have over-proofed somewhat. The crumb was quite a bit more open than I got with previous bakes of this bread. I attribute this partly to the finer-milled flour and partly to the levain.

100% Whole Wheat Sourdough Bread from WGB, made with fresh-milled flour

Loaf profile

Crumb close-up

My wife liked the flavor of this bread. It has a rather pronounced sourdough tang over a sweet, wheaty flavor. It confirmed my aversion to this combination of flavors, sadly. I will make this bread again, but I will stick to the yeasted version.

Franko's gorgeous 80% rye with rye flour soaker ( See 80% Sourdough Rye Bread- adapted from Jeffrey Hamelman's 'Bread') reminded me how much I loved this bread from Hamelman's Bread (See Sweet, Sour and Earthy: My new favorite rye bread). I had expected to make it again sooner, but got distracted by other baking projects. Franko's bake in a Pullman pan was so lovely, I thought I'd use mine, but, at the last minute, decided to bake it as one large, almost 2 kg boule.

For this bake, I omitted the instant yeast. The dough was raised by the rye sour only. Also, for this bake, I used fresh-milled rye, milled as described above.

80% Rye with Rye Flour Soaker from Hamelman's Bread, made with fresh-milled rye flour

After cooling, I wrapped the loaf in baker's linen to rest for 24 hours before slicing.

80% Rye crumb (Note: The uneven color is an artifact of the lighting.)

After unwrapping the loaf, the crust felt very hard, but it was delightfully crunchy. The crumb was soft and moist. The flavor had a nice caramelized tone from the crust. The crumb flavor was mildly sour, sweet and very earthy - just a good whole rye flavor. Delicious. I had some with dinner, without any topping. I have some cream cheese and smoked salmon to eat with this for breakfast. 

This remains my favorite high-percentage rye bread. I just love the flavor and the texture of the crumb.

David

dmsnyder's picture
dmsnyder


Horst Bandel's Black Pumpernickel

Jeffrey Hamelman's Bread – a Baker's Book of Techniques and Recipes is highly esteemed by TFL members. Which of his formulas is most commonly baked is unknown, although the Vermont Sourdough would be my guess, especially if you include SusanFNP's “Norwich Sourdough” version of it. There is little question regarding which of his several stories from the bakery is the favorite. It has to be the story of Horst Bandel's Black Pumpernickel, found on page 221 of my printing. This tale has an almost mythic quality that truly touches the heart, as it says so much about the age in which we live, the culture of the artisan baker and the character of the pastor, Horst Bandel, and that of Mr. Hamelman himself.

Hamelman's “Home” formula for this bread makes 3 lb, 12 oz of dough. The bread is to be baked in a covered Pullman/Pain de Mie pan. Hamelman specifies 4.4 lbs of dough for the most common (13 x 4 x 4 inch) size Pullman pan, so the formula needs to be re-calculated accordingly. I decided to bake in a 9 x 4 x 4 inch Pullman Pan, which I figured would take 3 lbs of dough. The weights in the following tables are for a quantity of dough just under this.


Overall Formula

Wt (g)

Baker's %

Rye meal (pumpernickel flour)

206

30

Rye berries

137

20

Rye chops

172

25

High-gluten flour

172

25

Old bread (altus)

137

20

Water

481

70

Yeast (instant)

4.6

1.3

Salt

14

2

Molasses, blackstrap

27

4

Total

1350.6

197.3


Sourdough

Wt (g)

Baker's %

Rye meal

206

100

Water

206

100

Mature sourdough culture

10

5

Total

422

205

Note: I used KAF Pumpernickel flour.


Rye-Berry Soaker

Wt (g)

Rye berries

137

Water

Enough

Total

137


Old Bread Soaker

Wt (g)

Old bread (altus)

137

Water

Enough

Total

137

Note: I used Hamelman's “80 percent Rye with a Rye-Flour Soaker” as altus. I did the soaking the day before the bake, wrung out the altus, saving the water, and refrigerated them. I believe it was George Greenstein from whom I learned that altus will keep refrigerated for a few days.


Final dough

Wt (g)

Sourdough

412

Rye berry soaker

137

Rye chops

172

High-gluten flour

172

Old bread (altus) soaker

137

Water

275

Yeast (instant)

4.6

Salt

14

Molasses, blackstrap

27

Total

1350.6

Note: I made the rye chops by coarsely grinding rye berries with the grain mill attachment to a KitchenAid mixer.

Procedures

This bread has multiple components, and the sourdough and the two soakers require advance preparation. Counting the minimum rest time between baking and eating, the procedures can easily stretch over 4 days. They did for me. I weighed out the ingredients and fed my starter on Day 1, milled the grain, made the altus, fed the sourdough and soaked the soaker on Day 2, mixed and baked the bread on Day 3 and 4 (overnight) and let the bread rest on Day 4.

The procedures as listed below assume you have already gathered the ingredients and have a mature sourdough culture. Where my procedures deviated from those specified by Mr. Hamelman, I have added parenthetical comments or notes.

  1. Feed the sourdough and ripen it for 14-16 hours at 70ºF.

  2. Soak the whole rye berries overnight. The next day, boil them in about 3 times their volume of water until they are soft and pliable, about an hour.

  3. Cut the “old bread” into cubes, crust and all, cover in hot water and let soak for at least 4 hours. Squeeze out as much water as possible, and reserve the water for use, if needed, in the final dough. The bread can be sliced, dried and browned in the oven before soaking, which Hamelman says provides a “deeper flavor.”

  4. Mix all the ingredients in a large bowl or the bowl of a mixer. Hamelman says to not add the reserved altus soaker water unless needed, but it is not clear whether the Final Dough water includes this or not. The dough description is “medium consistency but not wet, and it will be slightly sticky.” Mix at Speed 1 for 10 minutes. DDT is 82-84ºF. (I mixed the dough for about a minute with the paddle without adding any additional water. The ingredients mixed well and formed a ball on the paddle. I felt the dough was about the right consistency, but I did add 10 g of the altus water. I then attempted to mix with the dough hook. The dough just went to the side of the bowl, leaving the hook spinning without grabbing the dough. After about 5 minutes of this, with multiple scrape-downs of the dough, I gave up. I tried kneading on a floured board with little effect. This was the stickiest dough I've ever encountered. I finally formed it into a ball and placed it in an oiled batter pitcher.)

  5. Ferment in bulk for 30 minutes.

  6. Prepare your pullman pan by lightly oiling the inside, including the lid, and dusting with whole rye or pumpernickel flour. (I'm not sure this was necessary, since my pan is “non-stick.”)

  7. Form the dough into a cylindrical log and place in the pan. Slide the lid onto the pan.

  8. Proof for 50-60 minutes at 80ºF.

  9. Pre-heat the oven to 350ºF. If you have a baking stone, pre-heat it, too. You will be doing most of the bake with the oven turned off. The baking stone will act as a heat buffer, so the oven temperature falls more slowly.

  10. When the dough has risen to within about ¾ inches from the top of the pan, place it in the oven, covered.

  11. Bake at 350ºF for one hour. Then, turn the oven down to 275ºF, and bake for another 3-4 hours. Then, turn the oven off, and let the bread continue to bake for another 8-12 hours. The range of times given is due to the variability in ovens, specifically how well they retain heat, and how quickly their temperature falls once they are turned off. Hamelman says, “You will know when this bread is baked: The aroma will fill the entire room.” (The aroma of the baking bread was very present 2 hours into the bake. At about 4 hours into the bake, I turned the oven off. The next morning, the aroma in the room was not discernible. When I took the pan out of the oven, it was still warm, but not so hot I couldn't hold it in my bare hands. When I opened the pan, the bread was very aromatic, with the molasses smelling most strongly but the rye very much there as well.)

  12. When the bread is baked, remove it from the pan, and let it cool completely. It should then be wrapped in baker's linen and let rest for a minimum of 24 hours before slicing.

As you can see from the domed top of the loaf, it did not spring enough to fill the pan. I don't know if there was not enough dough, not enough water or whether it was inadequately mixed or proofed. Comments on this would be more than welcome.

Addendum: I sliced the pumpernickel about 36 hours after it was baked. It was very firm and sliced well into thin slices without any of the crumbling I feared. The crust is very chewy. The crumb was moist but extremely dense. The flavor was molasses and rye - very strong flavors.

Discussion and comments by more experienced pumpernickel bakers convinced me that I should have added much more water to the dough, but this bread is not bad as baked. Here are a couple crumb photos:

David


dmsnyder's picture
dmsnyder


One of the breads we baked at the SFBI Artisan II Workshop last month was a miche. Everyone thought it was one of the best breads we baked. I made it at home for the first time two weeks ago, but used “Organic Type 85” high-extraction flour from Central Milling rather than the mix of white and whole wheat with the addition of toasted wheat germ we had used at SFBI. (See This miche is a hit!)

This bread was delicious, but I did want to make it at least once using the formula we had used at the SFBI, just to see how it turned out at home compared to baked in a commercial steam injected deck oven. Certainly the several TFL members who have baked this miche in their home ovens since I posted the formula have found it to be good. Also, at the SFBI, we had found that miches scaled at 2.5 to 3 kg somehow had an even better flavor than those scaled at 1.25 kg. So, today I baked a 2 kg miche using the original SFBI Artisan II formula.

For those who would like to make this larger version, here is the formula for a 2 kg miche:


Total Dough

Bakers %

Weight (g)

AP Flour

96.67

1087

WW Flour

3.33

38

Water

73.33

824

Salt

2

23

Wheat germ toasted

2.5

28

Total

177.83

2000


Pre-ferment

Bakers %

Weight (g)

AP Flour

75

112

WW Flour

25

38

Water

100

150

Salt

0

0

Liquid starter

50

75

Total

250

375


Final Dough

Bakers %

Weight (g)

AP Flour

100

975

Water

69

675

Salt

2

23

Wheat germ toasted

2.5

28

Levain

31

299

Total

204.5

2000

The procedure used was the same as in my previous blog entry about this bread with one exception – shooting for a slightly lighter crust, I baked with steam for 20 minutes at 450ºF, then turned the oven to convection bake at 425ºF for another 40 minutes. I did not leave the miche in the turned off oven to dry out before removing it to the cooling rack. I did leave it in the oven while I heated the oven back up to 460ºF conventional bake for the next loaves (about 5 minutes).

I was concerned about over-proofing this loaf, and it was lined up ahead of a couple San Joaquin Sourdough breads waiting to bake.
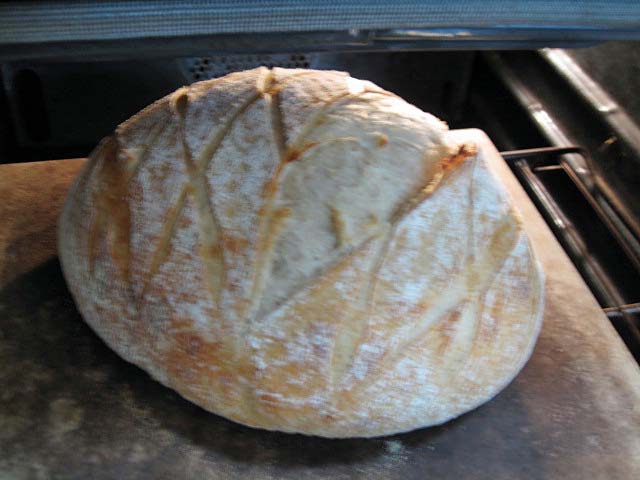
Miche after baking 20 minutes with steam at 450ºF

The blowout I got suggests the loaf was a bit under-proofed. I also shaped the boule really tight, which may well have been a second factor.

The miche sang loud and long while cooling. The crust had some crackles, but not like the last miche.
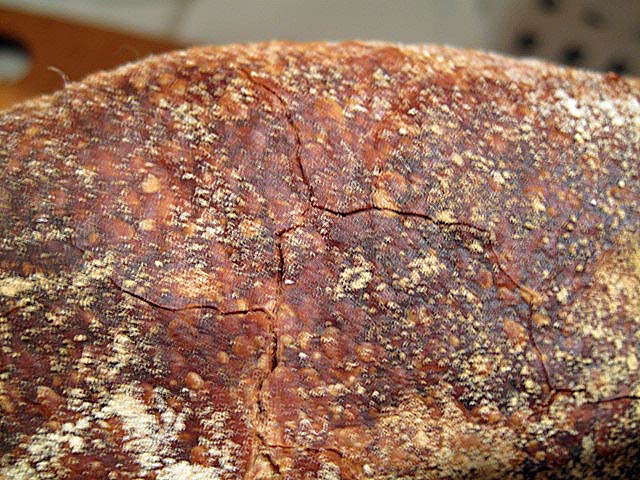
Crust crackles

Loaf profile, cut through the middle

Crumb

Crumb close-up

2 kg miche beside 514 g San Joaquin Sourdough bâtards

The crust was crunchy-chewy - much thinner than the last bake. It was much less caramelized, and this was apparent in the less wonderful crunch and flavor. The crumb was nice. It was quite noticeably denser in the center of the loaf. I think this is expectable with a miche of this size. I thought the crumb structure was pretty consistent from the center of a slice to the crust.

6 hours after baking: The aroma of the crumb had a pronounced whole wheat grassiness. The crumb was moderately chewy. From past experience, I expect it to be softer tomorrow. The flavor was good - mildly sour with a nice wheaty flavor - but I didn't enjoy it quite as much as the miche made with Central Milling's "Type 85" flour. I think the flavor would have been better had I used fresh-milled whole wheat. That's what I will do the next time I bake this miche.

24 hours after baking: The aroma and flavor have mellowed and melded. The grassy aroma is gone. It just smells like a good sourdough country bread. The flavor is now delightful - very complex - nuttier and sweeter. A very thin smear of unsalted butter makes this bread ambrosial.

I froze half the miche. The other half will be croutons for onion soup gratiné tonight, breakfast toast with almond butter and crostini with ribollita for dinner tomorrow. (The ribollitta was my wife's all-morning project.) That should leave another quarter loaf for sandwiches, panini, French toast ... 

David

Submitted to YeastSpotting


dmsnyder's picture
dmsnyder

One of my favorite uses for several days old sourdough bread is crostini. These little open-faced sandwiches can be topped with all sorts of meat spreads or vegetable combinations. They are very traditional in Tuscany as antipasti. I am usually prompted to make them when I get a chicken that includes the giblets. A spread of chicken liver, generally sautéed and mashed with diced vegetables, wine and herbs is among the most common topping for crostini, although I often flavor mine more in a French style with shallots, dry white wine, thyme and tarragon than in the Italian style.

Another traditional Italian topping for crostini is cavolo nero. This is a very dark green, curly-leafed kale which has a wonderful flavor. It is also delicious mixed with crumbled Italian sausage in a sandwich, on pizza or with pasta. This time of year, there is lots of cavolo nero in our local farmer's market, and tonight I made crostini di cavolo nero as an appetizer to eat while the trout and fennel gratin were finishing baking. I adapted the recipe from Flavors of Tuscany, by Maxine Clark.


Ingredients

6 thin slices of crusty sourdough bread

3 T EVOO, plus more for brushing the bread

10 oz (more or less) Cavolo nero, leaves cut from the tough central stem and cut into thin shreds.

2-3 garlic cloves, sliced thin

Sea salt and fresh-ground pepper

1 T balsamic vinegar

Fresh herbs to garnish (optional)

Procedure

Pre-heat oven to 375ºF

Brush both sides of the bread slices with olive oil, place the bread on a baking pan and bake for 10 minutes, turning once. They should be browned somewhat. Keep them warm.

In a 10-12 inch sauté pan or in a wok, sauté the garlic in 3 T olive oil on medium heat until they just start to color (about 1 minute).

Turn up the heat to medium-high. Add the cavolo nero and a dash of water. Season with salt and pepper. Toss and stir continuously.

When the cavolo nero is limp (1-2 minutes), add the balsamic vinegar. Continue to cook and stir until the vinegar has evaporated.

Place generous portions of the cavolo nero on the toasts and serve immediately.

Slices of bread (SFBI Artisan II Miche), ready to brush with olive oil and toast

De-stemming cavolo nero

Mis en place - balsamic vinegar, sliced garlic, shredded cavolo nero

Buon appetito!

David

Submitted to YeastSpotting

dmsnyder's picture
dmsnyder


I am continuing my exploration of fresh-ground flour this week with another bake of Peter Reinhart's “100% Whole Wheat Sandwich Bread” from Whole Grain Baking. I baked this bread three weeks ago and found the flavor marvelous, but the crumb was somewhat dense and cakey. I had ground the flour from hard red Winter wheat at the second from the finest setting. I did like the chewiness from the coarser ground grains. So, looking for a lighter loaf overall but maintaining the chewiness, I modified the formula and procedures somewhat.

Reinhart's formula calls for half the flour in a soaker of flour, milk product and salt. For the liquid, I used ¾ non-fat Greek-style yoghurt and ¼ water. The rest of the flour is in a biga made with flour, water and instant yeast. The biga is mixed, kneaded and refrigerated overnight.

I ground the wheat for the biga at the finest setting of my KitchenAid Grain Mill. This resulted in flour that was still a bit coarser than KAF WW flour, for example. I ground the wheat for the soaker at a medium-coarse setting.

I thought that I could get a lighter crumb and higher rising loaf if I developed the gluten in the biga portion before adding the soaker to the mix. So, I added all the other ingredients (salt, yeast, honey and canola oil) to the biga in the mixer bowl. I mixed for a couple minutes with the paddle at Speed 1, then with the dough hook for 11 minutes at Speed 2. The dough was rather sticky, but it cleaned the sides of the bowl, almost cleaned the bottom and had window paning. I then added in the soaker, which was quite crumbly, and mixed with the dough hook until it was incorporated into the dough.

After a 5 minute rest, I briefly kneaded the dough on the board, incorporating another couple tablespoons of fine ground whole wheat in the process, then transferred the dough to an oiled batter pitcher for bulk fermentation. Fermentation, proofing and baking were according to Reinhart's instructions. Note that, three weeks ago, I baked this bread in a Le Creuset oval Dutch oven. Today, I baked on a baking stone and steamed the oven using the SFBI method I've described in earlier postings.

The crust was crunchy, especially from the coarser pieces of wheat. The crumb reminds me of a 100% rye with rye chops. It's not what I was aiming for, but it is interesting. The crumb has two distinct textures from the different grinds of grain - tender and chewy-crunchy. The flavor is delicious.

I'd count this a worthwhile learning experience, but it's still not my ideal crumb for this bread. 

The other bread that I baked today was my San Joaquin Sourdough. I fed the levain with a 50/50 mix of KAF Sir Galahad and fresh-ground whole wheat. The final dough had 5% fresh-ground rye.

San Joaquin Sourdough breads with Julia Drayton Camelias

San Joaquin Sourdough Crumb

David


dmsnyder's picture
dmsnyder


We baked a miche the last day of the SFBI Artisan II (sourdough baking) workshop. This was one of the breads we mixed entirely by hand. The students' miches were scaled to 1 kg, as I recall, but our instructor baked a couple larger ones, using the same dough.

These miches were among the favorites of all the students for the wonderful texture of their crust and crumb and their flavor. I gave one of mine to brother Glenn, who has stopped reminding me in the past few days that I promised him the formula.

This formula is substantially different from the miche formula in Advanced Bread and Pastry. I blogged about the background of that miche last month. This one is more similar to contemporary versions such as that of James McGuire, Hamelman's adaptation of which is found in Bread.

The formula we used at the SFBI calls for mostly white flour, with a little whole wheat in the levain refreshment and a little toasted wheat germ in the final dough. From my reading, a high-extraction flour is preferred for miches. I had some of Central Milling's “Organic Type 85” high-extraction flour on hand, so that is what I used.


Total formula


Ingredients

Wt (g)

Baker's %

High-extraction flour

702

100

Water

515

73.33

Wheat germ (toasted)

18

2.5

Salt

15

2.08

Total

1250

177.91

Notes

  • The SFBI formula used 96.67% “Bread flour” and 3.33% Whole wheat flour. All the whole wheat flour is used in the levain. I used Central Milling's “Organic Type 85 Flour” for both the levain and the final dough

  • I did not use wheat germ since I was using high-extraction flour, but this ingredient did contribute to the great flavor of this bread as we made it in Artisan II.


Levain


Ingredients

Wt (g)

Baker's %

High-extraction flour

93.7

100

Water

93.7

100

Liquid starter

50

46.8

Total

237.4

246.8

  1. Dissolve the starter in the water and mix in the flour. Desired Dough Temperature: 78ºF.

  2. Ferment for 8-12 hours.


Final Dough


Ingredients

Wt (g)

Baker's %

High-extraction flour

586

100

Water

398

68

Wheat germ (toasted)

18

3

Salt

15

2.5

Levain

234

40

Total

1251

213.5

Procedure

  1. Dissolve the levain in the water. Add the other ingredients and mix thoroughly by hand. DDT: 75-78ºF.

  2. Transfer the dough to a clean, lightly oiled bowl.

  3. Ferment for 3-4 hours with 4 folds at 50 minute intervals. (I did this by the “stretch and fold in the bowl” technique.)

  4. Transfer the dough to a lightly floured board. Pre-shape as a tight boule.

  5. Cover and let rest for 20-30 minutes to relax the gluten.

  6. Shape as a tight boule and place, seam side up, in a floured banneton.

  7. Cover with plastic and retard overnight in refrigerator.

  8. Remove the boule from the refrigerator and allow to warm and complete proofing for 1-3 hours. (Watch the dough, not the clock!)

  9. 45-60 minutes before baking, pre-heat the over to 500ºF with baking stone and steaming apparatus in place.

  10. When the loaf is proofed, transfer the boule to a peel. Slash the boule as desired, and transfer it to the baking stone. Steam the oven and reduce the temperature to 450ºF.

  11. Bake for 20 minutes, then remove any water remaining in your steaming apparatus.

  12. Continue baking for another 40-50 minutes. (If you have a convection oven, switch to “Convection Bake” and reduce the oven temperature to 430ºF at this point. But see my tasting notes.)

  13. Remove the boule to a cooling rack, and cool thoroughly before slicing.

Notes on procedure

  • Traditionally, we were told, this bread is scored in a diamond pattern, but any scoring pattern that pleases you is fine. Just be aware that the diamond pattern tends to yield a flatter profile loaf than a simple square or cross.

  • This bread benefits from a very bold bake. The crust should be quite dark. It may look almost burned, but the flavor and crunchiness that is desired requires this.

  • This type of bread often improves in flavor very substantially 24 hours after baking.

    Crust

    Crumb


    Crumb close-up

Tasting notes

I sliced and tasted the bread about 4 hours after removing it from the oven. The crust had crackled nicely and was very thick and crunchy – the kind that results in crust flying everywhere when you slice it. The crumb was well-aerated, but without any really large holes. The crumb structure is similar to that I got with the miche from BBA made with this flour, but a bit more open. The crumb is chewy-tender.

The flavor of the crust is very dark – caramelized-sweet but with a bitter overtone where it is almost black. The crumb is sweet, wheaty, nutty and absolutely delicious. My note above notwithstanding, it's hard to imagine the flavor getting any better in another day.

I am enormously impressed with the flavor of the breads I have baked with Central Milling's “Organic Type 85” flour. I want more of it, and I want to try some of their other specialty flours, including those they mill for baguettes.

I will definitely be baking this bread again. I would like to make it as a larger miche, say 2 kg. Next time, I will lower the oven temperature to 420 or 425ºF when I switch to convection bake for the crust to be slightly less dark.

David

Submitted to YeastSpotting

dmsnyder's picture
dmsnyder


Pat's (proth5) baguettes have been my “go to” recipe for baguettes for quite a while. When she posted a new formula in November  - See Starting to get the Bear  - I promised myself to give them a try. I got around to it today.

These baguettes are made with both levain and a poolish and are spiked with some instant yeast. They still have a relatively long fermentation, for yeasted baguettes. Pat's description of her method included baking some of the dough the day they are mixed and retarding some to shape, proof and bake the next day.

Here is my interpretation of her formula a methods, with some modifications, as described below.


Poolish


Ingredients

Wt (oz)

AP flour

3.7

Water

3.7

Instant yeast

“generous pinch”


Levain


Ingredients

Wt (oz)

AP flour

1.7

Water

1.7

Ripe sourdough

0.35


Final dough


Ingredients

Wt (oz)

AP flour

31.35

Water

19.2

Instant yeast

0.05

Salt

0.55

Poolish

All

Levain

All


Total dough


Ingredients

Wt (oz)

Baker's %

AP flour

37.1

100

Water

25

67.25

Instant yeast

0.1

0.25

Salt

0.55

1.5

Starter

0.35

9

Total

63.1

178


  1. Mix the poolish and the levain and let them ferment at room temperature for 8-12 hours.

  2. Mix all the ingredients except the salt to a shaggy mass. Cover and let rest for 30 minutes. (I actually autolysed for 90 minutes.)

  3. Add the salt and hand mix in a large bowl or machine mix for 3-5 minutes at low speed. (I hand mixed the dough.)

  4. Bulk ferment for 4.5 hours with a stretch and fold at 2 hours. (Or, cold retard for up to some length of time, but surely less than 3 days. Or divide some pieces and retard the rest of the dough. This time, I divided the dough in two after the S&F and retarded half.)

  5. Divide into 10 oz pieces and pre-shape as logs. Rest the pieces, covered, for 20-30 minutes.

  6. Shape as baguettes.

  7. Proof en couche for 1.5 hours (Or until ready. Or retard shaped loaves.)

  8. Pre-heat oven to 500ºF with baking stone and steaming apparatus in place.

  9. Transfer loaves to peel. Score them and transfer them to the oven.

  10. Bake with steam for 5 minutes. Then lower temperature to 480ºF (convection, if you have it), and bake for another 12-13 minutes.

  11. Transfer to a cooling rack and cooling thoroughly before eating.


Because of the size of my baking stone, I divided half the dough into 4 pieces to make mini-baguettes.The dough handled really nicely, I thought. The baguettes were proofed and baked as above, according to Pat's directions. After 17 minutes, they were rather dark, especially the one at the back of the oven. They sang loudly when removed to cool. They came out of the oven just in time to eat with dinner, for a change, rather than just in time for bedtime snack.

Baguette crumb - torn, not cut

We ate one baguette with dinner – Sautéed petrale sole, leeks vinaigrette and warm Swiss chard salad with olive oil and lemon dressing.

The crust was very crunchy. The crumb was quite chewy and nicely aerated. The flavor was good, but I will use a bit more salt next time. I think I will also bake at a somewhat lower temperature for a slightly longer time. 460-480ºF for 20 minutes would be better for me, I think.

Addendum: I baked the second batch of baguettes today. I baked these at 470ºF for 20 minutes.

Baguettes with varied shaping and scoring

Compared to the first batch, the second had less dark crust. It was very crisp. The crumb was basically the same. The flavor was noticeably sweeter, but it still was under-salted to my taste.

These are very nice baguettes. I'll be following Pat's reports of her continuing bear hunt.

David


dmsnyder's picture
dmsnyder


A couple weeks ago, I posted my bake of the Whole Wheat Bread from Reinhart's BBA, made with fresh-milled flour. A reply by Karin (hanseata) prompted me to bake the “100% Whole Wheat Bread” from Reinhart's newer Whole Grain Baking book. I had made this bread once before leavened with sourdough starter and didn't particularly care for the combination of sourdough tang and whole wheat flavor, but I thought I really should make it again using instant yeast and with fresh-milled whole wheat.

The differences between the formulas for whole wheat bread in BBA and WGB are clearly evolutionary and illustrate where Reinhart has gone with his thinking about drawing the best possible flavor and performance from whole grain flours. In the WGB version, essentially all the flour is either in a biga or a soaker, with an optional additional small amount used to adjustment dough consistency, if needed.

I followed the recipe in WGB closely, with these choices where there were options: For the liquid in the soaker, I used about 2/3 Greek-style yoghurt and 1/3 2% milk. For the fat, I used canola oil. I added less than an ounce of additional WW flour during kneading.

After bulk fermentation, I shaped a single bâtard which was proofed on a linen couch then baked in a Le Creuset oval roaster (in which it barely fit).

I baked at 425ºF (convection bake) with the cover on the roaster. After 10 minutes, I reduced the temperature to 350ºF, and, after 10 minutes more, I removed the cover. I baked another 20 minutes with the roaster uncovered. At that point, I felt the crust should be darker and firmer, although the internal temperature of the loaf was 185ºF. I removed the loaf from the roaster, placed it on a sheet pan and baked for another 10 minutes. I left the loaf in the turned off oven with the door ajar for another 10 minutes before transferring it to a cooling rack.

The crust is thin, slightly crunchy and chewy. The texture of the crumb is moist and chewy – hard to describe but very pleasing. The chewiness is from the larger particles of grain, rather than from the gluten in the crumb. The crumb is otherwise quite soft – almost cake-like. I milled the wheat to the second finest setting. Next time, I plan to mill it at the finest setting, at least for the biga. The flavor is very similar to that of the BBA whole wheat bread but even better. There is no grassiness or bitterness from the bran, just a little sweetness from the honey and the wheat itself and good wheaty flavors. I much prefer this yeasted version to the sourdough one. 

This bread does not need any spreads or other enhancements. It is very satisfying plain. But I'm anticipating it will be equally delicious with almond butter or with eggs.

I also baked a couple boules of sourdough bread today. I used one of the formulas from the SFBI Artisan II Workshop, which calls for a liquid levain fed twice a day. These were baked in Lodge Combo Cookers.

David

Submitted to YeastSpotting


dmsnyder's picture
dmsnyder

Chicken, brie and apple panino

My brother, Glenn, and his wife gave us a panini press a few years ago. I confess to using it infrequently. Every time I do use it I wonder why we don't use it more often, because we really love panini.

Last night, I took a huge loaf of Country Rye Bread made from the formula in Tartine Bread out of the freezer for this morning's breakfast. As I left for the office this morning, I suggested to my wife that we make panini for dinner, to use this delicious bread while it was relatively fresh. She concurred. We made them. They were good.

Ingredients (for 2 panini)

  • Two baked chicken thighs seasoned with salt, pepper and dried herbs. (You could also grill or broil them and season them to your taste). Bone the thighs.
  • 6 thin slices of a quartered tart apple, skin on (braeburn, granny smith).
  • 8 thin slices of good brie about 1 x 4" each.
  • Chopped parsley (or water cress).
  • 4 slices Country Rye Bread from Tartine Bread (or any good country bread)
  • Olive oil (or walnut oil or olive oil infused with garlic and/or herbs).
Assembly
  1. Lay out the slices of bread so the outsides of the sandwiches are up. Brush the slices with the oil and turn them over.
  2. Add the other ingredients atop each of two slices of bread, in this order:
    1. 2 slices of brie
    2. One of the boned chicken thighs.
    3. 3 slices of apple.
    4. A sprinkling of chopped parsley.
    5. 2 slices of brie.
    6. Top each sandwich with another slice of bread, oiled side up.
Grilling
  1. Pre-heat your panini press on high.
  2. Place the panini on the grill and close the top.
  3. Grill for 30 seconds with gentle downward pressure on the upper grill handle.
  4. Grill for 3-5 minutes more without pressure until the cheese is melted and the bread is crisped and well-marked by the grill
Serve with a green salad or side dishes of your choice.


Mis en Place
Panini, assembled and on the grill
Panini ready to serve. (Cheese is definitely melted!)
Enjoy!
David Submitted to YeastSpotting


dmsnyder's picture
dmsnyder

A couple days ago, I tested my new KitchenAid Grain Mill's output with a formula calling for about 30% whole grain flour. It was very good. In fact, the flavor of that bread has improved over two days. Even as I dipped my toe in the home-milled flour waters, I knew that the real test, for me, would be how the flour performed in a 100% whole wheat bread.

Most of my breads are made with levain, but my favorite whole wheat bread has remained the “Whole Wheat Bread” from BBA. This is made with a soaker of coarse ground whole grains and a “poolish” made with whole wheat flour. I have used bulgur for the soaker in the past. Today, I used coarsely ground fresh-ground hard red winter wheat, the same wheat was used finely ground for the poolish and final dough. The formula can be made as a lean dough (plus honey) or can be enriched with oil and/or egg. I used both.

The KitchenAid Grain Mill does a great job with coarse grinding. I found that, with the first pass, the particle size is rather variable. It seems to even out by putting the flour through the mill again at the same setting.

I ground the rest of the grain at the next to finest setting. I put it through 3 passes of increasing fineness, actually. The flour ends up somewhere between semolina and AP flour fineness, at least by feel. This slightly coarse flour, fresh-ground, seems to absorb a bit less water than the KAF WW flour I usually use. I ended up adding about an extra tablespoon of flour to adjust dough consistency during mixing.

Bulk fermentation, dividing, shaping and proofing showed no differences I noticed from the behavior of this bread made with KAF WW flour. However, there was a remarkable difference in the aroma of the bread during baking and cooling. It filled the kitchen with a wheaty smell that both my wife and I found absolutely lovely. (As I write this, the bread is cooling. I hope it tastes as good as it smells!)

Another remarkable difference is that the color of the loaves is quite a bit lighter than loaves made with KAF WW flour and exactly the same other ingredients and the same baking time and temperature. I thought this might be because the KAF WW has malt added, but it is “100% hard red whole wheat,” according to the ingredient list on the bag.

The flavor of the bread is just perfect, to my taste. It has a wonderful whole wheat flavor with not a bit of grassiness. It is very slightly sweet. I used a very mild-flavored clover honey, and I cannot find any distinct honey taste in the bread. The flavor is bolder and more complex than this same bread made with KAF WW flour. I'm sold!

As I've written, above, Reinhart's whole wheat bread from BBA has been my favorite. I've made other whole wheat breads from formulas in Hamelman's “Bread” and Suas' “Advanced Bread & Pastry” that I found less tasty. I am now wondering how they would be if made with fresh-ground flour. Hmmmm …. This is shaping up to be a project.

David

Pages

Subscribe to RSS - dmsnyder's blog