The Fresh Loaf

A Community of Amateur Bakers and Artisan Bread Enthusiasts.

ehanner's blog

ehanner's picture
ehanner

I was so inspired today by Freerk's post about this 15th Century bread, well I just dropped everything I was doing and made a batch. The video recipe is inspired genius in my humble opinion. Very stylish and well thought out. My wife inquired if this was a dessert. I smiled and said no, just a snack:>)

These are fun to make, easy and fast. They are also history as they disappeared quickly. I highly recommend giving these a try. I backed these for 9 minutes. Any longer and they would start getting crusty. I did sprinkle some sugar topping over each piece just before baking.

Thank you Freerk for sharing this wonderful old recipe.

These are a little out of order but you will get the idea.

Eric


Just baked


Proofed and ready for bake.


The 1/4 sheet pan is perfect for these. They fit nicely in the proofer.

I pre shaped them and used a mid stage after coating the ropes in sugar mix. I found I needed an 18 inch rope to easily tie the knots. If you look at the far right you can see the coated ropes waiting to be stretched and knotted.

The second layer of proofing rolls.

ehanner's picture
ehanner

German Style-Many Seed Bread

When Hanseata posted her last bread of the year, it was a reminder of a recipe I have seen in Peter Rhinehart’s “Whole Grain Breads”. I hadn't made this one yet but it looks like it has promise. Actually, I love this book. Peters “Epoxy or pre dough” method is inspired. The need for less kneading during the final dough mix delivers delicious results every time. I get rave reviews on all the breads I bake from WGB.

A couple of days ago, Khalid (mebake) posted his results on the same bread and reported his family loved the flavor. I know Khalid to be a very talented baker so for his family to make a big deal on this one, well, that is enough to drive me to try it. I checked my supplies and prepared for a 4 times multiple batch. I decided to follow Khalids lead and add crushed and toasted walnuts to the toasted seed package. Somehow toasted walnuts sounds perfect for this bread.

The bread I am baking is on Page 210 of WGB under the International section and is considered a Transitional bread as the Biga is made of Bread flour or Hi Gluten flour. Considering the amount of seeds added, I used All Trumps Hi Gluten and fresh ground WW.

My initial plan was to hand mix this 9 Lb+ batch.  But as I started to chop the large amount of seeds into the soaker and biga, the DLX was calling my name.  One of the things I try to avoid when baking PR’s recipes in this book is ending up with a crumb that has swirls because I didn’t distribute the ingredients well enough. Maybe a single loaf batch would be easier but this one looks like a physical challenge. The DLX handled the incorporation of the seeds with the soaker and biga with no problem. The aroma of the dough is remarkable.

The dough proofed quite well for being so rough. There are over 775g of seeds in 4200g of dough so I wasn’t expecting  a large rise. The oven spring was nonexistent however so I was glad for the proof results. As you can see, it browned well and the baking profile was perfect to get a done interior crumb that is still moist. This bread is loaded with good wholesome flavor.

I highly encourage those who enjoy whole grain hearty breads to pick up a copy of Whole Grain Breads.  Read the chapters on the process and the Master formula. Reinhart’s method on this is unique.  Once you do it a couple of times, I find it’s very easy to fit in the schedule. He gives a conversion in most recipes for using your sourdough starter instead of yeast in the biga. His formulas  and methods produce everything I am trying to accomplish with baking. 

Eric


As good as this was last night just slightly warm, toasting brings yet another level of flavor out.


Here, a freshly cut slice shows the many seeds.

Glistening with melted butter, the flavor is amazing!

ehanner's picture
ehanner

Let me start by apologizing to the generations of German bakers before me. I have been trying to learn about the dense style dark bread sometimes called Pumpernickel or Schrotbrot or Roggen Vollkornbrot.  I've baked the Hamelman Horst Bandle bread and liked it after I finally figured out how to bake it at home. Then I have been fooling with the Barm process and Barm breads, both white and rye flours. I read a comment from Dan Lepard about soaking whole berries in dark ale after simmering to soften. So finally all of this came together for me and I decided to try incorporating a couple of these things into the basic Vollkenbrot recipe and make some changes to the sweetener. 

It isn't really an honest Ale Barm that soured the rye chops. I started with my white starter and fed it a couple cycles with ale and AP. It provided the sour component with a very nice aroma and fluffiness after it had aged. This bread doesn't rise like a conventional loaf to any great degree. You can see the domed top with some cracks that indicate there was some spring.

The Vollkornbrot and Schrotbrot do not normally contain any flour. Not Hi Gluten or Rye flour. Perhaps  a meal or another finer grade of chops but no flour. I like to mix all of the pre ferments and scalds and soakers and then adjust the hydration to a thick paste with dark rye flour. There is a last minute addition of chops that have not been soaked that absorbs a lot of the extra water/ale but I usually need at least 100 grams of dark rye to get it where I like it. Several of the recipes I have studied call for kneading (stirring) for 30 minutes every few minutes until the dough becomes sticky. I believe this occurs when the last chops and flour additions have become hydrated. It is obvious when it happens.

The recipes call for using treacle or black strap molasses. I have been slowly increasing the amount and also adding honey at an equal amount in addition. The bitter of the black strap and sweetness of the honey seems complementary to me and I am liking the combination. I have another small batch in ferment now that will be sweetened with sorghum. I think that will also be a nice flavor.

Anyway, not to be disrespectful to my forefathers, this bread is delicious beyond my dreams. We sliced a few pieces from the smaller loaf and ate it with butter while still warm. It was soft and loaded with full deep flavor. The color is darker than it appears in the photos due to my wanting to show the detail. The 10 hour overnight bake at 240F in a sealed pan did the job. My thanks to Andy, Juergen, Franko, Shiao-Ping and Jeff Hamelman and Dan Lepard to name just a few who helped me get this far.

Eric


Crumb shot shows the course and dense nature of this bread.

There are several sub components of the formula. The amounts will make enough for one standard  steel bread pan and give you a 1Kilo loaf, pre bake weight. If you have a pullman pan, seal the top first with foil and then place the lid on.

Sour:
150g Rye Chops
150g dark ale
25g active starter

Scalded Chops and Berries:
100g Rye Chops
150g boiling water
8g Salt

50g whole Rye Berries
100g Hot Ale

Final Dough:
120g Rye chops
Dark Rye Flour as needed for consistency (100g)
30g Black Strap Molasses
30g Honey

Method:

Combine sour and soakers the morning of the day you want to bake so they have 12 hours to age.
When preparing the dough, combine all the ingredients and mix well with a large spoon. Add Dark Rye flour as needed to lower hydration to a sticky paste. You want it to be wet enough you could not roll it. Stir every few minutes for 30 minutes and the paste will become sticky.
Prepare a 8x4 (approx) steel bread pan with side edges all around with butter or crisco.
Spoon paste into corners and level the top with a spatula. Now create an edge with the tip of the spatula and a slightly domed surface. The idea is to have a domed top so any water condensate will run down to the edge and down the sides of the loaf.
Brush the top with water.

Seal the top of your bread pan with a double layer of foil being carefull to get a good seal around the edges.

Put the pan in a preheated 350F oven for 30-45 minutes. Lower the heat to 240F and bake for 8-10 hours. I lower the heat to 220F for the last 2 of the 10 hours.

Decant the loaf and allow to cool on a wire rack for at least as long as it takes to cool completely. At this point you can wrap in saran or a tea towel for a day or so. This bread may be kept in a plastic bag on the counter or refrigerated. It would last a long time if you could keep from eating it.

Enjoy

ehanner's picture
ehanner

When I saw the strong proofing OWS was getting from his attempts at baking the Vienna Bread from Inside the Jewish Bakery.  I baked this as a tester a long time ago but this is the now released version so I thought I’d give it a whirl. It's a fast rising enriched dough that just takes a few hours to complete.

The first thing I noticed is that the volume amounts an gram measurements don’t line up just right for me. The flour I scoop and level weighs 135g per cup. The recipe calls for 4-1/3 Cups. In my kitchen that would be 584 grams where the gram number is 620g. The oil is 2 T at 3.0 grams. I measured over 3 T of oil to be 30 grams. I didn’t go down item by item to see how they all worked out, I figured these are really Norms recipes and he would have kept notes in percents, Cups and pounds/ounces. I chose to use the gram weights and ignore everything else.

Another variable I had to make a decision on was the dough temperature. The recipe calls for warm water. I figured if the water was 82F the dough would come out near 78F after adding a cold egg and the other room temperature ingredients. That worked out perfectly. My dough temp was 77F.

My standard bread flour is Gold Medal, Better For Bread in the bright yellow bag. I think it’s right around 12% protein. The recipe calls for bread flour so my BFB should be OK.

One other thing that caught my attention was the use of malt and sugar. I only added 1 heaping teaspoon of dry malt powder where as the recipe calls for 2 T of dry or liquid malt or 20 grams. 2 T seems like a lot for under 4 cups of flour.

I used my Kitchen Aid mixer for this 2.3 Lb batch. It took 10 full minutes to reach a semi smooth consistency and a decent window pane window.  I think I could of continued a little longer and fully developed the dough in retrospect. After removing the dough and manually kneading it for a minute or so, I shaped it in a ball and returned it to the mixer bowl and put it in the proofer, set at 78F. The dough was at 78F and after the rise it was still just where I wanted it, 78F. It took just 1 hour to double as you can see. I divided and shaped it into 2-534g logs. The recipe calls for 510 g pieces but this is what the recipe gave me. I don’t think the additional 24 grams will cause any serious over flowing of the dough. But considering what OWS has been seeing, it’s worth considering.

I egg washed after slashing and baked for what turned out to be 30 minutes at 350F to get an internal of 205F. I’m a little surprised the top tore open so much but It looks nice. The crumb is soft and tight grained as would be expected. The crust has a little bit of crunch where the egg wash came in contact with the sides of the pan. Sugar is caramelized slightly. I followed the directions pretty near right like the recipe called for, except for holding a little malt back. Looks OK to me and tastes great. This would be a great French Toast. Actually I almost made rolls out of half the dough and stuffed them with stewed onions. The girls loved this bread.

NOTE TO OWS: The only thing I am aware of that I did differently than you did is change the flour and held a stable dough temperature so I could judge the oven spring fairly. The spring seemed about right to me. Oh, and the malt may have been lower.

Eric


No collapsing here. Just a great enriched dough loaf.


After 8 minutes the dough looks about there. Total mix/kneading was 10 minutes


I would call this the right size pan for 534 grams of dough. 8.5X4.5 inches


Finishing proof at 78F at one hour.


Divided and shaped


Back in the 78F proofer for another hour.


Proofed to just over the top of the pans. Looks good.


Better lighting, proofed.


Egg wash and slash.


They look pretty good to me here.


Not overly expanded. Just right. They didn't collapse after cooling


ehanner's picture
ehanner

I got the bug to make Hamelmans Focaccia with Poolish a few days ago. It started with watching Frankie G's video on the subject and seeing him use 1/4 sheet pans. I liked the size and all the toppings got me drooling. So I ordered the 1/4 sheet pans from Frankie G which came with a cool trivet counter saver (thanks FG). I like the Poolish version of the Ciabatta dough which is Hamelmans dough for his Focaccia. The additional 10% fermented flour helps the flavor develop during the Poolish build up, overnight.

Every year about this time is when my baking starts to get weird. Just when I was thinking I could predict yeast activity in my preferment's, the season starts to change and everything takes longer. This year would be better I said. I no longer care that it's going to be 36F outside and a chilly 63F in the kitchen. My preferment's are happy working away in my new Folding Proofer. I set the temperature at 73F after mixing equal parts of flour and water and went to bed. I try to be mindful of Hamelmans suggestion for watching the dome of the expanding mix and waiting for it to start to fall in the center before mixing the final dough. I want the most effect from the preferment possible.

It's so nice to not to have to open the container holding the fermenting dough to check it. Peeking through the clear plastic viewing window is so easy. I'm watching for the first indication that my preferment is done. Right at 16 hours as JH said, it was done. The starter finishing  temperature was at 75F, just as it was upon mixing. That's professional style temperature control which will show up later.

I fermented the dough also at 75F for 1-1/2 hours and divided into 3 globs, shaped and transferred into my new pans. I had stewed 2 large onions for the topping on one pan. Another was going to get rosemary treated olive oil, some fresh rosemary and an assortment of seeds and garlic/onions. This one would get a final application of Mozzarella after baking, under the broiler. The third pan was a sweet offering with red grapes and sugar.

We sent a big slice of each of these to the neighbors. They turned out great. The flavor of the bread is full and complex. This is the best Ciabatta/Focaccia I have ever made. It HAS to be the watchful eye on the fermentation.  I had not made the grapes and sugar before. Next time I will use more sugar especially over each grape. This was really good. The onions were so sweet from being stewed that one was my favorite. Oh well maybe the savory pan was my favorite. Ummmm good.

Eric


Ready to bake.


The grapes found a pocket to hold the juice.

Onion and Rosemary

Great crumb on all 3 but this onion with rosemary was heavenly.

Savory just out of the oven.

Savory with melted Mozz Cheese

ehanner's picture
ehanner

I have been working on learning to mix, shape, ferment properly, boil and bake Bagels. Everyone in our household and all of my friends and neighbors likes these delicious breads and are happy I have taken up with this obsession.I have migrated to using Hamelman's formula for home bakers which makes 12-120 gram bagels. It's a very simple ingredient list, adding only malt powder to the basic 4. When I am making a batch destined for my In-Laws, I swap whole milk for 20% of the water to make the crumb softer. There are lots of bagel recipes out there. I say, find your favorite multi grain recipe and mix it to 58-60 % hydration. I frequently make a 20% rye or WW mix which we love. That's what is shown below.

There are a lot of small nuggets of information in the text below. I have discovered there are many variables and "must do" bits of advice out there on this subject. I want to finally get to the bottom of this and find out what matters and what doesn't

My personal goal is to find an easy way to make delicious Bagels quickly in the morning. No complicated thinking at 5:30 AM please. It's a two day process, and the putsey stage is the evening before, mixing, kneading and shaping. The next morning, I get up, turn on the oven to 500F, turn on the stove to boil the water I drew the evening before. It takes 45 minutes to bring my stone up to 430F. So at 45 minutes I boil the first set of 3 bagels and prepare them for baking. I leave the sheet pans in the refrigerator until just before I'm ready to boil the dough in the water. No bench time to warm the dough. They usually float right off and I'm only using 1/2 teaspoon of IDY instead of the 3/4 tsp Hamelman calls for.

My first major discovery was that I could make at least as good of a dough by hand as I could by machine. It is far easier to work the flour and water together by hand than it is to try to use my DLX mixer fitted with the dough hook. The DLX isn't taxed by the job but at 58% hydration, the dough just doesn't wan t to be moved, once the gluten starts to form and become strong. I can stand there pushing and prying the strong dough into position so it will travel around the bowl and be forced between the bowl and hook. Honestly it's much easier to just combine the ingredients by hand in the bowl. A series of 3 stretch and folds at 20 minute intervals will produce a beautiful smooth dough and well developed gluten.

The next thing I wanted to understand is the whole shaping thing and if the requirement to refrigerate overnight is warranted. I am convinced that the slow extended fermenting in the refrigerator is a beneficial step in developing a better flavor. AND, if you shape your bagels right after mixing/fermenting briefly, they stick together and don't come unglued in the boiling water. As a sub set of shaping I get best results when using the dog bone shape and then grinding the ends together as shown in Ciril Hitz video on bagels The pre-shaping method Hitz demonstrates is beautiful. I had to watch it several times to fully appreciate the subtle aspects of his technique. He uses the Dog Bone roll out which I have found works perfectly if I remember to remove one finger and "grind" out the joint using 3 fingers. If you are at all perplexed about making bagels, do your self a favor and watch the Hirtz video.

The next decision is weather or not to use ice water after the boil as Hamelman suggests or to place the boiled circles on a rack to cool and dry briefly before seeding. Hamelman says to boil 1 minute each side, Hitz says 10 seconds. I like my results using a 1 minute per side. As for the ice water bath or not, I think Hitz method of a shorter boiling time followed by cooling/drying on a rack works fine and simplifies the production line on the stove top. I don't see any benefit of adding an ice water bath. It's just one more thing to mess with, adding ice after each batch.

I wanted to be a purist and use bagel boards. If I was using a rotating oven in a production setting, bagel boards would be the answer to drying out the bottoms and getting a well done product. After baking maybe 15 batches of bagels during the last few Months, most using my home made red wood boards. I can see a minor difference on the bottom but certainly nothing that would indicate the need to flip the bagels over after a few minutes. This process is risky for me and I frequently end up having one or more not turned  over properly and need to go in the back of the oven with tongs to fix my errors. It is way easier to seed the dough after the rack and place them on the parchment they proofed on in the cooler. The sheet pan slides in on top of the stone nicely. Yes, I have been steaming when I bake on a sheet pan. The wet webbing on the  boards negates the need for additional steam.

One other small thing I have found I can eliminate that makes the process a little cleaner is to skip the corn meal. I noticed Hitz places his seeded bagels on clean parchment where most other authors say to sprinkle cornmeal on the proofing sheet. I have been spraying a light coat of Pam on the parchment to make it easier to remove the cold dough from the paper, with out disfiguring the shape on the way to the hot water. The boiling water stays cleaner and there is no down side after baking. So again I find the Hitz method to be preferable.

The last big question is what to put in the water, if anything. I have tried a heaping Tablespoon of Baking Soda, Barley Malt Syrup, Honey, Molasses and Sorghum Syrup. Oh and also plain old water too. Hamelman says use enough Malted Barley to make a dark tea. That's about 2 tablespoons. Hitz says something similar or to use honey for a slightly sweet flavor on the crust.  Honestly, I can't taste any difference but it does smell nice when the barley is steaming in the pot. All of the add in ingredients smell great in the pot but not much of that good aroma is transferred to the bread product. So, if you feel like you have a pallet that is sophisticated enough to notice, go for it. But if you thought you had to wait for another day because you didn't have Malted Barley, don't bother waiting. The crusts MIGHT be a wee bit softer, less crispy if you use a syrup. Take a good hard look at the photo below of two bagels side by side. One was boiled in clean water, one was boiled in water with a large scoop of Baking Soda. Both have a soft sheen and are very close to the same color. Both boiled for 2 minutes total,  17 minutes @500F with steam for 4 minutes on a sheet pan.

I hope this lengthy write up is of interest to those of you who have hesitated in making Bagels. I know they seemed complicated from start to finish at first. I was sure if I did a few batches I could make uncomplicated the process and gather the proper equipment to be able to easily make authentic NY style water bagels.

Eric

Column 1 and 4 are boiled in water only. 2 and 3 had Baking Soda added.

Can you tell which bagel was boiled in water only and which had baking soda mixed in? I had expected the one with baking soda to be darker. If there is a color difference, I'd say the one on the left is slightly darker. That's the water only version.


The crumb structure is still more open than I would like. I have reduced the amount of yeast and I am lowering the DDT temp to try and control the activity. But, it looks pretty good now and has a nice chew. This is 80% All Trumps High Gluten flour and 20% fresh ground WW from Country Creations (Flourgirl51).


Baked on parchment on a sheet pan. Certainly not burned and just a nice crisp crust on the bottom.


ehanner's picture
ehanner

A few Months ago, I applied to be a product tester for Brod & Taylor who designed a new folding proofer. It was a concept which appealed to me, due to our lack of counter space and my need to find a proper place to ferment and proof my breads. So I filled out the application and forgot about it. A few weeks ago I heard from the company who wanted to know if I was willing to try the folding proofer and let them know how I liked it. I was thrilled to be able to have one and run it through its paces. The company, is from Massachusetts. As far as I know, there are no other similar products on the market. They say you can warm, rise bread, make yogurt and melt chocolate. I think they missed the fact that while bulk fermenting could be considered rising, most people consider the two events (fermenting and proofing) separate events. Both require temperature control and can be reliably and easily accomplished in this product.

Counter space is hard to find in our house. When I told my wife I was getting a proofer to try out she gave me the rolled eyes “where’s that going to go?” look. Maintaining a stable warm temperature in our latitude is a challenge so she has endured foam coolers and all sorts of contraptions in the past. I’m sure I deserved the look, lol. I explained this is a folding box that compresses to a flat (sort of) profile and is easily storable.

The arrival of the folding proofer brought complements from my wife. She liked the design and the folding and unfolding concept. The controls are simple. Turn the power on and set the temperature you desire.  The range is between 70 and 120F. I did some testing the first day and found that it did indeed maintain a very close tolerance on my selected temperature of 78F. The digital temperature selector and heat on light flickered every few seconds maintaining the set temp within a half degree over 6 hours. I used 3 instant read dial thermometers I calibrated and an IR digital laser meter. Everybody read the same temp all around the inside of the box. There is a small tray that sits on the bottom of the heating element to boost the humidity inside the closed box.  You are supposed to pour a small amount of warm water in the tray during the 5-10 minutes of warm up.

Last night I mixed up a poolish preferment and placed it in the folding proofer. The temp was set at 78F. This morning it was all happy and bubbling and exactly 78F. I mixed the dough and undershot my DDT of 78 and had a dough temp of 73F. I put the fermenting dough in the box, set the temperature to 78F and gave it a S&F every 30 minutes for 2 hours. After the shaping, I placed the dough in my large banetton that will hold a 3 Lb loaf. It easily fit inside the proofer. I didn’t think it would be necessary to cover the dough since the humidity would be boosted by the water in the tray. After an hour and a half, the dough was ready for baking and there was no dryness on the top of the exposed dough. It also wasn’t damp like it sometimes is when I have used the oven or microwave to proof in. This is good as I know that can have the effect of gluing the dough to the linen lining. The dough popped right out of the basket which was a good sign. I loaded the bread into the hot oven, folded up the proofer in seconds and put it away in the pantry, out of sight. Smiles all around.

I haven’t made much yogurt but I know how important it is to hold the right temperature for several hours. This device will certainly make easy work out of holding 115F for 5-6 hours. No need to buy another kitchen device when this one will do double duty. I think I’ll surprise the wife with some fresh homemade yogurt. She will flip cause she knows I know nothing of yogurt.

I was thinking about the warming capability. I think the next time we have a family dinner, I’ll put the previously baked dinner rolls in the “warmer” and turn it up to 120F for a while before dinner. Nothing like warm rolls with a meal but sometimes the planning can get in the way.

TWO WEEKS LATER:

After using the Folding Proofer for a few weeks, I am liking it more than I thought I would.

 I like how it works. It’s a simple device that is very cleverly engineered.  Yes, you could say it’s just a warm box of air, but the more I use it, the more I appreciate it for what it does, all by itself. Last night while I was enjoying our “ World Champion Green Bay Packers” playing (thrashing)  the Denver Broncos, I was baking chicken wings in the oven. At the same time my garlic bread stick dough was proofing in the proofer. The kitchen was busy with several projects all at once. It was nice to know I wouldn’t have to schedule my hurry up soft bread rolls to get them done.  I get it that cooks and bakers need to be clever to get things done in the kitchen. Multi tasking is a necessity. But, I am really appreciating not having to juggle anything else to get consistent results in my bread products. People coming and going out the door, wind blowing through the house when it’s nice enough to have a window open but it’s really only 50F outside. I like not having to guard my dough from the elements. It’s a personal indulgence.

I like that my KA mixer bowl fits inside the proof box. It is tall enough I can place the mixed dough directly into the Folding Proofer for bulk fermenting at an established desired dough temperature. I REALLY like it that my large DLX mixer bowl fits under the lid. I have to remove the screen below and slide the water tray over but it so so nice to be able to ferment 9 pounds of dough, right in the mixer. Set it and forget it, as has been said. The heavy stainless steel bowl can cool off in the kitchen and once it does cool, there isn't an easy way to get it back warm. I ferment until it reaches the top then divide and shape. Easy.

I like that I can place a 9X13 baking pan in the proofing box and watch my cinnamon buns rise through the clear window in the top, without opening the lid. Being able to see the dough easily, without opening an oven door when I think of it is a big help for my attention deficit forgetfulness. The family enjoys keeping an eye on the progress too by glancing in the top window.

I like that the amount of moisture seems to be just right for not allowing the dough to skin over while fermenting or proofing. A small amount of water in the tray below the rack delivers the perfect environment. I find I don’t need to cover the dough even during long bulk ferments. This is something professional bakers take for granted, with a dedicated automatic proofing oven which costs thousands of dollars.

I like that I don't have to cover my dough with plasticrap so it won't skin over. No more carefully lifting the film off the top of an over proofed dough, hoping it won't tear and collapse. This is not a small thing to consider.

Wrapping up my analysis of this new kitchen tool, I think some of you will appreciate the versatility and functionality that the Folding Proofer brings to the home baker. Using it gives me a certain control of things that are otherwise sketchy. If I have learned anything about baking over the years, it is that everything matters. The exact amounts of water and at what temperature? The exact amount of yeast and controlling the Desired Dough Temperature (DDT) by whatever means possible will assure predictable results. Sourdough starters are especially sensitive to minor fluctuations in temperature. Using this proofer overnight on your preferment will deliver a predictably fully active levain or Poolish or Biga in the morning, regardless of how cool it is in the kitchen. Once you know you can maintain a proper fermenting temperature, your Pain au Levain will rise much more reliably. We all know about waiting for the dough to kick off and increase in volume because it was a little chilly. Anyone who has tried to make starter builds using the “Detmold 3 stage method” will immediately appreciate the ability to control the process.

Many of the issues that arise with new sourdough bakers are related to not understanding how sensitive natural yeasts and bacteria are to temperature and how to provide the proper climate for success. Depending on where you live and your personal home situation, this can be frustrating for SD new bakers. This tool will smooth the road to successful results.

Some will say “It’s a lot of money for a warm box of air”. Some will say “I can get the same effect with a cup of boiling water in the oven”. Both are valid opinions and I also have used the hot water in the oven. I have also had the oven turned on while I was proofing/fermenting bread in it. Hot water in the oven is an imperfect solution that works to some degree for some people. First, you have to have no other need for the oven, and, you will have to abandon the dough during pre heating that takes upward of an hour if you are using a stone, 20 or more minutes without a stone. During this time your proofing dough begins to cool and shrink. Second, depending on your electric oven, the pilot light will either make it too warm of an environment or not warm enough. Sure, you can cycle the heat on and off while guessing at how warm the interior is. If you have no distractions and nothing else to do, that is a work around. But, it’s a work around for home bakers who don’t have access to a dedicated proofing oven.  Believe me; you don’t know what you’re missing.

The inventor of this product cleverly decided to make it folding so that you can remove it from sight when not in use. This is a much bigger deal than I had realized. It needs to be the large size it is to work with other kitchen tools (pans, bowls, bannetons). My wife really appreciates that it will be gone and out of sight when I’m done using it. She hasn’t mentioned that the foam cooler that lives in the garage I have used in the past looks bulky and trashy sitting on the counter but I know she’s thinking it.

The unit is high enough that I could envision a second shelf supporting another layer of proofing croissants or rolls. I think I’ll mention that to the designer.

The marketplace will ultimately determine what the price point will be. Like every new product, the early adopters will pay a little more to try out a new gadget. Eventually the price will drift down some as the mass market takes off. It’s not for me to say what it should sell for. I’m happy that there are entrepreneurs willing to take a chance on a product that helps me bake better breads at home. I like it, a lot!

Eric

 Here are a few photos of my use. The new Brod & Taylor web site has much more glamorous images and a full product description.


Proof box collapsed on counter. Can be completely assembled in 20 seconds.
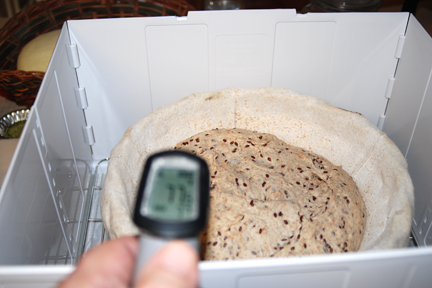


Large lined basket easily fits inside. This is 3.5 Lbs of Stout and Flax seed sourdough.


The fact that I can bulk ferment a large batch of dough in the proofer is a big deal to me.
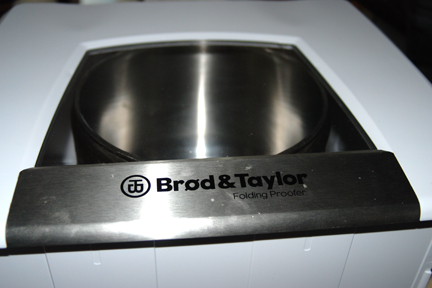

It just fits with room to spare for circulation of the warm moist air above.
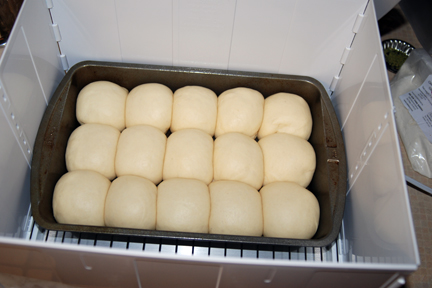

My baking pans fit nicely and you can see that another layer would work above as well.
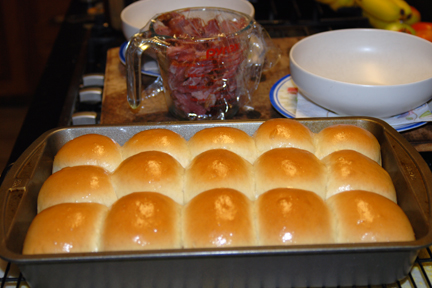

Dinner rolls that were fast fermented and proofed at 80F because I could, and time was short.
Being able to adjust the ferment/proofing temperature to accommodate my needs are a help.

ehanner's picture
ehanner

Those of you who have been following the forum have noticed the frequent posts on Bagels of all kinds. I have been experimenting with toppings and flavoring myself. Lumos has her beautiful WW bagels displayed on the front page. There has been much written about how firm/dense bagel dough is and warnings about not over heating our mixers by too large of loads or repeated batches. I decided to try Mike Avery's Sourdough Bagel recipe as written in his book "Back to Bagels" but instead of using a Kitchen Aid or my DLX mixers, I would do the entire mixing and kneading development process by hand. Mikes basic recipe includes a small amount of olive oil which makes the crumb softer and easier to chew. Of all the bread theme books I own, Back to Bagels is the very best value at $5 for the PDF form and I would say the most comprehensive book on the subject. I highly recommend the book for new and old timers alike. Mike details 8 different bagel flavors and how to prepare them. If you like blueberry bagels, spring for the $5. book and try the sourdough version. Utterly delicious!

Let me say I didn't expect to be able to easily develop the dough to a nice window pane condition, using only my hands. With all we have all learned about how time will do what we used to beat into the dough, I doubted a 56% hydration dough would stretch and fold well enough to do the job.--I was wrong.  Here are the photos in evidence.

I apologize for the lengthy number of images. The idea of hand mixing and kneading bagel dough is so novel I thought some of you might like to try it. Since it is almost entirely a matter of technique, I thought the photos would answer most questions and encourage people to try this simple and gratifying process.

I'll post the recipe for these as soon as I hear back from Mike. Enjoy! Recipe now added courtesy of Mike Avery. This is just the recipe. The mixing and shaping techniques are described in detail in the book. There is a selection of other bagel recipes, each one delicious. Here is a link to the entire Bagel section which goes into much more detail about the process. It's a good read for anyone just learning about sourdough and bagels.

Eric

Sourdough Plain Bagels

These are a simple bagel, the same bagel that I featured in section 4, but with a larger batch size. This bagel is the basis for all of our bagel recipes.

Ingredients:

6 bagels                        12 bagels            Ingredient

230 grams                   460 grams          Water

8 grams                        16 grams             Light Olive Oil

45 grams                      90 grams            Sourdough Starter

450 grams                    900 grams          High Protein Bread Flour

10 grams                      20 grams             Salt

15 grams                      30 grams             Malt Powder

 Mix the ingredients, and allow to rise about 2 hours, or until they are ready. Cut into 6 or 12, 120 gram pieces, round or roll into cigars, cover and let rest 30 minutes. Do final bagel shaping, put them on a baking sheet covered with parchment or Silpat, oil, cover, give them an hour of

floor time, and then refrigerate them for 12 to 24 hours. Boil in malted water, seed if desired, and then bake at 500F for about 15 minutes.


Mise en Place


All in the bowl, ready for the spoon.


Started with a spoon and switched to the plastic spatula to incorporate this dry dough.


After a minute of scraping and turning , still some dry flour at the bottom.
This is where you could be tempted to add additional water. Fear NOT. It will eventually be fine.


It took a mere 2 minutes to get to this point. All flour is incorporated and the dough is one mass.


I hand kneaded just long enough to be sure there were no lumps of dry dough. You can see the mass is lumpy and not smooth at all.


Dough is now resting for 20 minutes covered with an expensive shopping bag.


Now rested, on to the first stretch and fold. There were 3 S&F's in 20 minute increments.


The second stretch. It teases out easily and letter folds nicely. Now getting smooth.


This is after the 3rd S&F. Dough is smooth and silky if firm. Quite impressive for a firm hand mixed dough.


I was able to tease out a nice window pane. It doesn't show well in this photo but I could see my finger through the membrane. The time since first mixing the dough is now 1 hour and 20 minutes.


All the dough is spread out on the counter ready to be divided into squares this size and shape.


Each 125g piece is flattened into a square/rectangle and tightly rolled into a log as a pre shape.


Ready to rest and roll.


Resting under plastic.


Rolled log, about to be wrapped around 3 of my fingers. Hand for scale.


Notice blunt ends are overlapped. When you roll the joint on the counter, it spreads out and becomes even or the same thickness all around the ring. (at least that's the idea)


Stretch the inside out gently or it will close up later. I usually go back and open the ring again before the fridge.


This is a half batch. Just the right amount for a small family for a couple days.
The recipe calls for  1 hour bench time after shaping and before refrigerating. The one hour is allowing the dough to warm to room temp and begin to wake the yeast. Depending on your starter, the room temp and how much gas was produced during the ferment yesterday, your bagels may or may not float test at this point. Try floating one in cool water. If it floats go ahead to the next step of boiling. If not wait another 15 to 30 minutes and try again.


Here are my first 3 bagels sitting on the bottom. They had not proofed long enough. The next 3 did float. You can see in the crumb photo that the crumb is dense and not as open as I would like. The float test will prevent this happening.


This image is out of order. I am holding a cold dough ring about to drop it into the boiling malted water.


Out of the hot and into the ice water. Still not floaters.


One seeded and two plain on the board, ready for baking.


Done baking. They are a little blotchy to my eye. i was trying to cook them more blond this time.


A better close up I think.


The crumb is just barely done and slightly dense. Never the less quite delicious. Next time I'll add 1 minute to the 15 minute baking time.


My breakfast this morning, plus a cup of strong, black coffee.


ehanner's picture
ehanner

I have been baking a batch of Bagels every other day for a week, trying to figure out how get consistent results and decide which shaping method to use and recipe to use. Most recently my goal has been to incorporate onions in the process and make a batch of half onion and a few poppy seed and a few "everything".  In another thread I had asked the best way to add onions on top so I could split the batch up and change the topping using the same dough mix. For these, I re hydrated the dry onions with hot water and once cooled, spooned them onto the tops prior to over turning them onto the Bagel Board. The onions didn't burn and the flavor was good. This is a work in progress.

I like the Hamelman recipe and method so far. I'm patiently waiting for my copy of  "Inside the Jewish Bakery" which I will consult when it arrives. I've gotten the feel for rolling the snakes (Glenn's usage lol) and have finally embraced the concept of shaping and retarding overnight. I like to retard in bulk for other breads but there are a few reasons why it works better in this sequence. Here are the results.

No burned onions this time.

A little Lox and Capers cover the bread.


ehanner's picture
ehanner

It's funny how things come together some times. Katie, one of Andy's students in college developed this recipe that Karin (a German baker transplanted to Maine) baked and posted last week. It was a beautiful loaf. About the same time a new poster from Iceland ( Schrödinger's O...) presented a beautiful bread with a natural expansion instead of slashing. I decided to try my own nut brown ale since it is very flavor rich and semi dark and, available. I also added a small amount of toasted wheat germ to add a little dimension to the chew and flavor.

I first must say to Katie I think your bread is wonderful. It has a full depth of flavor and a great aftertaste. Your hydration and baking times were right on for me. Thank you so much for sharing your creative energy. also a word of thanks must go to Andy, for bringing this talent forward for us to see and enjoy her work. And Karin for her inspiration and conformation the recipe can be baked out of scale. It's always nice to see her work. Then comes -kristjan, who showed us a beautiful boule he has been baking for some time and shared with us only that day. I was so inspired that I tried a shaping and natural expansion I had been wanting to try instead of scoring to see if I could bring some art to the surface of this loaf. So, here is my take on Katie's Stout with Flax Seeds.

Pages

Subscribe to RSS - ehanner's blog