The Fresh Loaf

A Community of Amateur Bakers and Artisan Bread Enthusiasts.

ehanner's blog

ehanner's picture
ehanner

As a follow up to my last post on super hydrated dough, I have been making a loaf every day now for 3 days. My first batch had 10% dark rye and my daughter thought it was uncommonly delicious. That's a big statement from a 17 yo daughter.

Day 2 brought a batch with only 5% rye and a less intense bake in the  early stage. The loaf was lighter in color and still delicious.

Today, I made a double batch and stayed with 5% rye which I scalded and cooked for 1.5 hours. After cooling to RT, I incorporated the rye and went to an autolyse period of 20 minutes. At that time I added the salt and yeast and folded for a dozen or so times to incorporate the salt. There was quite a difference in the way the dough felt and handled after delaying the salt for 20 minutes.

The flavor is quite unique. The nutty after tones are still there and it seems just a little sweet and wholesome. I don't think that is a very good description let me think about it and  talk to my testers.

Sorry I don't have an image to show at the moment. I'll try to get one up when my camera returns.

Eric

ehanner's picture
ehanner

This past year has been very interesting for me. I made learning rye breads a goal at the years end, and while I now know enough to understand it's going to take a lot longer, I'm making progress. Recently I did an experiment with scalding rye that worked out well. We have had some great threads here on the benefits of autolyse and mixing patterns. I was reminded of a post from Shiao-Ping where she  made a Gerard Rubaud bread and another one from James Macguire that utilized long cool ferment at high hydration.

One thing that these breads have in common is hydration in the area of 80% and small amounts of yeast. This combination requires longer fermenting times and allows the development of flavorful acids. When handled gently, the bread that develops is airy and moist with great color and nutty after tastes.

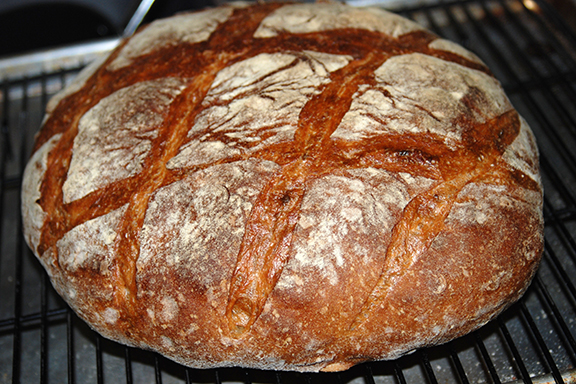
I decided to make a single 900 gram loaf at 80% hydration. My plan was to start with a 90/10 ratio of AP/Dark Rye so it would darken well and hold moisture better than a straight white loaf. This is a plan for a small miche (if there is such a thing). Only the basic ingredients of flour, water, salt and yeast.This was a hand mixed dough. Just a plastic scraper, wire whisk, larger bowl and my hands were used. A key element to making this dough behave like I wanted was to control the water temperature so as to end up at a desired dough temperature of 70 degrees F. The natural reaction of the water being absorbed by the flour raises the temp by around 4 degrees F. So it's important to start near 70 at the warmest. My ambient room measures at 75F along with the flour.

The formula for adjusting the variable (water) follows. 215F - room temp - flour temp -5F = Water temp. For me this looks like 215F-75 -75 -5= 60F. When everything is mixed together the dough will be at or near 70F. Prof. Calvel and James Macguire both have made a point to stress that correct dough temp is the MOST important and critical aspect of making the dough you want. You just can't treat that as idle chatter form the masters and expect greatness in your oven. I like this bread because it can be made in a single day. In fact if you start at 11 AM, you should be done by 4ish, in time for dinner. The methods employed are from the old European school. My next batch will be with only 5% dark rye

Ingredients:
450g AP flour
50g Dark Rye flour
1/2 teaspoon Instant Dry Yeast (IDY)
10g Sea Salt
400g Water (cool)

Method:
Start by measuring the room and flour temperature and doing the calculation for the water temp. If you need to use ice to cool the water to arrive at a DDT of 70F, so be it.

Combine all dry ingredients in a large bowl and make sure the flours are well combined. Add water all at one time and stir with a spoon, switching to a scraper. This should involve no more than 2 minutes and should result in a rough mass with no dry flours in the bowl. Cover and rest for 20 minutes.

After 20 minutes, fold in the bowl for 8-10 repetitions rotating as you go. Alternatively, pour on the counter and fold with a scraper using double letter folds.Return to the bowl and cover.

Repeat the folding process every hour for a total of FOUR folds. That means 4 more folds after the first. When it is time for the last fold, don't fold, dust flour around the seam between the dough and the bowl and using the scraper, loosen the dough ball up so you can pour it out on a floured counter.

Brush any loose flour off the top of the dough and cover it with the bowl for about 20 minutes. Removing the bowl, pull the edges up to the center around the dough to tighten the lower surface and roll the ball over to the seamed side down. Prepare a linen lined basket with flour rubbed into the fabric and lightly dust the top of the dough. Roll the dough into your hands and place it into the basket seems up. Cover with a towel and proof for around 45 minutes. The dough will have become light and puffy and will test with the finger poke test.

Pre heat the oven to 450F when the dough goes into the basket using a stone and steam producer.

Load dough when it is ready and steam normally for 15 minutes. LOWER oven temp to 350F after the 15 minutes and start checking for done around 45 minutes total bake time. The idea is to bake the interior more slowly and not to over do it with color.

I left the loaf in the oven with the heat off and door ajar for another 5 minutes to help draw the moisture out. Remember it was an 80% hydrated mix. Cool and enjoy.

Eric

ehanner's picture
ehanner

After seeing Shiao-Ping's post last week about the Sonoma Bakery near her, I was awakened from a long slumber. My other half has been working on a high protein diet that forbids grains, potatoes and rice. I have been supportive of the diet plan and have tried to not create things in the kitchen that would test her strength. What happened was I also was keeping to the plan and found surprisingly that I did not crave starches. So my self imposed hiatus has come to an end.

The beautiful crumb image from the Sonoma Miche really caught my eye. The red/brown color with the open crumb pattern and gelatinous structure seemed a contradiction of possibilities. Reports of long spoiling times and moist mouth feel were clues I can follow.

I thought I would deviate from the norm in creating this mix in that contrary to most SD mixes that use rye, I did not mix the rye with the levain. I poured boiling water into all of the rye (360g) at 100% hydration. So equal amounts of dark rye and hot water. To my surprise the dark rye absorbed all of the water and I had to work to get it mixed evenly. This I left on the counter for 24 hours as a soaker. The next morning it was a very firm Frisbee. The next time I will use much more water. I had an awful time getting a smooth mixture but eventually it came together. I added all the water for an overall hydration of 80% and mashed with a potato masher. I then added the levain and the 60% bread flour and salt. The dough looked more like chocolate frosting and was smooth and soft. I used 15% of the flour weight for levain and expected a good first rise in 4-6 hours. It had doubled in 6 hours with 2 stretch and folds in between.

I did a final shape on the counter into a boule and rolled the 1160g ball into a large banneton dusted with flour. I'm working on a distinctive slash pattern and thought I would try my first initial "E". No snickering please. A surgeon I am not. I'll have to think of something more simple to execute.

After proofing for 1.5 hours, the dough had risen respectably. I had preheated my oven/stone to 480F for the initial phase of the bake. I steamed normally and removed the block after 12 minutes and lowered the oven to 430F for 20 additional minutes. At this time I checked the internal temp and found it to be 180F. I again lowered the temp to 410F as the crust color was looking good. Another 10 minutes and the temp was 200F so I again lowered to 380F for another 10 minutes. The internal was 210 now so I shut the oven off, propped the door open with a blade and let it dry for another 10 minutes.

After cooling for 1 hour, we cut it open. The crumb was more like I would expect from a rye recipe. Some aeration but not too tight. It is very moist on the inside. After a day of being out and covered by a towel it is still moist in the center. Longer and lower baking next time. The flavor is exceptional and different from any sour rye I have made previous. There is a mild sour taste but another sweet aroma and flavor I am not familiar with. The soaking of the rye and then not souring the rye must be the difference. I dried a piece in the toaster today and it was delicious.

I do want to get a more open crumb than I did here. I think I'll try 30% dark rye next time and the extended ferment. It's a very good loaf if a little heavy. A longer baking profile will help that.

Eric

Added by Edit:

Note: I really like the finely milled dark rye I get from Stan at NY Bakers. It gets nice and dark when scalding and has a wonderful aroma. No caraway seeds here. Just the flavor of scalded rye and a hint of sour.

Overall formula:

Dark Rye flour, fine milled, from NY Bakers. 360g
Bread flour  800g
Water  928g
Salt  23g
Levain  174g

Soaker:
360g Dark Rye or whole Rye sifted.
720g Very hot water
Stir in a large bowl. Cover when combined and cover for 24 hours.

Dough:
All of Soaker
208g water at 80F
Combine water and break up the soaker.
When soaker is broken up, add 174g of Levain and combine.
Add flour and salt. Mix until well combined and gluten starts to develop.

Ferment at room temperature until doubled. During ferment time, every hour perform a gentle stretch and fold and return to bowl.
When doubled, gently pour out on floured counter and gently shape into desired shape, tightening as you go. Place in a banneton and proof for approx 1.5 hours, or until 80% expanded.

Preheat oven to 470F. Bake at 470f for 12 minutes with steam. Release steam and lower oven to 430F for another 30-40 minutes. Check for internal temp of 210f. Prop door open with oven off to help dry the bread for 10 minutes.

Allow to cool on wire rack for at least 1 hour. The moisture does spread out after a day of being covered with a towel.
Enjoy!

ehanner's picture
ehanner

I was in Walmart last week and noticed a new green bag on the shelf next to the bright yellow Bread Flour from Gold Medal. It could be that this isn't a new offering from GM but it's the first time I have seen the Green package. I thought I would try a bag and see how it like it compared to other AP flours I use. First, the price made me take a second look. It was priced at $4.74 for a 5 pound bag. The Bread flour next to it is $2.65.

I have been wanting to make a batch of croissants so I thought his would be a good recipe to try my new organic AP on. A better test for me will be a French bread since I'm struggling with my laminated dough skills. Next time. Some people use a stronger flour for croissants than AP. I like the tender crumb I get from the AP. I used SteveB's recipe and procedure which I have enjoyed for some time. My croissants don't look any where as good as Steves or Larry's or Andy's and probably everyone else but they are delicious! Every time I make these  I swear I'm going to buy a sheeter even if I have to put it in the garage.

Proofing after 1st egg wash, under the cover. These half sheet covers are just terrific for these.

After 1st egg wash

A little crowded for good browning:>(

A small sample with my name on it :>)

Reasonable crumb and very nice flavor!

ehanner's picture
ehanner

I have been keeping an eye on an Aussy site for a while and enjoying some of the wonderful ideas they have created in breads.

The bakery is Companion Bakery in Tasmania and they have a still shot live feed of the bakery you can lurk here.

The fellow who runs the bakery I believe is Graham and his son who is also an excellent baker. To say these guys are adventurers would be short changing their spirit. They have a great site and lots of experienced bakers in the area that contribute. I suggest checking out these guys. A great project.

One of the breads they make is a Romano-Celery loaf that just looks great. I decided to try my hand and use the skills I have to make this savory bread. I used the percentages that Hamelman usually suggests for cheese and olives of around 20-25% and made a base SD dough with 15% WW at about 70% hydration. I thought I would use some flax seeds I had soaked prior to getting the bug to try this but I neglected to check the resource and used about 15% flax which I think was  little heavy handed.

So here are a few images and I'll get back with a crumb shot later.

I'm drooling while I wait.---Drooling over!

The first thing I have to say is that the house smelled like Romano cheese for hours. That's a good thing! At the end of 43 minutes, the last 3 of which was oven off and door propped open, The cheese was smoking where it was in contact with the stone. Next time I'll use parchment over the stone.

The crumb is about right considering how I handled it. I rolled with tightening like Mark Sinclair does with no bench flour and a light mist of oil on the counter. Then I rolled the dough in bench flour before placing en couche for proofing of 45 minutes.

The flavor is Romano cheese. The celery is there every now and then but just. I softens up totally and is quite mild. The flax seed I can't appreciate at all. I know it adds nutrition and maybe there is more complexity but it would be asking a lot to identify the nutty flavor from it. I will make this again with less cheese and more celery. Actually I think an all celery loaf might be pretty good. I'm surprised really  but there is a nice flavor. Maybe a touch of a milder cheese.

This is a bold full flavor bread that needs a similar main course. It was a hit around the table and during the afternoon as a snacker. If you want to try my formula here is what you need.

Levain: 250g (50g mother culture added to 80g water and 120g fresh ground WW) Let ripen overnight at room temp.
Soaker: 50g Flax seed and 80g water, covered overnight.

Dough:
250g Levain added to
500g water
790g Bread Flour
130g soaked flax seeds and the now absorbed water.
Salt: 18g
Romano: 20% bakers percent or 180g
Celery: 22% or 198g

Mix and develop dough moderately. Stretch and fold twice over 3 hours, more if necessary. After second folding, spread dough out on counter and sprinkle cheese and celery over the top. Fold to incorporate ingredients. Place in covered container and let dough ferment until double. For me this was an additional 2 hours.

Divide as desired and pre shape, rest and shape. (I made 2- 1000+ gram batards)

I proofed for 45 minutes at room temp, slashed and loaded on a preheated stone at 460F. Steam as normal. Lower heat to 440F after 10 minutes. Bake for a total of 40-45 minutes. I propped the door open slightly at 40 minutes, turned the oven off and let the bread dry out. The crumb was quite moist so I would suggest a longer drying period.

Enjoy!


Eric

ehanner's picture
ehanner

I have been working on Sam Fromartz's mixed yeast and levain, long ferment method for baguettes. I know Hamelman prefers the poolish preferment method and I have to say I like the aroma that comes off the poolish better than almost anything. So, I decided early this morning to start the poolish and spent the day rereading the chapters on preferment of yeasted breads in Bread.

Along the way, I read over a sentence I had no doubt seen several times in the past, concerning steaming and baking on Page 100. Here in plain common words I discovered something I don't recall ever seeing before that I think is going to change my breads for the better. Hamelman is saying that for the home baker, after the steam period, the door can be propped open with a spoon for the remainder of the bake to help give a crisp crust in the drying phase of the bake. I have turned the oven off and left the bread in the oven at the end of baking to crisp the crust and make it slightly thicker and easier to cut after cool down. But never have I had the door propped open for 18 minutes. Right out of the oven the crust is hard and well colored. Now that it has cooled and been cut, I'm a little surprised that it's more open. The crumb is airy but not the dense crumb with many larger size holes. This is more like foam with a few larger holes. Honestly, I'm not sure why at this point. I'll have to think on it over night as it's already past my bed time. :>) I think I like the flavor better with these over the long refrigerated ferment. I still have another 700g of dough in the fridge I saved to bake Saturday so we'll see how that is after the overnight.
Eric

These were baked for 24 minutes at 470F. They are 350 grams pre bake.

The loaf on the left got 4 slashes and looks a little over proofed at 1-1/2 hours to me.

Not quite as open as I like but good for brochette.

ehanner's picture
ehanner

Intrigued by the beautiful Baguette's that Sam Fromartz has been baking, I continue to plod along, improving my skills at baking this simple(?) bread. The original post on his blog can be found here.

I'm actually trying to see if I can taste and see an improvement in the bread when using some original French T55 flour sent to me by a very kind friend a while back. This is Organic T55 from Biocoop and reported to be very good flour. My new go to AP flour is from Dakota Maid. I like the colors I get and the flavors of the grain. After the side by side with the T55, I'm wondering about the amount of malted barley they add. The crust seems to color much more quickly. I used the same formula and method for both flours to arrive at these results. Both breads were flavorful and exhibited good qualities. Not the same but both very good.

Eric


T55 Baguette has a nice lighter golden color. The flavor didn't suffer in comparison to the DM flour which was much darker from the same bake time.

Crust detail on the T55. You can see the more golden color, even through the heavy handed additional flour I dusted over the dough prior to baking.

This is the Dakota Maid crumb. Very translucent and a nice crisp crust.

ehanner's picture
ehanner

Just recently, Mariana-Aga, a fellow baker who I have great respect for and who is an occasional poster here, presented a very interesting paper with extensive photos on the development of gluten. For the purposes of her research and documentation she used a food processor to mix and develop, then over develop the dough. All of the various stages are carefully documented and you can see the tell tale signs of the dough being over worked and ruined.

 This experiment shows what over kneading will do to your dough. It is also possible to over develop your dough by simply over fermenting it, either at room temperature or in the refrigerator. We have all had a dough turn slack and sticky from not being attended to in the proper time.In fact unless you use a food processor, it is very hard to mechanically over develop or over mix your dough at home. The mixers most home bakers use are not capable of over mixing unless you take a long nap while mixing.

If you don't learn anything more from this great post other than to finally know that there is no fixing it if you get in this situation. I have tried adding more flour to the extreme, and it never works. You may as well resign yourself that this will never be right and toss it in the compost.

If you have seen this, you know what I'm talking about!

And finally, I learned a nice trick for cleaning that unbelievably sticky gooey dough mess from my bowls and hands. This alone is reason enough to visit this very informative blog post by Mariana.. I hope some of you find it as interesting as I have.

Eric

PS: This page is written in Russian. Google Translate had no trouble translating to English.

ehanner's picture
ehanner

Larry (Wally) posted his version of Sam Fromartz's award winning Baguette's last week and after reading the post, I thought I would try it again. First I copied Larry's recipe and method and then I went to look at the original write up by the author/baker. There were a few small things that separate the two methods but the formula I think was right on. When you look at Sam's images of his breads, well they are stunning. The crust has just the right amount of color and spring. They look crisp and well, just perfect.

I'm not new to baguettes but I am always willing to bow to a master when it comes to improving the art form. Baguettes are 90% technique and 10% formula, I'm certain. So my intention here is to read closely the instructions Sam has left for us to understand. No detail is too small.

I made 2 batches yesterday, a 500g and a 1000 g mix. I thought I would bake the first 2 pairs of 250g baguettes, followed by the next 4, 2 at a time. This gives me a chance to evaluate the process and make some changes along the way. I was taken at how hard it was for me to keep from what I normally do and make a change no matter how small. Proofing in the couche cloth seam side down for example was a challenge for me. I had to re think my handling process and make a change.

In the end I only have one item that I didn't remember to change over to Sam's method and I think it will make a big difference in a positive way. That would be moving my stone up from the second shelf to the middle shelf. A seemingly small thing but the breads will get a more intense heat and brown up there I'm certain.

We taste tested this afternoon and the verdict is the bread is exceptionally tasty and has a nice mouth feel and after taste. The aroma is very original to me from my long ago memory of a wonderful baguette in Paris.

What I have learned from this exercise so far is that with a baguette, everything matters. There are many ways to make a good loaf, but, far fewer ways to make a really great loaf. I need to raise the bar and focus on the smallest details to make them as good as I possably can. Soon enough.

Eric

ehanner's picture
ehanner

I cooked a 10 pound corned beef today and we had a New England boiled dinner. It's my start of the St. Patrick's holiday meals. Tomorrow will be the corned beef sandwiches on the Rye below. I have made this Deli style Rye a hundred times and just about every time I swear I ruined it and don't expect it to spring in the oven. When I open the door and see that nice puffy brown loaf I can smell the caraway and I just know I beat the odds one more time. That's the thing about rye, especially really sour rye that sat on the counter for 24 hours and the fridge for 2 days. It's been hectic around here and I didn't get to it when I had planned.This is evidence that even ugly bread can be delicious. I don't know WHAT I was thinking when I slashed  these two. It certainly wasn't baking. These have a poppy seed and large crystal salt topping.

One loaf will go to my son along with a care package of a couple pounds of meat and potatoes/carrots. I think  I need to go down to his apartment and bang some pans today to check for survivors from last night.

Eric

Pages

Subscribe to RSS - ehanner's blog